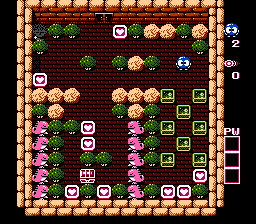
Take the four Hearts between the two rows of Gols, thus obtaining four magic shots.
(Enemy hole) Shoot twice the second Gol from the bottom in the right column. Push the middle-lower Emerald up, then push the lower-left Emerald on the tile where the Gol was: it will reappear between the Medusa and the leftmost Heart. IMPORTANT: leave behind the Hearts in the lower-right corner: they must be collected last!
Make your way up: push two Emeralds on the sides upwards, then push the lower-middle Emerald sideways, then push the upper-middle Emerald up, left, down, left and up against the door, so that it is between Medusa and the Heart. Collect the two Hearts in the upper-left part.
Go back down, and push the lower-left Emerald all the way to the right, then a few tiles up. You have to take two Hearts in the process, but leave the last one untouched.
Now you have to be very quick. Shoot twice the lowest-right Gol, grab the last Heart, then do slalom between the fireballs of the two lower-left Gols until you can get to the jewel box. Strategy: move to the next row when the fireball gets close to Lolo, so that there is room to move back up behind that fireball and before the next.
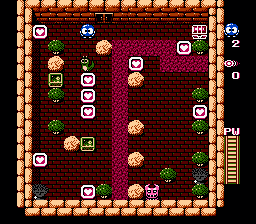
Three bridge powers are available, but the lava stream burns them down after a short while. The first bridge should be crossed twice quickly, the
Get the top-left and the three Heart framers aligned with the Snakey; one bridge power gets unlocked. Push either Emerald frame exactly three tiles south of the Snakey (where the third Heart was, aligned with the gap between the two trees).
Quick now: create a bridge while Done Medusa is going up, push the Emerald across it (and lock Don Medusa in the south area), get the Heart at the top, push the Emerald down by one tile or more, and cross the bridge again before it burns. The second bridge power is now activated.
Collect the Heart near the jewel box, this activating the third bridge power.
Push the second Emerald three tiles south of Snakey (as the previous one), create a bridge and push the Emerald across it. Now, push one Emerald south so to block Don Medusa and Medusa's eyesight to the west, then push the other Emerald between the two trees to bloxk Medusa's eyesight to the north. Collect the Heart, create a bridge and cross back.
You should have 4 magic shots now. Shoot Snakey once, push it all the way south, then west between Medusa and the westmost Heart, grab the Heart and shoot away the egg.
wait for Snakey to reappear, shoot it once, push the egg between Medusa and the last Heart, grab the Heart. Now collect the jewel from the box and exit the room.
Work on the first row of three Emeralds: push the side ones down, then the middle one to the left. Grab the three Hearts, then repeat the same with the second row of Emeralds and collect the next three Hearts.
Push an Emerald all the way up, then right against a Heart, then down, then right again. Beware of Don Medusa's eyesight, and make sure Rocky remains in the lower-right portion of the room. Collect the two Hearts.
Push the Emerald down, until half-tile beyond Don Medusa and the last Heart, and so that Rocky is to the left, together with Don Medusa. Collect the last Heart and trap Don Medusa and Rocky to the left.
Proceed to the lowest area. Push the upper Emerald all the way to the left, collect the jewel from the box, then exit.
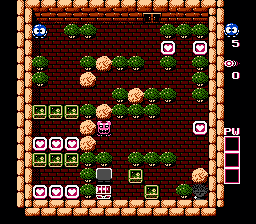
Three bridge powers, and three secluded areas beyond lava streams. Notice that the right one has 7 Hearts, the upper-left one has 6, and the lower left has 4. In order to make sure you activate all the bridge powers, it is better to clear them in that order (7, then 6, then 4).
Collect the four Hearts in the middle to activate the first Bridge power.
Quick now: create a bridge to the right, collect the four Hearts to the south, then the three to the north, and rush back to the main area: Rocky should remain trapped on its islet. The second bridge power got activated.
Quick again now: wait for Leeper to move to the right, then create a bridge on the single lava tile against the wall, run across the "ring" and exit. Leeper should move out of its islet: touch it when it is to the very right, so that the way to the jewel box remains free. The third bridge power got activated.
Quick again now: position Lolo on the jewel box (enemies are unable to step on it), create a bridge and run around Rocky's islet. Cross back the bridge, grab the jewel, and leave the room.
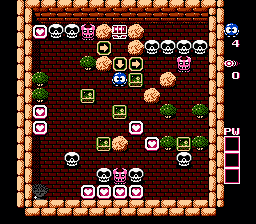
Step one tile left at once, or Don Medusa will stab Lolo.
Block that Don Medusa by pushing the nearby Emerald (the upper-right one) up on the arrow tile. Grab the Heart straight south from it for two magic shots, but leave the nearby one as the last.
Collect the Heart in the upper-left corner for two magic shots. Position Lolo south-west from the north-east-most Emerald. Shoot twice the upper-left Skull, then shoot twice the Skull next to it, and take cover behind the nearby Emerald. Don Medusa should then erase the two Skulls when they try to reappear. Push the middle Emerald left and up, so to trap Don Medusa in the corner.
Walk across the one-way arrow, then push the Emerald to the right by one tile (or half-tile, or one-and-a-half tile), so that the Skulls will be unable to pass between the rocks.
Push the top-left Emerald between the left Hearts and the upper Don Medusa. Push the lower-left Heart between said Hearts and Medusa. Grab the two Hearts.
Grab the rightmost Heart in the row of four to obtain two magic shots. Shoot the leftmost Skull and push it down. Grab two more Hearts, and therefore two more magic shots (you should have three now).
Position Lolo north-west from the middle rock, vertically aligned with the Skull to the left of the lower Don Medusa. Shoot the Skull twice, and take cover behind the rock. Shoot the Skull to the right of the same Don Medusa, and push it left on top of its fellow's location: another Skull will be erased. Grab the bottom Heart for two magic shots.
Shoot the lower-right Skull, push it aside, then push the Emerald up one or two tiles.
Quick now: grab the last Heart and rush to the Jewel box before the Skulls can bite Lolo. Grab the jewel and exit the room.