General[edit]

- In this version, there are only 30 stages, and no enemies will appear on the ground level.
- At stages 1, 5, 9, 13, 17, 21, 25, and 29, the player must choose one of the ten common wings and start the stage.
- Colliding with enemies or bullets will cause your fighter to lose the equipped wings if any. Colliding with obstacles and Gobunasu fortresses will always kill your fighter immediately.
- If you die on stages where selecting a wing from the start is not available (stages 2-4, 6-8, 10-12, 14-16, 18-20, 22-24, 26-28, 30), you start a new life without wings. The only way to select wings on these stages is by using the Voltage pickup, pause the game, and press "Select" button to choose a wing.
- When your fighter is destroyed, you have about three seconds to continue shooting bullets before returning to a previous point. However, if you manage to defeat a boss before returning, this miss will not count and you can start next stage without wings (unless the next stage has an option to select a wing).
- It is recommend to pause the game, then press "Select" button to pick a wing, if you have no wings.
Hidden items[edit]
In addition to the hidden wings, the Famicom version has a few more hidden items in most stages.
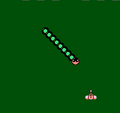
- Voltage: Appears in middle of every odd stage. This item looks like a green icon with "VOL" character. Collecting this item adds a charge to wing changing, which is used by pressing
 when paused. Beware that, hitting this item before collecting it will turn the item into a useless umbrella. There is no limit of stocking this item, and each pickup adds one to useable stock.
 - Black Diamond: Appears in middle of every even stage, except Stage 30. This item looks like a bracked alphabet letter. Attacking this item will change the letter displayed, and collecting the item will change your wing into the corresponding wing with that letter.
- Trump Icon: Found under the obstacles in Stage 4, 8, 12 and every four stages after. This item first appears at a shuffling state, and one shot will put it to stop at one of the four trump icons:
- Spade: Same as Voltage but with three charges.
- Heart: Grants an extra live.
- Diamond: Grants three charges of colliding with obstacles' weakness points without damage. Players will still lose a fighter when colliding the armored parts. The fighter will change appearance with this item in effect.
- Club: Grants three charges of colliding with enemies and bullets without damage. Also changes the appearance of your fighter. Another appearance is available if your fighter has both Diamond and Club powerups.
- Knight Piece: Found under the obstacles in Stage 8, 12, 16 and every four stages after. This item looks like the Knight piece in the chess. Grants an extra live, but may be destroyed by shots, which causes this item to become useless umbrella.
- Comet: Found under the obstacles in Stage 2, 6, 10, 14, 18, and 22. This item looks like a star with one wing. Collecting it will show the word "SKIP" and warp the player to four stages after. Shots will turn this item into useless umbrella.
Enemies[edit]
- Nōsu - These are two attached flying pods that floats a random weapon at certain intervals throughout a level. Destroying them will release a weapon.
- Te~yuuka - Diamond-shaped enemies that appears alternately from the left and right, shoots bullets, and then retreats.
- Gōba - Bat-like enemies that sneak up from above, go halfway down the screen, rebound back up, and lock on to the player's fighter.
- Gai - Bomb-shaped enemies that come in groups.
- Gomazu - Siren-shaped enemies that appear from above and fires projectile at the player.
- Zāzua - Dart-shaped enemies coming in packs. They are fast and home in slightly.
- Bogi - Space shuttle-like enemies that come from behind.
- Imāna - Cymbal-like enemies that come from the left and right.
- Zukiru - Caterpillar-like enemies that appear from behind, reaches the front row, and rushes into the player's fighter.
- Bon - Plane-like enemies that appear from the side of the screen.
- Rahanosu - Octopi-like enemies with a little green, round thingys with a face drawn on them. They move forward like a sidewinder, and releases projectiles while doing so.
- Bagurā - Baluster-like enemies that surface from nowhere, at which point they are invulnerable, and after a while, they expand to full size. They can only be attacked at their maximum size.
- Akosu - Barrel-like enemies that rush in a straight line at high speed from the front and scatter bullets.
- Naganza - Cabbage-like enemies that suddenly stops in front of the player's fighter at high speed from diagonally forward left and right, shoot bullets, and then retreat.
- Rabanka - Bat enemies that come and hit the player's fighter from behind.
- Mekabora - Frying pan-like enemies that consist of two sections - the pan, and the handle. These will try to fling the pan at you, while the handle runs away. If you hit the handle, the pan will automatically be released, flying towards you at high speed.
- Zogō - Cupcake-like enemies that appears in groups, releases projectiles, and rush into the player's fighter.
- Azemu - Y-shaped enemies that fly towards the player's fighter at high speed.
- Sorejā - Appears in groups from the back, fires a projectile and after firing a projectile, it leaves the screen.
- Kobuzakku - Enemies that slowly descends from the top of the screen and goes straight as long as you do not move the fighter sideward, but if you move the fighter sideward, they will rush toward your fighter.
- Fainarumisairu - Syringe-like enemies that appear before the boss and come in numbers. When encountering a Gobunasu fortress, they will continuously appear even after the boss appears and after a few seconds, they will stop from appearing. For the case of animal bosses, however, they will immediately stop from appearing once the boss appears.
- Gobunasumisairu - Rounded missiles that are fired from Gobunasu fortresses.
Obstacles[edit]
Structures come in a wide variety of shapes and sizes. All of them have weak spots and hitting them will destroy the structure. Some structures have weak spots that can only destroy a certain portion of it. Collision upon them will kill the fighter instantly, regardless if they have a wing or not, except the player has diamond morph in that wing.
| Image | Structure | Points | Total points (each section) | Stages | Description |
|---|---|---|---|---|---|
 |
Babo (Variant 1) | 50 | 800 | 9, 13, 20 | A pillar structure. |
 |
Babo (Variant 2) | 100/300 | 800/2400 | 1, 4, 5, 7, 9, 13, 16, 25 | A H-shaped structure. The whole structure can be destroyed by hitting a weak spot located at the centre, and both pillars have also a weak spot. Destroying pillars will obtain 100 points, while the whole structure itself is 300 points. |
  |
Baei | 200 | 3200 | 1, 5, 16, 18, 19, 21, 25, 26 | An octagon-shaped structure. Its only weak spot is at the front. Their arrangement is either straight in a row or slightly zigzagged. |
 |
Plus | 200/220 | 1600/1760 | 2, 12, 17, 22, 26 | Cross-shaped structures with weak spot at the front and neon barricades at its left and right side. They come in pairs. |
 |
Basa (Variant 1) | 100/200 | 11, 18, 23, 27 | Has two octagon-shaped weak spots, with a rectangular weak spot at the middle. | |
 |
Basa (Variant 2) | 100/120 | 6, 12, 20, 24, 28, 29 | Has two neon barricades and an octagon-shaped weak spot at the middle. | |
 |
Basa (Variant 3) | 100 | 6, 8, 14, 18, 20, 22, 30 | Has an octagon-shaped weak spot in the middle. They come in a pattern assembled going left. Sometimes has a special powerups. | |
 |
Basa (Variant 4) | 100 | 1600 | 2, 4, 6, 10, 16, 20, 26, 30 | Has an octagon-shaped weak spot in the middle and come in pairs. Like Variant 3, they come in a diagonal pattern. Sometimes has a special powerups. Each pair has a total of 200 points, with 100 on each structure. |
 |
Baido (Variant 1) | 400 | 7, 24, 28, 29 | Smaller version of the I-shaped and Roman numeral of number one (I)-shaped structure.. | |
 |
Baido (Variant 2) | 400 | 11, 14, 28 | Larger version of the I-shaped and Roman numeral of number one (I)-shaped structure. | |
 |
Baido (Variant 3) | 300 | 3, 14, 17, 24 | Larger version of the Roman numeral of number two (II)-shaped structure, as well as a pair of I-shaped structures. Each pair has a total of 600 points, with 300 on each structure. | |
 |
Baido (Variant 4) | 3, 11, 17, 29 | Larger version resembling the Roman numeral of number three (III) consisting of two neon barricades on either side and a weak spot in the middle. | ||
 |
Solid (Flower) | 600 | 4800 | 8, 15, 21, 26, 29 | Appear without gaps in between structures. It has four squares that change color as its weak spot. It is difficult to survive unless you have J-Wing or no wings by press B. |
 |
Solid (Hole-in-octagon) | 600 | 4800 | 5, 12, 19, 24 | Has gaps in between structures. It is an octagon-shaped structure with an enclosed weak spot. |
 |
Bakiru | 20 | 1280 | 9, 13, 15, 19, 21, 25, 29 | Structures resembling land mines. |
 |
Delta | 300/310 | 2400/2480 | 15, 22, 27, 29 | Triangle-shaped structure with a neon barricade protecting its weak spot. |
 |
Neon Lights (Variant 1) | 10 | 480 | 3, 17 | It consists of 8 row and has 6 neon barricades in each row. Each blocks consist of 3 neon barricades. The blocks in square 1, 8, 9, and 16. |
 |
Neon Lights (Variant 2) | 10 | 480 | 4, 10, 13, 21 | Similar to the 1st variant, but in zigzag pattern. The blocks in odd row are in squares 3, 4, 11, and 12, and the even row are in squares 1, 8, 9, and 16. |
 |
Neon Lights (Variant 3) | 10 | 960 | 8, 14, 19, 23, 27 | Similar to the 1st variant, but it has 12 neon barricades in each row and each block consist 6 neon barricades. The blocks are in squares 4, 5, 12, and 13. |
 |
Neon Lights (Variant 4) | 10 | 800 | 23, 26, 30 | A mix or combination of the 1st, 2nd, and 3rd variants where it both uses long and short neon barricades and also has a zigzag pattern. It has 10 barricades in each row and each block consist 5 neon barricades (the centre has long barricades along with 4 short barricades). The blocks in odd row are in squares 1, 8, 9, and 16, and the even row are in squares 6, 7, 14, and 15. |
 |
Neon Lights (Variant 5) | 10 | 30 | It has 10 rows, and has a gap in row 3, 6, 8, 11, and 14. It fills all neon barricades entire row in row 2, 5, 7, 10, 13, and 15. The pattern is unique. The zigzag pattern is in row 1, 4, 9, and 12. The blocks in row 1 and 9 are in square 1, 8, 9, and 16. The blocks in row 4 and 12 are in square 4, 5, 12, and 13. The zig zag pattern has 12 barricades in each row. |
Bosses[edit]
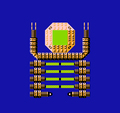
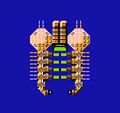
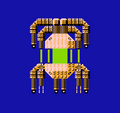
At the end of each stage, there is a boss that the player must defeat in order to advance to the next stage. Heavily-armored Gobunasu fortress appears at stages that are not multiples of 3 (i.e. stages 1, 2, 4, 5) while animal bosses appear at stages that are multiples of 3 except stage 30 (i.e. stages 3, 6, 9). Unlike in arcade version, Gobunasu fortresses have a durability meter at their cores so you need to pour in lots of bullets before destroying them and they have their core durability shown as body color, in the order of yellow, light green, teal, light purple and dark pink. Animal bosses, however, require a certain number of hits before defeating them. Animal bosses are easy to be defeated if you are using Dyna or Fire wing.
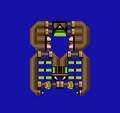
- Type G011 (Daberusatan): The unique boss in Stage 1. Has two barricades in front and two octagon-shaped barricades inside. Just an example of how to defeat Gobunasu fortress.
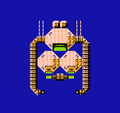
- Type G012 (Furagunasu): Appears in Stages 2, 11 and 20. Has six barricades on both sides, with two of them are neon barricades, and one neon barricade in front of a core. Similar to Daberusatan, this boss is easy to defeat.
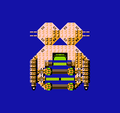
- Type G013 (Bakyomira): Appears in Stages 4, 13 and 22. Has a long corridor guarded by four neon barricades. C-WING is effective.
- Type G014 (Jairagesu): Appears in Stages 5, 14 and 23. Has armor in front of core, but it is possible to destroy two neon and octagon-shaped barricades then move past the armor part and shoot the core. Similar to Furagunasu, this boss is easy to defeat, but beware if it's armor part in middle that cause losing a life if you don't pay attentionly.
- Type G015 (Supaidanasu): Appears in Stages 7, 16 and 25. Has eight neon barricades and its core is totally enclosed so that J-WING is a must. However, this boss has far less core durability.
- Type G016 (Gokyura): Appears in Stages 8, 17 and 26. Similar to Type G013 (Bakyomirā), but has eight neon barricades and more difficult than Bakyomira.
- Type G017 (Gobikku): Appears in Stages 10, 19, 28 and 29. Core is armored in front. Only side attacks like S-WING and jumping attacks like J-WING can defeat this. For Stage 29, do not take cannon wing, use side wing by pause, then select.
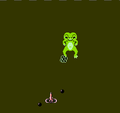
- Devil Spider: Appears in Stages 3, 12 and 21. It jumps forward and spits lots of bullets, then jumps back. Bullet-piercing D-WING is effective. Unlike other animal bosses, collision into it does not harm the fighter thus the player will be able to fight it while over the boss.
- Blue Frog: Appears in Stages 6, 15 and 18. It sidesteps and lays eggs, which will explode into spread bullets. D-WING is effective against its bullets.
- Space Snake: Appears in Stages 9, 24 and 27. It moves fast and shoots quick burst of bullets. The only weakness is at the head, and it is extremely weak against F-WING.
- Type G018 (Death Gobunasu): The final boss in Stage 30. Besides of heavily stacked shields, it has a shutter in front of core so that, it can only take damage when the shutter is open. Beat this and you will receive the game ending.
-
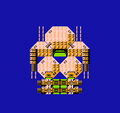
Type G011 (Daberusatan)
-
Type G012 (Furagunasu)
-
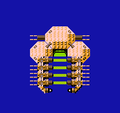
Type G013 (Bakyomirā)
-
Type G014 (Jairagesu)
-
Type G015 (Supaidanasu)
-
Type G016 (Gokyura)
-
Type G017 (Gōbikku)
-
Devil Spider
-
Blue Frog
-
Space Snake
-
Type G018 (Death Gobunasu)


