- Zoumotsu Zigoku (臓物地獄? Entrail Hell)
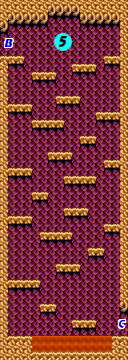
1: When you arrive in the second stage, you are greeted by flying archer imps, who love to rain arrows straight down on you when they are over your head. It is worth taking the time to remove them from the area before you proceed so that they can't overwhelm you, or making jumping difficult. You'll reach a pool of lava. The first one can be jumped over, but you won't be able to reach the ledge beyond the second without some assistance. This is where your new magic power Blizzards come in handy. By casting the spell, all of the lava will turn to ice, making it easy to walk on and leap from. Turn the lava into ice in order to proceed to the higher ledge and beyond. If you are fast enough, you can run over the next three lava pools-turned-ice, and destroy the blocks preventing you from climbing to the next ledge before the ice thaws and it returns to lava. The screen will begin to flash indicating that the magic is just about to fade. If you don't make it in time, simply cast Blizzard again in order to proceed.
2: Past the first ordeal, a new type of enemy will literally fall out of the sky. Odd organic blobs pulsate and hop around the ground. If you're lucky, they'll get stuck in the little gaps in the ground. Be sure to avoid them yourself, as falling through one means instant death. The blobs will come from the left and the right, and archer imps continue to appear. Leap over the gaps to face one last lava pool. This one is too long to leap over without casting Blizzard again.

3: You face a new enemy in this cave. One which is more annoying than deadly. Large bats hang from various points along the ceiling. They remain dormant until you get close. Then they begin to "hop" back and forth, shedding projectiles that fan out in three directions as they move. From a far enough distance, these projectiles are easy to anticipate and avoid. It's often difficult to eliminate the bats, as they're not often place conveniently close enough for you to attack, and they're only vulnerable when they're flying, but its worth taking the time to do so if it's possible.
4: You'll need to cast Blizzard in order to make it across the next lava pool. However, the stream of lava falling from the ceiling will also freeze. As a result, you'll need to blast a hole through it in order to access the other side. If you're quick about it, you can almost reach the end of this section while the bats and two round purple enemies are frozen in place. If they begin to thaw while you're still approaching them, get to a safe location in order to attack them before moving on.
5: This vertical corridor is populated by two things: the round purple enemies that you have seen a few times now, and eyes in the wall. The eyes shed tears which drop down and roll along a platform until they reach a side and continue to fall. For the most part, the round enemies won't bother you as long as you let them fall off the side of a platform on their own accord. The eyes are stationary, and make fairly easy targets to take out. Doing so can make your trek down to the bottom a little safer.
6: You'll come face to face with more archer imps. Take the first one out carefully. Once you start moving to the right, you'll also begin to encounter the hopping organic blobs from earlier. Turn around to remove them when they get close, and shoot out the blocks in the wall to make a passage for yourself, and possibly find hearts and mana orbs. Another archer imp and more blobs will await you in the section above, so proceed with caution.
7: Another archer imp will appear beyond the blocks hanging from the ceiling. If you kill it, there's a good chance that it will drop a blue potion, which will restore all of your magic power. However, you'll need to remove the blocks in order to collect the bottle in time. If you're low on hearts, it's not a bad idea to destroy the four blocks on top of the next ledge either. From here, you'll need to cast Blizzard again, and poke holes through the columns of ice in order to reach the ledge beyond. You'll likely encounter some blobs frozen in mid-air just before the magic wears off. Prepare to remove them before you climb the steps. If you are very low on health, you can walk to the left and lure some blobs over to the steps, and then safely shoot them from behind the steps in the hope that they might drop a heart. Otherwise, climb the steps.
8: A lone bat will make passage through here difficult. You can try to scoot past him, or take a moment to remove him first. Then you'll encounter more wall eyes. The leap below the first one isn't too bad as long as you can get a sense for when there's a break between the tears. However, the leap below the second eye is quite challenging because the ceiling beyond it is so low. In order to successfully jump over this gap, you must leap from the very edge of the previous platform, and you must tap the jump button extremely quickly, in order to perform the smallest jump possible. If you touch the eye, you will get thrown upward and miss the jump as a result. There is another method to accomplish this, but it involves intentionally jumping into the gap as a tear begins to fall, so that hitting the tear actually causes you to pop up and complete the jump. Then watch out for the next two eyes as you approach the lava. Cast Blizzard to freeze the lava, and punch your way through the column of ice. If you're fast enough, you can collect another 1-up doll from inside the ice.
9: Before you sink down through the hole at the bottom of the screen below the last three wall eyes, be sure to hop over the gap and up the side beneath the third eye. Take the eye out and continue to climb up to the large red pitcher, which not only adds an extra bar to your health meter, it also completely restores any lost health. Once you have four health meter bars, head down for another challenge.
10: You might feel relieved to have another bar of health, but don't start celebrating. You're toughest foe yet awaits you in this hallway. Along with some bats, three dragon skeletons guard this hallway. Dragon skeletons are powerful. They take a lot of attacks to destroy, they can breathe fire at you from a distance, and they hurt you for a full bar of damage if they touch you. At least use Twin Fire on the first dragon, as it tends to give you a blue potion to restore all of your magic. After that, you have to decide if it's worth using that mana up to fight your way through the remaining skeleton dragons, or use traditional attacks. If you can keep the skeletons on the higher ledges above you, they're a little easier to fight against, although you don't have a ton of control over where they jump. As you deal with them, keep your eyes on your position on the ground, and the attacks from the bats. Assuming you survive the encounter with all three dragon skeletons, you can drop down the next hole to face the boss.
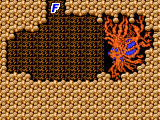
Boss: Parasite[edit]

The boss of this stage is a strange creature attached to the right wall known as Parasite. He doesn't move at all, so you don't have to worry about him escaping your attack. What you do have to worry about are the three orbs of goo that he spits out along the ground. Not only can these hurt you, but there's a bit of a splash effect when they hit the ground that can also damage you. However, it's actually possible to stand close enough to Parasite to hit him, while also having very little to worry about from his attacks. The goo that Parasite spits out can be shot and rendered harmless before it reaches anyone. If you manage to stand close enough to Parasite so that you're roughly halfway between the first and second goo trajectories, you can land a lot of attacks on Parasite, as well as destroy the first and only reach threat of goo before it hits the ground. Once you find the right position, don't move and don't stop firing. Take the boss out in no time.


