Rescue a second POW[edit]

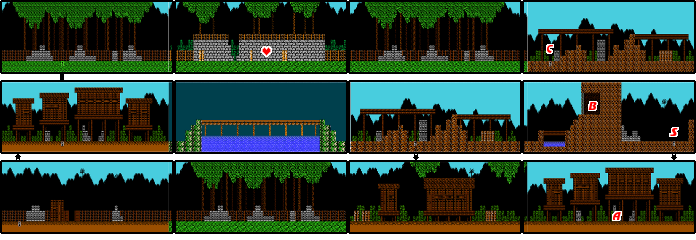
Rambo will land the helicopter at a second POW site. You begin the final portion of your mission at the S located on the right side of the middle layer of the map above. It just so happens that your rescue target is on the other side of a cliff wall that you can't climb over, so you'll have to navigate around to his location. Start by taking the "S" tile by the helicopter.
You'll be on a screen with several huts and crates. It just so happens that there is a vial of medicine that you can discover by breaking the crates around location A. It will return whenever you leave the screen and come back, so you can fill up your supply of medicine and restore your health. However, at this time, you should be at the highest combat level of 7, or very close to it. After you achieve combat level 7, your health will be automatically restored whenever you collect another 9000 experience points. With enemies in the area that provide 200 experience points, and sometimes even 500 points, it's not terribly difficult to do this a couple of times before you complete the game.
From the location of the medicine vial, you must head to the left several screens until you discover an "N" tile. In the process, you must run past several well armed soldiers, including soldiers in armored suits that shoot fireballs at you. These are worth 500 experience points when you defeat them. Go all the way to the left to reach he "N" tile, and push ![]() . It's a one-way trip. However, in the next screen, you will discover another "N" tile. You do not want to use that tile just yet. Instead, run all the way to the right.
. It's a one-way trip. However, in the next screen, you will discover another "N" tile. You do not want to use that tile just yet. Instead, run all the way to the right.
You will reach a familiar bridge scene. It make look bad if you happen to get hit and fall in, but it just so happens that one of the soldiers in the water toward the left side of the screen will give you a red J icon if you defeat him, which gives you extra jumping power. This will allow you to leap high enough out of the water and back on to the bridge so that you can continue to the right. In the next screen, there is a one-way "S" tile that will take you back to the layer below.

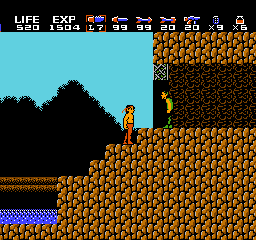
Keep going right, and eventually, you will make it to the location of a second prisoner (B). Use your knife to slash a hole in the fence and talk with the prisoner. If you happen to get killed after this, you will start off from this location. After rescuing the prisoner, you must head back to the left. You have two options. If you used a large number of medicine vials to reach this point, you may wish to use the "S" tile that you passed to collect more medicine from location A, and then make your way back to the left. Otherwise, you can stay in this layer and run all the way back to the "N" tile that you passed earlier and continue your journey.
Once you've made it to the top layer, you must proceed to the right again. When you reach the second screen, presented in front of a broken brick wall, you will encounter a boss around the middle of the screen. Like the fight in enemy base B, this boss's head will enlarge every time you hit him. He carries a gun and is quick to use it. But like all boss fights, you instantly get all of your health back when you defeat him, so don't be afraid to fight close and take some damage in order to defeat him quickly. You'll earn another heart for doing so, increasing your maximum health to 800.
After you defeat the boss, keep running to the right and make it through one more screen. You will eventually arrive at a screen that has an "S" tile early on (C). If you arrive at this location before having rescued the second POW, and you use the tile, you will return to the helicopter. However, if you have already rescued the POW, using this "S" tile will take you to the final confrontation. There is no reason to explore the remaining right side of the screen.
The enemy helicopter[edit]

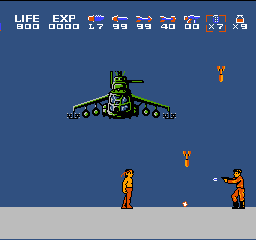
Remember that helicopter that chased you to this location? Well, it's here, and it's determined not to let you leave alive. It will hover along the top portion of the screen, rendering it safe from every attack that you can use except for grenades. While it floats back and forth, missiles will rain down from the sky. Occasionally, one or two soldiers will appear from either side of the screen. Whenever you kill the soldier from the right, he gives you arrows. However, whenever you kill the soldier from the left, you get a full supply of grenades.
To prepare for this fight, you should try to have as close to nine vials of medicine as possible. Additionally, it would be a good idea to get your experience points up to 9000 in order to earn a full restoration of health (assuming you have already reached combat level seven) just prior to entering the fight with the helicopter. A full supply of grenades is helpful in order to give you a head start, but not necessary.
Once you're in the fight, you must jump up and toss grenades at the peak of your jump in order to hit the hull of the helicopter. Naturally, you will run out of grenades. You must wait for a soldier to drop from the left side of the screen and defeat him for more grenades. If you are already using grenades, feel free to use them to kill him, since he just gives you more. Try to avoid wasting grenades on the right soldier unless you have to. It's nearly impossible to dodge every missile that falls from the sky as you fight. Don't forget to monitor your health throughout the fight, and use vials of medicine when necessary. You will have to strike the helicopter with approximately 50 grenades before it will blow up.
Epilogue[edit]

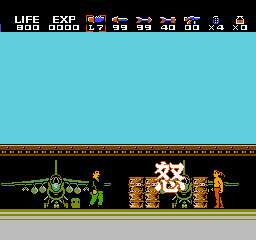
After defeating the helicopter, you will return to the original base where you started the game from. The helicopter that you fly home in crash lands on the base. You will find Murdock furiously running back and forth on the base. If you press ![]() when he is on the screen, you will shout a kanji symbol at him, 怒 (Ikari, which means fury, or a slave to ones passions). The kanji is a reference to the Japanese title of the film, which was known as ランボー/怒りの脱出 (ランボー/怒りの脱出? Ranbō: Ikari no Dasshutsu) Rambo: The Furious Escape. When Murdock is struck by the symbol, he is turned into a frog. However, if you leave the screen and return, Murdock will be back in his original form and you can repeat the process. To receive the true ending of the game, use the "S" tile to visit the other side of the base and find Colonel Trautman. If you speak with him, Trautman and Rambo will have a conversation along similar lines to the end of the movie. Then the game will end. Congratulations.
when he is on the screen, you will shout a kanji symbol at him, 怒 (Ikari, which means fury, or a slave to ones passions). The kanji is a reference to the Japanese title of the film, which was known as ランボー/怒りの脱出 (ランボー/怒りの脱出? Ranbō: Ikari no Dasshutsu) Rambo: The Furious Escape. When Murdock is struck by the symbol, he is turned into a frog. However, if you leave the screen and return, Murdock will be back in his original form and you can repeat the process. To receive the true ending of the game, use the "S" tile to visit the other side of the base and find Colonel Trautman. If you speak with him, Trautman and Rambo will have a conversation along similar lines to the end of the movie. Then the game will end. Congratulations.