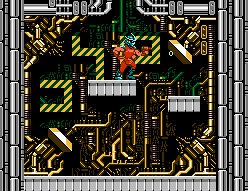
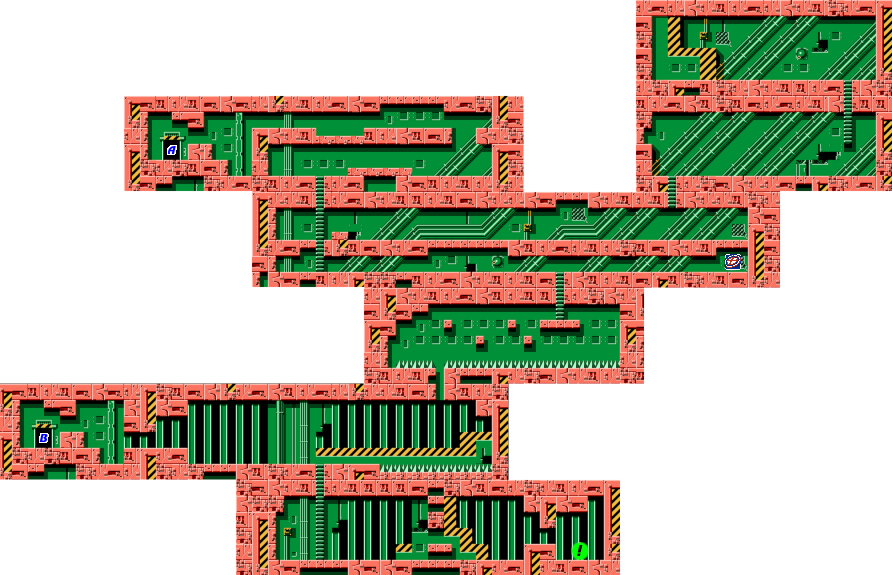
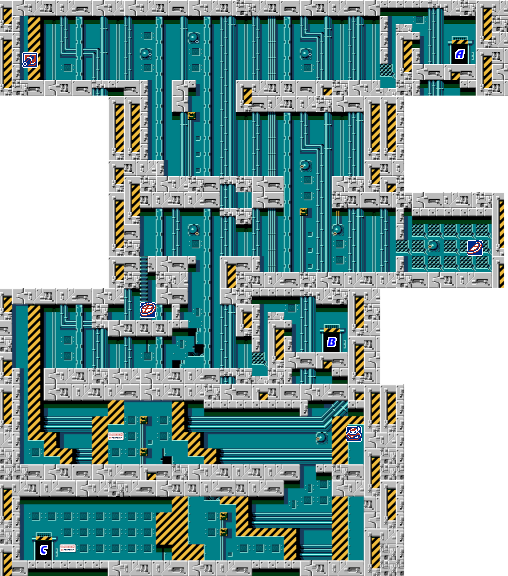
Unlike the other areas, this final area has no overworld map. You are now inside the Technodrome, and you must navigate your way through its interior until you make it all the way into the control room, where you will enter the final battle. To do so, you'll have to survive everything that the Technodrome and the Foot Clan have to throw at you, and it's more than you ever encountered up to this point.
All items here can only be picked up once, so there's no chance of refilling health. There are a lot of point of no return spots, meaning you will have a lot less opportunities to stock up on subweapons.
There are 3 types of enemy sets: Very Easy Area 1 enemies, Medium Area 4 (or Area 1 Building I), or the ridiculously hard Area 6 exclusive enemies. If you are lucky to get Area 1 enemies, take full advantage of that and leave just 1 of those enemies present on screen. It is possible to alternate in the beginning for easier enemies, but this tactic won't work mid-way and beyond. The Area 6 enemies containg the Jetpack Soldiers and Mecha Kangaroos have a lot more health, very hard to hit due to flying, and inflict massive damage.
Part 1[edit]
You begin in the upper right portion of the map. Depending on whether you kill the Foot Soldier standing behind you when you arrive, you may encounter jet pack soldier if you kill him, or more Foot Soldiers if you don't. The Foot Soldiers are far easier to kill, but they will be throwing shuriken at you. Make your way to the ladder and climb down.
Wait for the robot drones beneath you to fly back to the right and then drop down to the floor. Advance to the left, but watch out for more jet pack soldiers. Duck beneath them or jump over them if you are able to. They are not worth tangling with. Climb down the ladder on the left side.
When you arrive, remove any drones in the way. On the level below you is a full pizza, a rare health item in this level. If you don't really need it, it's better to not risk trying to grab it, but assuming you do, you'll have to head to the left, climb down a ladder, and make it all the way back to the right. Drones will be coming at you, some aiming for your head. Donatello's bo is effective at clearing them out of the way, but there's another way to safely traverse these corridors. If you have any turtle with any amount of boomerangs, switch to him. Activate the boomerangs and throw them continuously as you walk forward. The boomerangs will clear the space in front of you, and return to you so you never really run out of them. When you are still on the upper level and walking above the wall mounted cannon, be sure to stop and use Donatello's bo to destroy it before you continue. The nice thing about the wall mounted cannons is that they remain destroyed not matter what.
At this point, you have to make a decision: If you have lost a turtle and would like to reclaim him, you'll want to take the ladder below. If you have all four turtles, and are more interested in finding more pizza, you'll want to climb the ladder to the section above. Rescuing a turtle is a one way trip, so you give up the opportunity to collect the health if you go that way.
Taking the upper route to pizza and kiai[edit]
Climb up the ladder on the far left side. Watch out for the drone flying overhead. You can use the boomerang trick here too to clear away drones. When you reach the right side, you may have to deal with two robotic kangaroos who jump around and try to hit you with their tails. You're safe if you fight them from the raised ledge to the left, but if you go too far back to the left, the second kangaroo bot will keep respawning, so try not to go too far to the left. When they're clear, you can jump up to the level above, and walk back to the left. Watch out for more drones approaching you. Even if there is a bigger enemy to the left, you should be able to easily avoid it and make your way to door A. Skip down to Part 2 below.
Taking the lower route to a turtle[edit]
If you've decided to rescue a turtle, you'll need to climb down the ladder. This is a treacherous path. You'll start out on a platform above a long bed of spikes with a robotic kangaroo hopping around below. You can remove the kangaroo with Don's bo if you like, but the bigger threat to your existence are the spikes, and there's nothing you can do about those. The small platforms that line the upper portion of the room are nice, but incredibly difficult (and in some cases impossible) to jump on to. They may help you out, but inevitably, you're going to land on some of the spikes and take damage. Jump off of them as quickly as you can and make your way to the very small gap in the floor which you must fall through to continue.
Unfortunately, that small gap is going to drop you right over a lot more spikes and two robotic kangaroos. Do your best to jump over to the left to get out of the spikes as quickly as possible. At this point, Door B to the next part is to the left, but a ladder will lead you down to where a captured turtle can be rescued. If you climb down the ladder, watch out for any enemies and make your way to the right to rescue one of your brothers. Then climb back up, head left, and reach a lower portion of Part 2.
Part 2[edit]
Where you start from determines how much of Part 2 you must endure.
Continuing from Door A[edit]
When you arrive, you're immediately beset upon by an enemy. Evade it as best as you can, jump up to the ledge on the left and drop down the chute to the floor below. As you head left, you may encounter a boomerang thrower or two. Attack them from the safety of the ledge below before you advance. Destroy the first wall mounted cannon, and continue to the gap. If you would like to obtain some Kiai scrolls, jump up and destroy the high wall mounted cannon (either with Donatello's bo, or any special weapon). Then leap over the gap to the next platform. Another cannon is just beyond the second gap, but it's lower. If you clear it away, continue all the way to the left to find the scrolls.
Either way, drop down through one of the gaps to the floor below. You may encounter some robotic kangaroos guarding the area. Another wall mounted cannon guards the next gap that you must drop down. When you reach the floor below, you have another decision to make. There is a half pizza to the left, but it can sometimes be more trouble than it's worth. You have to clear away any enemies guarding the floor where you landed, jump in through a narrow gap in the right wall, and take out another wall mounted cannon to safely retrieve the half pizza.
Whether grab it or not, there is a full pizza that is worth the risk all the way to the left. Continuing from where you fell, advance to the left until the gap. Destroy the wall mounted cannon on the other side, and then hop across. Continue until you reach a ladder, climb down, and you'll find the full pizza in a small area. Collect it, and climb back up. Fortunately, the wall mounted cannon will still be destroyed. Drop down the gap in the floor to the level below.
At this point, you are just to the left of where door B deposits you. Continue reading the section below.
Continuing from Door B[edit]
From the door, jump over to the ledges on the left, and drop down the small chute to the floor below. Watch out for any drones that may be flying through the area. Continue to the gap on the left and fall through it. This area tends to have a trio of flying enemies move through the hall. Duck down when they fly over you. Also watch out for more jet pack soldiers. Ignore them as much as possible. When you reach the gap on the right, don't fall down just yet. Do what you can to destroy the wall mounted cannon above it, and then jump over the gap to grab an Invincibility Tile. With the Invincibility active, drop down to the floor below. Head to the left and crash through all of the enemies while you approach Door C. Pass through it to enter the next part.
Part 3[edit]
The final area of the Technodrome contains nothing but flying drones and the deadly Jetpack soldiers. This area forces you to walk down a long corridor to reach the far side where the control room is. This is a challenge that can be extremely frustrating because of the enemy placement through the area, but if you know what to expect, it's not quite as bad. The hallway will alternate between sets of drones flying through, and pairs of jet pack soldiers. One of the jet pack soldiers flies just low enough to scrape your head with its foot so you take damage. If you can duck in time to avoid it, stay in place until the lasers they shoot go over your head, and then advance past them. If you know when they will appear, you can trick the lower one into flying upward if you leap into the air just before they show up.
As you continue down the corridor, the ceiling and the floor will get closer together. Eventually, it will be much harder to avoid getting hit as you make your way down. That distance will close to the point where there is no more room to jump. At this point, the jet pack soldiers stop showing up in pairs, and take you on one at a time. However, they also refuse to fly through the tunnel. They get just close to you, then reverse direction and fly backwards to the right, firing a laser at you as they leave. Don't advance when they appear, and they will leave you unharmed. But remember to strike the drones, preferably with Donatello's bo, as they continue to appear.
When the ceiling opens back up, you have reached the end. Take out a few more drones on your way to the ladder. Climb up to the level above, and you will hear the mid-boss music. A final jet pack soldier prevents you from reaching the control room until you defeat it. The easiest way to do so is to head to the left side with Donatello, squat down, and attack downward with your bo so that the top part of it strikes the soldier in mid-air. If successful, you'll destroy the soldier without taking any damage. From here, it's a short walk to the last door of the game, and where you'll face the final challenge.
BOSS: Shredder[edit]

The time has finally come for the showdown between the turtles and Shredder. When you arrive in the room, lighting will appear and Shredder will materialize on the left platform. Once fully formed, the battle will begin. Surprisingly, Shredder isn't actually all that difficult because he gets stunned each time he gets hit. The only difficult part of the fight is getting hit by him by contact (3.5 squares worth of damage) or the slow shooting gun (instant kill). He will follow you around the room, so if you head to the ground, he'll drop down. If you jump up to the platforms, he'll leap up as well. You can nail him with scrolls if you have any, but even boomerangs and shuriken are effective. Donatello's bo does good damage as usual if you have no special weapons. It's almost as if just surviving the journey to this room was the real boss challenge, and the fight against Shredder is just a formality. Either way, you should be able to defeat him with little trouble, switching turtles around if necessary.
Upon defeating Shredder, you will be treated to the (rather short) ending the game. The story concludes with no credits shown, and the game returns to the title screen. Congratulation on beating this extremely difficult game.


