Controls[edit]
 : Use the Dpad to navigate through the menus, and to direct Gil throughout the tower. Gil can move in any of the four cardinal directions, and not diagonally.
 : Press the I button to accept menu selections, and to have Gil draw his sword. Gil will keep his sword drawn for as long as the I button is held down. During this time, his shield moves from his front side to his left, so it is still capable of blocking spells, but only if they come from his left. If you press Button I while facing a wall and not moving, you will use the Pickax (assuming you still have Pickax uses left). Using a Pickax on the outer wall will ruin the Pickax for the remainder of that floor. Pressing the I button on the item selection screen toggles the II button item selection.
 : Press the II button to cancel menu selections, and to activate the item that you have assigned to the II button on the item selection screen. If the item is a consumable, it will reduce the count of available uses by one, or remove the item from Gil's inventory. By pressing the II button when Ishtar presents a hint for the next floor, you are taken to the point allocation screen.
 : Press Run to start the game and to pause the game during gameplay. Press and hold Run, and then press Select to return to the title screen. This is a good way to use a continue to go back to a floor where you might have missed a vital treasure chest.
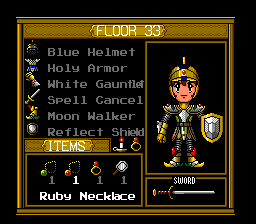
 : From the main gameplay screen, press Select once to enter the item selection screen where you can equip the various pieces of armor that you have collected and assign an item for use with button II. Press Select once more to be taken to the point allocation screen, although you are not allowed to reallocate points in the middle of game play. This may only be done before each floor begins.
Characters[edit]
Gil[edit]


Gil is the destined hero of this game. He has been charged by the goddess Ishtar to ascend the Tower of Druaga and rescue the maiden Ki from the demon Druaga. Not only must Gil use his sword and shield to navigate through the labyrinthine floors of the tower, he must use his wit and memory to reveal the locations of the treasures contained on each floor, some of which are absolutely necessary for Gil's success. Gil is patterned after the Gilgamesh of Sumerian legend.
Ki[edit]


The maiden Ki is actually a priestess in her own right. When Druaga assumed possession of the tower, Ki attempted to climb to the top in an effort to stop Druaga from stealing the Blue Crystal Rod. But she was captured by Druaga and is now held prisoner. Ki goes on to be a tremendous asset in Gil's future adventures, but first she must be rescued from Druaga's grasp.
Ishtar[edit]


Ishtar, unable to meddle directly in the affairs of mortals on earth, can only sit and watch as Gil answers her call to service. But she provides Gil with valuable information in the form of clues that can help Gil reveal the treasure chests on each floor (on the Easy, Normal, and Hard difficulties. Even Ishtar is unaware of the reveal methods for the Pro Game.)
Druaga[edit]


Just before the Sumerian Tower could be completely destroyed, the evil demon Druaga moved into the Tower and restored it for use as his striking point against the gods. His goal is to lay claim to the Blue Crystal Rod by stealing it from the heavens and use it to enslave humanity.
Game Difficulties[edit]
The game can be played on any of four difficulties. The differences are described in the table below.
| Difficult | Spirit Crystal | Hit Points | Timer | Pickax uses | Continues | Password |
|---|---|---|---|---|---|---|
| Easy | Automatic | Displayed | No | Displayed | Infinite | Yes |
| Normal | Collected (Up to Floor 24) | Displayed | No | Displayed | Infinite | Yes |
| Hard | None | Displayed | Yes | Not Displayed | 10 Credits | No |
| Pro | None | Not Displayed | Yes | Not Displayed | 3 Credits | No |

If you try to input the hidden command of calling "Another Tower" in Famicom version at the title screen, an additional message "There is no Another Tower at all!" will appear.
Floor Features[edit]
In this version, each tower floors is shaped like a square. Each of the 60 floors of the Tower appear similar to one another and differ only in layout and monster content.
Keys, Doors, and Walls[edit]

In order to escape each floor, Gil must find and collect the key, and bring it to the locked door in order to open it and discover the stairwell to the next floor. The key will be in plain sight until a particular floor is reached. At that time, the key will be invisible, but still obtainable. The silver chime can alert Gil when he is facing the key at the very beginning of the level, but to truly see the keys after they go invisible, Gil must possess and activate (just once) the Book of Keys.
Unlike in other versions, the door occupies a tile as a pillar, and never be hidden. By walking in front of the door with the key, it will open immediately.
Walls play an important role in The Tower of Druaga as well. They can be used strategically in your defense, or destroyed to give you faster access to a monster or an item. Walls can be destroyed by using the Pickax. To use the Pickax, face a wall, and press Button I without moving. If you have Pickax uses remaining, you will use one up and the wall will be destroyed. If you attempt to use the Pickax on any of the outer walls, or the pillar where the exit door is, the Pickax will be broken for the remainder of the floor. Your Pickax uses are refilled on the next floor. Be aware that dragons and a few other enemies can destroy walls as well. Note that some of the secondary treasure (see below) allow Gil to make new walls, as a kind of defense.
Treasure[edit]


Most, but not all, of the floors contain a hidden treasure chest that can only be revealed by completing a certain task. The methods for obtaining the treasure are the same in the Easy, Normal, and Hard difficulties, and Ishtar will start each floor by providing you with a hint or a clue for discovering that floor's reveal method. Sometimes the method requires the killing of all or certain monsters. Sometimes an item must be used. Use your imagination when you are stumped. Most of the items that Gil collects from the treasure chests are required in order to successfully defeat Druaga and rescue Ki, so try not to miss any of the chests. The reveal methods for the Pro Game are entirely different, and Ishtar will not provide you with any clues for the methods, so you will have to discover them on your own. Your efforts will go smoother if you are familiar with some of the reveal methods used in the original arcade game.
Some floors may even contain a second optional treasure chest that can be revealed, but unlike the first chest, it will usually be a consumable support item, and will never be critical to the success of Gil's mission (the Pro Game does not contain any secondary chests.) All treasures must be equipped or selected through the equipment screen by pressing Select during gameplay. Also note that treasures will not be added to your inventory before beating the floor. For example, you cannot equip the Jet Boots on Floor 2 where you find them.
Monsters & Magic Circles[edit]

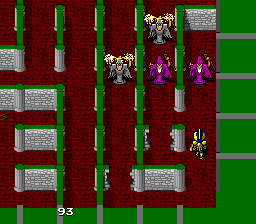
Each floor contains a predetermined set of monsters that can be fought, or evaded. Some monsters (such as bats) can not be defeated by Gil and must simply be avoided. Some of the monsters cause instant death for Gil while other drain Gil's Hit Points over time. Learn which monsters can be fought and which must be avoided early on for success in the more difficult floors later.
Some floors have anywhere from 5 to 9 magic circles painted on the floors. Sometimes these magic circles have various properties, and sometimes they are simply for illustration. Sometimes they even figure into the reveal method for the floor, so pay attention to the clues that Ishtar provides.
Spirit Crystals[edit]


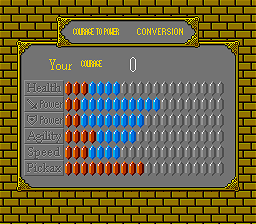
Spirit Crystals can only be collected on the floor in the Normal Difficulty. You are automatically awarded one Spirit Crystal for beating each floor in the Easy game, and they can not be obtained at all on the Hard or Pro game. Spirit Crystals only occur on the first 24 floors of the Normal game. Initially, they are collected simply by touching them. Later on the method requires a little more effort, as the crystal may roam the hallways and must be caught, or warp from point to point around the floor, or in some cases it must be touched three times in order to possess it. Once gained, spirit points are used to augment one of Gil's six different attributes: Total Health, Offensive Power, Defensive Power, Sword Speed, Walking Speed, and Pickax uses. The points distributed to each attribute are awarded above and beyond what Gil's current equipment set up provides him with, up to a maximum value of 20 per attribute. Points are distributed on the status screen (press Select on the Equipment screen, or press Button II when Ishtar is giving you the hint for the floor.) Points can only be distributed on Easy and Normal Difficulty, in Hard or Pro, the helmets will have no effect even if they are supposed to give points.
Items[edit]
The follow tables illustrate what items can be collected throughout the various floors of the tower. You begin the game with very basic equipment. All subsequent equipment offers defensive or offensive improvements over the original items (with the exception of Evil items).
| Helmets | |
|---|---|
| Blue Helmet | +4 spirit points |
| Horned (Hyper) Helmet | +8 spirit points |
| Evil Helmet | reduces available spirit points |
| Armors | |
| Red Line Armor | +24 HP |
| Black Knight Armor | +18 HP, enemies won't chase you |
| Holy Armor | +18 HP, absorb three spells |
| Blue Line (Hyper) Armor | +60 HP |
| Evil Armor | reduces Hit Points |
| Gauntlets | |
| White Gauntlet | +4 sword speed |
| Blue Gauntlet | +10 sword speed |
| Evil Gauntlet | sword can not be drawn |
| Swords | |
| White Sword | +3 sword strength |
| Spear | +6 sword strength |
| Dragon Slayer | +2 sword strength, strong against dragons |
| Spell Canceler | +2 sword strength, reflect spells with sword drawn |
| Excalibur | +10 sword strength |
| Evil Sword | reduced sword strength |
| Boots | |
| Jet Boots | +4 walking speed |
| Levitate Boots | +2 walking speed, avoid pitfalls and goos (an enemy smaller than slime) |
| Moon Walkers | +3 walking speed, facing direction does not change if sword not drawn |
| Rocket Boots | +8 walking speed, strong against dragons |
| Turtle Boots | reduced walking speed |
| Shields | |
| Red Line Shield | +4 DEF |
| Fire Shield | +2 DEF, absorb fireballs |
| Reflect Shield | +2 DEF, also reflect spells from the sides |
| Blue Line Shield | +10 DEF |
| Evil Shield | reduces defense |
| Pickaxes | |
| Copper Pickaxe | 2 Pickaxe uses |
| Silver Pickaxe | 5 Pickaxe uses |
| Gold Pickaxe | 10 Pickaxe uses |
| Protective equipment | |
| Emerald Necklace | Gil can pass through fire elements on the floor. |
| Ruby Necklace | Gil can pass through fireballs. |
| Sapphire Necklace | Gil can pass through dragons' fire breath. |
| Red Ring | Gil can safely pass through Red Will'o Wisps |
| Blue Ring | Gil can safely pass through Blue Will'o Wisps |
| Automatic Items | |
|---|---|
| Silver Mirror | The speed of the mirror knight slows down. |
| Gold Mirror | The white hyper knight on Floor 59 can be destroyed. |
| Bronze Key | Needed to open certain treasure chests. |
| Silver Key | Needed to open certain treasure chests. |
| Gold Key | Needed to open certain treasure chests. |
| Balance | Needed when you open a treasure chest to turn Evil Equipment into Hyper Equipment |
| Ank | Needed to open the treasure chests which contain Crystal Rods. |
| Red Crystal Rod | Needed to save Ki |
| Green Crystal Rod | Needed to save Ki |
| Blue Crystal Rod | Needed to enable Druaga to see and fight you (otherwise you will not advance to Floor 60). |
| Ruby Mace | The mace is needed to reach and defeat Druaga. |
| Equipable Items | |
| Silver Chime | Rings if Gil faces the direction of the key for the first few seconds on a floor. If used, disables the BGM on the floor. |
| Gold Chime | Rings when Gil reveals the primary treasure chest for the floor. If used, rings if Gil has not revealed the primary treasure. |
| Book of Maps | Allows you to view the layout of the floor at will (but none of the contents) |
| Book of Keys | Allows you to see the keys once they become invisible. |
| Book of Light | Turn on or off the lighting of floor. Does not affect candles on walls. |
| Candle | Allows you to see ghosts on any floor (must be activated). |
| Rope | Exit the level and ascend one floor. |
| Silver Shovel | Exit the level and descend one floor. |
| Gold Shovel | Exit the level and choose any of the previously visited floors to return to and continue your journey from. |
| Consumable Items | |
| Light Blue Potion | Restore 10 HP |
| Blue Potion | Restore all HP |
| Green Potion | Antidote and restore Pickaxe uses. |
| Black Potion | Poison, lose 1 HP per second. |
| Rainbow Pickax | Unlimited Pickax uses for one floor |
| Match | Allows you to see ghosts for one floor |
| Copper Trawl | Construct one wall behind your position. |
| Silver Trawl | Construct two walls behind your position. |
| Gold Trawl | Construct five walls behind your position. |
| Acid Scroll | Damage all enemies on the floor. |
| Quiet Scroll | Magicians are prevented from casting spells. |
| Sleep Scroll | Put all enemies to sleep. |
| Clear Scroll | Every wall is destroyed. |
| Shell Scroll | Gil is protected from spells for the remainder of one floor. |
| Heat Scroll | Gil is invincible and can crash through enemies for several seconds. |
| Burn Scroll | Destroy every enemy instantly. |
| Silver Clock | Enemy movement is stopped for 5 seconds. |
| Gold Clock | Enemy movement is stopped for 20 seconds. |
| Red Crystal | No damage from knights on one floor. |
| Green Crystal | No damage from ropers on one floor. |
| Blue Crystal | No damage from any enemy on one floor (including Druaga!) |