
The enemies become much more difficult on this floor, including a variety of enemies that cast spells, and use breath weapons. Since it takes a bit longer to get back to the castle from here, it's a good idea to at least bring extra POITONS of LATUMOFIS in case one of your party members gets poisoned, as it's more difficult to get them back to the Castle alive. It's good to get in the habit of casting KATINO against non-spell casters, and MONTINO against spell casters.
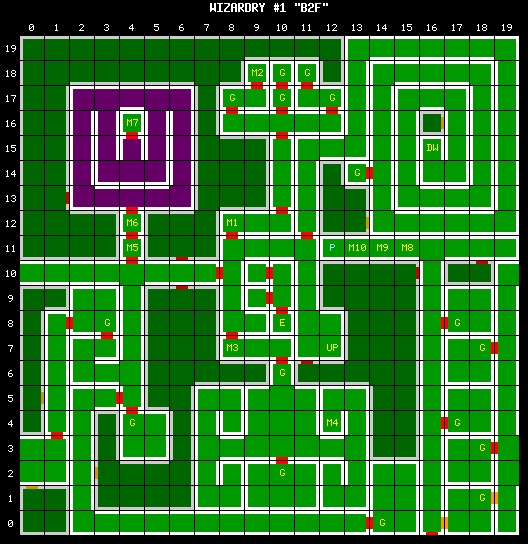
If you came to this floor via the Elevator, you will find that the area of the floor that you arrive in is completely shut off from the rest of the map.
Ultimately, you are searching for one of two statues that you can only obtain if you bring along the keys from the first floor. In the NES (and Famicom) versions of the game, you also need to find the KEY of GOLD, which is not found in other versions, and permits you access to the darkness portion of the first floor. Note that, although you shouldn't throw away any important items that you find, there will come a time when you may need to remove these items in order to make room for others. This shouldn't happen until you're much farther into the game, and no longer have any need for these items.
Up Stairs (E12-N7)[edit]
If you came via the stairs from Floor 1, you will arrive here, and can use these stairs to return to the previous floor.
Down Stairs (E16-N15)[edit]
The stairs that lead down to Floor 3 are located in the center of a long spiral corridor in the northeast corner of the maze.
Elevator (E10-N8)[edit]
Once again, if you use the elevator to visit this floor, you won't be able to explore very far. It is only connected to a small hallway with two uninteresting rooms.
Message 1 (E8-N12)[edit]
AS YOU ENTER THIS ROOM, A SILVERY FOG ENVELOPS YOU.
TERRIBLE DEMONS FORM ALL AROUND YOU.
IN TERROR, YOU FLEE FROM THE ROOM!
The KEY of SILVER is needed to get through this passage. You will be pushed back one step if no one in your party possesses the key. The STATUE of BEAR can be found by venturing through this section. You will also encounter the CREEPING COIN enemies here, which are relatively easy targets that yield a substantial amount of experience points.
Message 2 (E9-N18)[edit]
YOU SEE A STATUE OF A BEAR ON A PEDESTAL.
ON THE WALL IS A SIGN READING "I'VE GOT A MILLION OF'EM".
This is where you can collect the STATUE of BEAR. It is required for passage through the section of this floor that is marked with M5.
Message 3 (E8-N7)[edit]
AS YOU ENTER THIS ROOM, A BRONZE, SMOKE FILLS IT.
YOU FEEL COMPELLED TO LEAVE IMMEDIATELY!
The KEY of BRONZE is needed to get through this passage. You will be pushed back one step if no one in your party possesses the key. The STATUE of FROG can be found by venturing through this section.
Message 4 (E12-N4)[edit]
ON A SILVERY DISK STANDS A STATUE OF A FROG WEARING A RED AND BLUE CAPE.
THE STATUE ANIMATES AND SHAKES ITS LEGS WHILE IT YELLS "YEAH .. YEAH .."
This is where you can collect the STATUE of FROG. It is required for passage through the section of this floor that is marked with M6.
Message 5 (E4-N11)[edit]
NOBODY IN THE PARTY CAN BREAK THE DOOR DOWN.
You will need the STATUE of BEAR to pass through this door. You will be pushed back one step if no one in your part possess the statue.
Message 6 (E4-N12)[edit]
NOBODY IN THE PARTY CAN BREAK THE DOOR DOWN.
You will need the STATUE of FROG to pass through this door. You will be pushed back one step if no one in your part possess the statue.
Message 7 (E4-N16)[edit]
IN THIS ROOM IS A STATUE OF A MONSTER WITH THE BODY OF A CHICKEN AND THE HEAD OF A CAT.
THE STATUE IS MADE OF BRONZE, AND LIES ON AN ONYX PEDESTAL.
THERE ARE UNUSUAL RUNES ON A PLAQUE THEREON.
After reading the message, you will be asked if you would like to look around. If you answer yes, you will discover the KEY of GOLD. If someone in your party already possesses the key, the message is not displayed. Depending on which version of the game you have, this key can be required at different locations.
Message 8 (E15-N11)[edit]
A PLACARD NEAR THE GROUND READ: "A DUNGEON'S DARK ..."
Message 9 (E14-N11)[edit]
A PLACARD NEAR THE GROUND READ: "WHEN IT'S NOT LIT ..."
Message 10 (E13-N11)[edit]
A PLACARD NEAR THE GROUND READ: "WATCH OUT. OR YOU'LL .."
Pit (E12-N11)[edit]
If you step on to this square, you will fall into a pitfall. Every one in your party will suffer 1d8 (1 - 8) points of damage. The only reason you're ever likely to investigate this location is simply to complete a map of this floor.