(added more areas and an extra bug location) |
Trig Jegman (talk | contribs) mNo edit summary |
||
| (47 intermediate revisions by 15 users not shown) | |||
| Line 1: | Line 1: | ||
{{Header Nav|game=Petz: Dogz 2 and Catz 2}} | {{Header Nav|game=Petz: Dogz 2 and Catz 2}} | ||
{{control selector|Wii, PlayStation 2}} | {{control selector|Wii, PlayStation 2}} | ||
In Dogz and Catz, while looking for requested items, you will find many butterflies and other bugs. Once you have caught them, you can go to Clara and release them into the flowerbeds (note that if there is already a bug there it will be replaced by the next one you put in) or take them to Tom at the Pawn Shop and sell them. Some bugs are rarer than others, and when you hit a milestone of different bugs you can have, you will get a new colour of Kimono (a coat which you can wear). | In Dogz and Catz, while looking for requested items, you will find many butterflies and other bugs. Once you have caught them, you can go to Clara and release them into the flowerbeds (note that if there is already a bug there it will be replaced by the next one you put in) or take them to Tom at the Pawn Shop and sell them. Some bugs are rarer than others, and when you hit a milestone of different bugs you can have, you will get a new colour of Kimono (a coat which you can wear). | ||
==How to catch bugs== | ==How to catch bugs== | ||
To catch a bug, first you must have | To catch a bug, first you must have received the bug cage from Victor. Then, go up to one and press {{control|{{wii|A}}|{{psx|X}}}} when 'catch insect' appears at the bottom of the screen. Then, a metre will appear with a net over it. There will also be a yellow bar moving around, indicating the bug. When the bar is completely under the net, press {{control|{{wii|A}}|{{psx|X}}}}. A picture of the button will also appear above the metre when you can catch the bug. If you sucsessfullly caught it, it gets put in your inventory. | ||
<gallery> | |||
File:Petz Catz 2 bug catching 1.jpg|Wait until the yellow bar is under the net... | |||
File:Petz Catz 2 bug catching 2.jpg|Press {{control|{{wii|A}}|{{psx|X}}}}... | |||
File:Petz Catz 2 bug catching 3.jpg|Then you catch the bug... | |||
File:Petz Catz 2 bug catching 4.jpg|And it goes into your inventory | |||
</gallery> | |||
==Bug List== | |||
You can find a list of bugs in the Magic Encyclopedia, once it has been given to you, under '''Memo''' in the pause menu. There are 35 bugs altogether. | |||
{|{{prettytable|notwide=1|style=margin-left:auto;margin-right:auto}} | |||
!colspan="5"|Page 1 | |||
|- | |||
|[[File:DogIsland_cabbagebutterfly.png|50px|link=#Cabbage White]] | |||
|[[File:DogIsland_yellowbutterfly.png|50px|link=#Oriental Clouded Yellow]] | |||
|[[File:DogIsland_greenbandedswallowtail.png|50px|link=#Green banded Swallowtail]] | |||
|[[File:DogIsland_swallowtailbutterfly.png|50px|link=#Swallowtail]] | |||
|[[File:DogIsland_chestnuttigerbutterfly.png|50px|link=#Chestnut Tiger]] | |||
|- | |||
|[[File:DogIsland_whitebutterfly.png|50px|link=#Pieridae]] | |||
|[[File:DogIsland_blackswallowtailbutterfly.png|50px|link=#Black Swallowtail]] | |||
|[[File:DogIsland_commoneggflybutterfly.png|50px|link=#Blue Moon Butterfly]] | |||
|[[File:DogIsland_brimstonebutterfly.png|50px|link=#Common Brimstone]] | |||
|[[File:DogIsland_purplespottedswallowtail.png|50px|link=#Purple Spotted Swallowtail]] | |||
|} | |||
{{-}} | |||
{|{{prettytable|notwide=1|style=margin-left:auto;margin-right:auto}} | |||
!colspan="5"|Page 2 | |||
|- | |||
|[[File:DogIsland_goliathbirdwingbutterfly.png|50px|link=#Giant Birdwing]] | |||
|[[File:DogIsland_morphobutterfly.png|50px|link=#Morpho]] | |||
|[[File:DogIsland_greatorangetipbutterfly.png|50px|link=#Great Orange Tip]] | |||
|[[File:DogIsland Red Butterfly.png|50px|link=#Red Butterfly]] | |||
|[[File:DogIsland_birdwingbutterfly.png|50px|link=#Magellan Birdwing]] | |||
|- | |||
|[[File:DogIsland_monarchbutterfly.png|50px|link=#Monarch]] | |||
|[[File:DogIsland_asiandragonfly.png|50px|link=#Damselfly]] | |||
|[[File:DogIsland_commonskimmerdragonfly.png|50px|link=#Common Skimmer]] | |||
|[[File:DogIsland_reddragonfly.png|50px|link=#Red Dragonfly]] | |||
|[[File:DogIsland_greeneyeddragonfly.png|50px|link=#Golden-Ringed Dragonfly]] | |||
|} | |||
{{-}} | |||
{|{{prettytable|notwide=1|style=margin-left:auto;margin-right:auto}} | |||
!colspan="5"|Page 3 | |||
|- | |||
|[[File:DogIsland_lesseremperordragonfly.png|50px|link=#Skimmer]] | |||
|[[File:DogIsland_commonhawkerdragonfly.png|50px|link=#Common Hawker]] | |||
|[[File:DogIsland_redwingdragonfly.png|50px|link=#Yamamoto Dragonfly]] | |||
|[[File:DogIsland_whitewingdragonfly.png|50px|link=#Relic Dragonfly]] | |||
|[[#Scarce Swallowtail|Scarce<br />Swallowtail]] | |||
|- | |||
|[[File:DogIsland Vivid Green.png|50px|link=#Vivid Green]] | |||
|[[#Camberwell Beauty|Camberwell<br />Beauty]] | |||
|[[#Eggfly|Eggfly]] | |||
|[[File:DogIsland Gold Butterfly.png|50px|link=#Golden Butterfly]] | |||
|[[File:DogIsland Silver Butterfly.png|50px|link=#Silver Butterfly]] | |||
|} | |||
{{-}} | |||
{|{{prettytable|notwide=1|style=margin-left:auto;margin-right:auto}} | |||
!colspan="5"|Page 4 | |||
|- | |||
|[[File:DogIsland Yuke Butterfly.png|50px|link=#Yuke Butterfly]] | |||
|[[File:DogIsland Rainbow Butterfly.png|50px|link=#Rainbow Butterfly]] | |||
|[[File:DogIsland Golden Dragonfly.png|50px|link=#Golden Dragonfly]] | |||
|[[File:DogIsland_bellcricket.png|50px|link=#Bell Cricket]] | |||
|[[File:DogIsland_cricket.png|50px|link=#Cricket]] | |||
|} | |||
==Bugs== | |||
{|{{prettytable}} | |||
|width="10%"|'''Name''' | |||
|width="30%" style="background-color:#ccddee;color:#5566aa"|'''''<span style="color:#5566aa" id="Cabbage White">Cabbage White</span>''''' | |||
|width="30%" style="background-color:#ccddee;color:#5566aa"|'''''<span style="color:#5566aa" id="Oriental Clouded Yellow">Oriental Clouded Yellow</span>''''' | |||
|width="30%" style="background-color:#ccddee;color:#5566aa"|'''''<span style="color:#5566aa" id="Green Banded Swallowtail">Green Banded Swallowtail</span>''''' | |||
|- | |||
|'''Location''' || | |||
* [[#Dolphin Coast|Dolphin Coast]] | |||
* [[#Jade Fields|Jade Fields]] | |||
| | |||
* [[#Lappy Lake|Lappy Lake]] | |||
* [[#Crystal Caverns|Crystal Caverns]] | |||
| | |||
* [[#Jade Fields|Jade Fields]] | |||
|- | |||
|'''Name''' | |||
|style="background-color:#ccddee;color:#5566aa"|'''''<span style="color:#5566aa" id="Swallowtail">Swallowtail</span>''''' | |||
|style="background-color:#ccddee;color:#5566aa"|'''''<span style="color:#5566aa" id="Chestnut Tiger">Chestnut Tiger</span>''''' | |||
|style="background-color:#ccddee;color:#5566aa"|'''''<span style="color:#5566aa" id="Pieridae">Pieridae</span>''''' | |||
|- | |||
|'''Location''' || | |||
* [[#Jade Fields|Jade Fields]] | |||
* [[#Tail Heights|Tail Heights]] | |||
* [[#Dolphin Coast|Dolphin Coast]] | |||
| | |||
* [[#Tail Heights|Tail Heights]] | |||
* [[#Gongoro Peak|Gongoro Peak]] | |||
| | |||
* [[#Tail Heights|Tail Heights]] | |||
* [[#Gongoro Peak|Gongoro Peak]] | |||
|- | |||
|'''Name''' | |||
|style="background-color:#ccddee;color:#5566aa"|'''''<span style="color:#5566aa" id="Black Swallowtail">Black Swallowtail</span>''''' | |||
|style="background-color:#ccddee;color:#5566aa"|'''''<span style="color:#5566aa" id="Blue Moon Butterfly">Blue Moon Butterfly</span>''''' | |||
|style="background-color:#ccddee;color:#5566aa"|'''''<span style="color:#5566aa" id="Common Brimstone">Common Brimstone</span>''''' | |||
|- | |||
|'''Location''' || | |||
* [[#Whisker Woods|Whisker Woods]] | |||
| | |||
* [[#Monolith Isle|Monolith Isle]] | |||
| | |||
* [[#Sky Heights|Sky Heights]] | |||
* [[#Lonesome Park|Lonesome Park]] | |||
|- | |||
|'''Name''' | |||
|style="background-color:#ccddee;color:#5566aa"|'''''<span style="color:#5566aa" id="Purple Spotted Swallowtail">Purple Spotted Swallowtail</span>''''' | |||
|style="background-color:#ccddee;color:#5566aa"|'''''<span style="color:#5566aa" id="Giant Birdwing">Giant Birdwing</span>''''' | |||
|style="background-color:#ccddee;color:#5566aa"|'''''<span style="color:#5566aa" id="Morpho">Morpho</span>''''' | |||
|- | |||
|'''Location''' || | |||
*[[#Gongoro Peak|Gongoro Peak]] | |||
| | |||
*[[#Whisker Woods|Whisker Woods]] | |||
| | |||
*[[#Zoo|Zoo]] | |||
|- | |||
|'''Name''' | |||
|style="background-color:#ccddee;color:#5566aa"|'''''<span style="color:#5566aa" id="Great Orange Tip">Great Orange Tip</span>''''' | |||
|style="background-color:#ccddee;color:#5566aa"|'''''<span style="color:#5566aa" id="Red Butterfly">Red Butterfly</span>''''' | |||
|style="background-color:#ccddee;color:#5566aa"|'''''<span style="color:#5566aa" id="Magellan Birdwing">Magellan Birdwing</span>''''' | |||
|- | |||
|'''Location''' || | |||
*[[#Monolith Isle|Monolith Isle]] | |||
| | |||
*[[#Monolith Isle|Monolith Isle]] | |||
| | |||
*[[#Crystal Caverns|Crystal Caverns]] | |||
|- | |||
|'''Name''' | |||
|style="background-color:#ccddee;color:#5566aa"|'''''<span style="color:#5566aa" id="Monarch">Monarch</span>''''' | |||
|style="background-color:#ccddee;color:#5566aa"|'''''<span style="color:#5566aa" id="Damselfly">Damselfly</span>''''' | |||
|style="background-color:#ccddee;color:#5566aa"|'''''<span style="color:#5566aa" id="Common Skimmer">Common Skimmer</span>''''' | |||
|- | |||
|'''Location''' || | |||
*[[#Whisker Woods|Whisker Woods]] | |||
| | |||
*[[#Lappy Lake|Lappy Lake]] | |||
| | |||
*[[#Jade Fields|Jade Fields]] | |||
|- | |||
|'''Name''' | |||
|style="background-color:#ccddee;color:#5566aa"|'''''<span style="color:#5566aa" id="Red Dragonfly">Red Dragonfly</span>''''' | |||
|style="background-color:#ccddee;color:#5566aa"|'''''<span style="color:#5566aa" id="Golden-Ringed Dragonfly">Golden-Ringed Dragonfly</span>''''' | |||
|style="background-color:#ccddee;color:#5566aa"|'''''<span style="color:#5566aa" id="Skimmer">Skimmer</span>''''' | |||
|- | |||
|'''Location''' || | |||
*[[#Jade Fields|Jade Fields]] | |||
| | |||
*[[#Dolphin Coast|Dolphin Coast]] | |||
*[[#Whisker Woods|Whisker Woods]] | |||
| | |||
*[[#Lappy Lake|Lappy Lake]] | |||
|- | |||
|'''Name''' | |||
|style="background-color:#ccddee;color:#5566aa"|'''''<span style="color:#5566aa" id="Common Hawker">Common Hawker</span>''''' | |||
|style="background-color:#ccddee;color:#5566aa"|'''''<span style="color:#5566aa" id="Yamamoto Dragonfly">Yamamoto Dragonfly</span>''''' | |||
|style="background-color:#ccddee;color:#5566aa"|'''''<span style="color:#5566aa" id="Relic Dragonfly">Relic Dragonfly</span>''''' | |||
|- | |||
|'''Location''' || | |||
*[[#Bubble Cave|Bubble Cave]] | |||
| | |||
*[[#Whisker Woods|Whisker Woods]] | |||
| | |||
*[[#Bubble Cave|Bubble Cave]] | |||
|- | |||
|'''Name''' | |||
|style="background-color:#ccddee;color:#5566aa"|'''''<span style="color:#5566aa" id="Scarce Swallowtail">Scarce Swallowtail</span>''''' | |||
|style="background-color:#ccddee;color:#5566aa"|'''''<span style="color:#5566aa" id="Vivid Green">Vivid Green</span>''''' | |||
|style="background-color:#ccddee;color:#5566aa"|'''''<span style="color:#5566aa" id="Camberwell Beauty">Camberwell Beauty</span>''''' | |||
|- | |||
|'''Location''' || | |||
*[[#Jade Fields|Jade Fields]] | |||
*[[#Zoo|Zoo]] | |||
*[[#Dolphin Coast|Dolphin Coast]] | |||
| | |||
*[[#Whisker Woods|Whisker Woods]] | |||
| | |||
*[[#Sky Heights|Sky Heights]] | |||
*[[#Gongoro Peak|Gongoro Peak]] | |||
|- | |||
|'''Name''' | |||
|style="background-color:#ccddee;color:#5566aa"|'''''<span style="color:#5566aa" id="Eggfly">Eggfly</span>''''' | |||
|style="background-color:#ccddee;color:#5566aa"|'''''<span style="color:#5566aa" id="Golden Butterfly">Golden Butterfly</span>''''' | |||
|style="background-color:#ccddee;color:#5566aa"|'''''<span style="color:#5566aa" id="Silver Butterfly">Silver Butterfly</span>''''' | |||
|- | |||
|'''Location''' || | |||
*[[#Tail Heights|Tail Heights]] | |||
*[[#Monolith Isle|Monolith Isle]] | |||
*[[#Bubble Cave|Bubble Cave]] | |||
| | |||
*[[#Crystal Caverns|Crystal Caverns]] | |||
| | |||
*[[#Bubble Cave|Bubble Cave]] | |||
|- | |||
|'''Name''' | |||
|style="background-color:#ccddee;color:#5566aa"|'''''<span style="color:#5566aa" id="Yuke Butterfly">Yuke Butterfly</span>''''' | |||
|style="background-color:#ccddee;color:#5566aa"|'''''<span style="color:#5566aa" id="Rainbow Butterfly">Rainbow Butterfly</span>''''' | |||
|style="background-color:#ccddee;color:#5566aa"|'''''<span style="color:#5566aa" id="Golden Dragonfly">Golden Dragonfly</span>''''' | |||
|- | |||
|'''Location''' || | |||
*[[#Monolith Isle|Monolith Isle]] | |||
| | |||
*[[#Sky Heights|Sky Heights]] | |||
*[[#Zoo|Zoo]] | |||
| | |||
*[[#Whisker Woods|Whisker Woods]] | |||
|- | |||
|'''Name''' | |||
|style="background-color:#ccddee;color:#5566aa"|'''''<span style="color:#5566aa" id="Bell Cricket">Bell Cricket</span>''''' | |||
|style="background-color:#ccddee;color:#5566aa"|'''''<span style="color:#5566aa" id="Cricket">Cricket</span>''''' | |||
|- | |||
|'''Location''' || | |||
*[[#Jade Fields|Jade Fields]] | |||
*[[#Crystal Caverns|Crystal Caverns]] | |||
| | |||
*[[#Dolphin Coast|Dolphin Coast]] | |||
*[[#Lappy Lake|Lappy Lake]] | |||
*[[#Bubble Cave|Bubble Cave]] | |||
|} | |||
==Times of the Day== | ==Times of the Day== | ||
Bugs stay in the same place, throughout the day and night. If you catch all the bugs in the area, the only way to make them reappear is to re-enter the area or trigger a cut-scene. | |||
==Bug Setups== | ==Bug Setups== | ||
| Line 15: | Line 242: | ||
==Where to find Bugs== | ==Where to find Bugs== | ||
===Dolphin Coast=== | ===Dolphin Coast=== | ||
[[File:PD2C2 Dolphin Coast Bugs.jpg]] | |||
{|{{prettytable|text center=1}} | {|{{prettytable|text center=1}} | ||
! Location !! Setup 1 !! Setup 2 !! Setup 3 | |||
! | |||
|- | |- | ||
! A | ! A | ||
| Cabbage White | |||
| {{n/a}} | |||
| Cabbage White | | Cabbage White | ||
|- | |- | ||
! B | ! B | ||
| Cricket | | Cricket | ||
| {{n/a}} | |||
| {{n/a}} | |||
|- | |- | ||
! C | ! C | ||
| {{n/a}} | | {{n/a}} | ||
| Cabbage White | |||
| Cricket | |||
|- | |- | ||
! D | ! D | ||
| {{n/a}} | |||
| Swallowtail | |||
| {{n/a}} | | {{n/a}} | ||
|- | |- | ||
! E | ! E | ||
| Swallowtail | | Swallowtail | ||
| {{n/a}} | |||
| {{n/a}} | |||
|- | |- | ||
! F | ! F | ||
| Golden- | | Golden-Ringed Dragonfly | ||
| {{n/a}} | |||
| {{n/a}} | |||
|} | |} | ||
===Jade Fields=== | |||
{|{{prettytable|text center=1}} | {|{{prettytable|text center=1}} | ||
! Location !! Setup 1 !! Setup 2 !! Setup 3 | |||
! | |- | ||
! A (Across the first bridge, near a tree) | |||
| Bell Cricket | |||
| Scarce Swallowtail | |||
| Cabbage White | |||
|- | |||
! B (Behind a snake on the west of the area) | |||
| Gren Banded Swallowtail | |||
| {{n/a}} | |||
| {{n/a}} | |||
|- | |||
! C (South of the entrance to Lonesome Park) | |||
| Red Dragonfly | |||
| {{n/a}} | |||
| {{n/a}} | |||
|- | |||
! D (West of a boulder in the north of the area) | |||
| Scarce Swallowtail | |||
| {{n/a}} | |||
| {{n/a}} | |||
|- | |- | ||
! | ! E (In front of the southest bear) | ||
| Common Skimmer | |||
| {{n/a}} | |||
| {{n/a}} | | {{n/a}} | ||
|- | |- | ||
! | ! F (near where you found the Chamomile) | ||
| {{n/a}} | |||
| Common Skimmer | |||
| {{n/a}} | | {{n/a}} | ||
|- | |- | ||
! | ! G (on the corner of the path, east of the yellow snake) | ||
| {{n/a}} | |||
| Cabbage White | | Cabbage White | ||
| {{n/a}} | |||
|- | |- | ||
! | ! H (east of the cliff) | ||
| Swallowtail | | {{n/a}} | ||
| Green Banded Swallowtail | |||
| Scarce Swallowtail | |||
|- | |||
! I (west of the entrance to Lonesome Park) | |||
| {{n/a}} | |||
| Bell Cricket | |||
| {{n/a}} | |||
|- | |||
! J (west of the yellow snake) | |||
| {{n/a}} | |||
| {{n/a}} | |||
| Green Banded Swallowtail | |||
|- | |- | ||
! | ! K (near a dark green snake in the east of the area) | ||
| {{n/a}} | |||
| {{n/a}} | | {{n/a}} | ||
| Red Dragonfly | |||
|- | |- | ||
! | ! L (in front of the northest bear) | ||
| {{n/a}} | |||
| {{n/a}} | | {{n/a}} | ||
| Common Skimmer | |||
|} | |} | ||
===Lappy Lake=== | ===Lappy Lake=== | ||
{|{{prettytable|text center=1}} | |||
! Location !! Setup 1 !! Setup 2 !! Setup 3 | |||
|- | |||
! A (On the south island near the entrance to South Pawville) | |||
| Oriental Clouded Yellow | |||
| {{n/a}} | |||
| {{n/a}} | |||
|- | |||
! B (To the north of the middle island) | |||
| Damselfly | |||
| {{n/a}} | |||
| {{n/a}} | |||
|- | |||
! C (The sandy part of the island in the northwest of the lake, leading to Tail Heights) | |||
| {{n/a}} | |||
| Skimmer | |||
| {{n/a}} | |||
|- | |||
! D (the north of the island in the southwest of the lake) | |||
| {{n/a}} | |||
| Cricket | |||
| {{n/a}} | |||
|- | |||
! E (the south of the middle island) | |||
| {{n/a}} | |||
| Damselfly | |||
| Damselfly | |||
|- | |||
! F (In the gress near area C) | |||
| {{n/a}} | |||
| {{n/a}} | |||
| Cricket | |||
|- | |||
! G (The Northest island) | |||
| {{n/a}} | |||
| {{n/a}} | |||
| Oriental Clouded Yellow | |||
|} | |||
===Whisker Woods=== | ===Whisker Woods=== | ||
Whisker Woods is different to other levels, as it has four bug setups. | |||
{|{{prettytable|text center=1}} | |||
! Location !! Setup 1 !! Setup 2 !! Setup 3 !! Setup 4 | |||
|- | |||
! A (slightly south and east of the south west bridge) | |||
| Vivid Green | |||
| {{n/a}} | |||
| {{n/a}} | |||
| {{n/a}} | |||
|- | |||
! B (near the curve on the bottom island) | |||
| Black Swallowtail | |||
| {{n/a}} | |||
| {{n/a}} | |||
| {{n/a}} | |||
|- | |||
! C (at the fork in the past on the west island) | |||
| Yamamoto Dragonfly | |||
| {{n/a}} | |||
| {{n/a}} | |||
| {{n/a}} | |||
|- | |||
! D (north of where saul was standing, around a tree) | |||
| Golden Dragonfly | |||
| {{n/a}} | |||
| {{n/a}} | |||
| {{n/a}} | |||
|- | |||
! E (south of the middle snake) | |||
| {{n/a}} | |||
| Vivid Green | |||
| {{n/a}} | |||
| {{n/a}} | |||
|- | |||
! F (near a tree in the south of the west island) | |||
| {{n/a}} | |||
| Yamamoto Dragonfly | |||
| {{n/a}} | |||
| Vivid Green | |||
|- | |||
! G (north from the bear, opposite the Hot Spring) | |||
| {{n/a}} | |||
| Giant Birdwing | |||
| {{n/a}} | |||
| {{n/a}} | |||
|- | |||
! H (north of the entrance to North Pawville) | |||
| {{n/a}} | |||
| Monarch | |||
| {{n/a}} | |||
| {{n/a}} | |||
|- | |||
! I (near the logs in the south of the area) | |||
| {{n/a}} | |||
| {{n/a}} | |||
| Monarch | |||
| Golden-Ringed Dragonfly | |||
|- | |||
! J (to the west of the bridge to the Hot Spring) | |||
| {{n/a}} | |||
| {{n/a}} | |||
| Black Swallowtail | |||
| {{n/a}} | |||
|- | |||
! K (behind the middle snake) | |||
| {{n/a}} | |||
| {{n/a}} | |||
| Yamamoto Dragonfly | |||
| {{n/a}} | |||
|- | |||
! L (in-between areas A and I) | |||
| {{n/a}} | |||
| {{n/a}} | |||
| {{n/a}} | |||
| Black Swallowtail | |||
|- | |||
! M (at the end of the path in the North-East of the area) | |||
| {{n/a}} | |||
| {{n/a}} | |||
| {{n/a}} | |||
| Monarch | |||
|} | |||
===Tail Heights=== | ===Tail Heights=== | ||
{|{{prettytable|text center=1}} | |||
! Location !! Setup 1 !! Setup 2 !! Setup 3 | |||
|- | |||
! A (In the giraffe's valley) | |||
| Chestnut Tiger | |||
| {{n/a}} | |||
| {{n/a}} | |||
|- | |||
! B (North of the straight path from the village) | |||
| Pieridae | |||
| {{n/a}} | |||
| {{n/a}} | |||
|- | |||
! C (In front of the first boar) | |||
| {{n/a}} | |||
| Swallowtail | |||
| {{n/a}} | |||
|- | |||
! D (In front of the windmill) | |||
| {{n/a}} | |||
| Eggfly | |||
| {{n/a}} | |||
|- | |||
! E (Near the fishing pier) | |||
| {{n/a}} | |||
| {{n/a}} | |||
| Swallowtail | |||
|- | |||
! F (In the grassy area, near the path to the windmill) | |||
| {{n/a}} | |||
| {{n/a}} | |||
| Pieridae | |||
|} | |||
===Sky Heights=== | ===Sky Heights=== | ||
{|{{prettytable|text center=1}} | |||
! Location !! Setup 1 !! Setup 2 !! Setup 3 | |||
|- | |||
! A (in grass, east of first bog) | |||
| Camberwell Beauty | |||
| {{n/a}} | |||
| Common Brimstone | |||
|- | |||
! B (far east of Theophilus' house) | |||
| Common Brimstone | |||
| {{n/a}} | |||
| {{n/a}} | |||
|- | |||
! C (west of first bog, directly across from A) | |||
| {{n/a}} | |||
| Common Brimstone | |||
| {{n/a}} | |||
|- | |||
! D (directly east of Theophilus' house) | |||
| {{n/a}} | |||
| Camberwell Beauty | |||
| Rainbow Butterfly | |||
|} | |||
===Monolith Isle=== | ===Monolith Isle=== | ||
{|{{prettytable|text center=1}} | |||
! Location !! Setup 1 !! Setup 2 !! Setup 3 | |||
|- | |||
! A (on the path, north of the vultures) | |||
| Blue Moon Butterfly | |||
| {{n/a}} | |||
| {{n/a}} | |||
|- | |||
! B (west of the snake) | |||
| Great Orange Tip | |||
| Yuke Butterfly | |||
| {{n/a}} | |||
|- | |||
! C (far east of the island) | |||
| Eggfly | |||
| Great Orange Tip | |||
| {{n/a}} | |||
|- | |||
! D (near warpstone) | |||
| {{n/a}} | |||
| Eggfly | |||
| {{n/a}} | |||
|- | |||
! E (directly north of A) | |||
| {{n/a}} | |||
| Red Butterfly | |||
| {{n/a}} | |||
|- | |||
! F (south of C) | |||
| {{n/a}} | |||
| {{n/a}} | |||
| Blue Moon Butterfly | |||
|- | |||
! G (east of the catchable kiwis) | |||
| {{n/a}} | |||
| {{n/a}} | |||
| Red Butterfly | |||
|} | |||
===Bubble Cave=== | ===Bubble Cave=== | ||
=== | ===Crystal Caverns=== | ||
=== | ===Lonesome Park=== | ||
=== | ===Gongoro Peak=== | ||
{| class="wikitable" | |||
|- | |||
! '''Location''' !! '''Setup A''' !! '''Setup B''' !! '''Setup C''' | |||
|- | |||
| '''1 (Off the path, to the left, bottom right of the map)''' || Chestnut Tiger || N/A || N/A | |||
|- | |||
| '''2 (Top center of the map, path to the left of the snake to the left, before where you find Bartholomew) || Pieridae''' || N/A || N/A | |||
|- | |||
| '''3 (Center right of the map, after both snakes, hidden behind a 4-paw stone, in clearing with two treasure chests)''' || Purple Spotted Swallowtail || Camberwell Beauty || N/A | |||
|- | |||
| '''4 (Bottom left of the map, past the chicks, below the black chickens)''' || N/A || N/A || Chestnut Tiger | |||
|- | |||
| '''5 (Center of the lower part, in the middle of the bulls)''' || N/A || Chestnut Tiger || Camberwell Beauty | |||
|- | |||
| '''6 (Above the area with the warp stone and the buildings, go out of the path, up and to the right, to the right of the bull)''' || N/A || N/A || Pieridae | |||
|} | |||
===Zoo=== | |||
The zoo is different to other levels, as it has two bug setups. | |||
{|{{prettytable|text center=1}} | |||
! Location !! Setup 1 !! Setup 2 | |||
|- | |||
! A (in front of the area where the vulture, gorilla, and buffalo are located) | |||
| Scarce Swallowtail | |||
| {{n/a}} | |||
|- | |||
! B (between where the bear and penguin are located) | |||
| {{n/a}} | |||
| Rainbow butterfly | |||
|- | |||
! C (in front of the lion) | |||
| {{n/a}} | |||
| Morpho | |||
|- | |||
! D (between the boar and elephant) | |||
| Scarce Swallowtail | |||
| {{n/a}} | |||
|} | |||
==Mistakes in the Magic Encyclopedia== | |||
1. The Magic Encyclopedia says that the Yuke Butterfly is caught on Monolith Isle. It is actually caught in Bubble Cave. | |||
{{Footer Nav|game=Petz: Dogz 2 and Catz 2|prevpage= | {{Footer Nav|game=Petz: Dogz 2 and Catz 2|prevpage=Items|nextpage=Fish}} | ||
Latest revision as of 14:33, 19 September 2022

In Dogz and Catz, while looking for requested items, you will find many butterflies and other bugs. Once you have caught them, you can go to Clara and release them into the flowerbeds (note that if there is already a bug there it will be replaced by the next one you put in) or take them to Tom at the Pawn Shop and sell them. Some bugs are rarer than others, and when you hit a milestone of different bugs you can have, you will get a new colour of Kimono (a coat which you can wear).
How to catch bugs[edit]
To catch a bug, first you must have received the bug cage from Victor. Then, go up to one and press ![]() when 'catch insect' appears at the bottom of the screen. Then, a metre will appear with a net over it. There will also be a yellow bar moving around, indicating the bug. When the bar is completely under the net, press
when 'catch insect' appears at the bottom of the screen. Then, a metre will appear with a net over it. There will also be a yellow bar moving around, indicating the bug. When the bar is completely under the net, press ![]() . A picture of the button will also appear above the metre when you can catch the bug. If you sucsessfullly caught it, it gets put in your inventory.
. A picture of the button will also appear above the metre when you can catch the bug. If you sucsessfullly caught it, it gets put in your inventory.
-
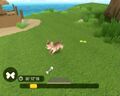
Wait until the yellow bar is under the net...
-
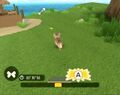
Press
 ...
...
-

Then you catch the bug...
-
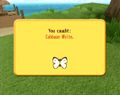
And it goes into your inventory


Bug List[edit]
You can find a list of bugs in the Magic Encyclopedia, once it has been given to you, under Memo in the pause menu. There are 35 bugs altogether.
| Page 1 | ||||
|---|---|---|---|---|

|

|

|

|

|

|

|

|

|

|
| Page 2 | ||||
|---|---|---|---|---|

|

|

|
File:DogIsland Red Butterfly.png | 
|

|

|

|

|

|
| Page 3 | ||||
|---|---|---|---|---|

|

|

|

|
Scarce Swallowtail |
| File:DogIsland Vivid Green.png | Camberwell Beauty |
Eggfly | File:DogIsland Gold Butterfly.png | File:DogIsland Silver Butterfly.png |
| Page 4 | ||||
|---|---|---|---|---|
| File:DogIsland Yuke Butterfly.png | File:DogIsland Rainbow Butterfly.png | File:DogIsland Golden Dragonfly.png | 
|

|
Bugs[edit]
| Name | Cabbage White | Oriental Clouded Yellow | Green Banded Swallowtail |
| Location | |||
| Name | Swallowtail | Chestnut Tiger | Pieridae |
| Location | |||
| Name | Black Swallowtail | Blue Moon Butterfly | Common Brimstone |
| Location | |||
| Name | Purple Spotted Swallowtail | Giant Birdwing | Morpho |
| Location | |||
| Name | Great Orange Tip | Red Butterfly | Magellan Birdwing |
| Location | |||
| Name | Monarch | Damselfly | Common Skimmer |
| Location | |||
| Name | Red Dragonfly | Golden-Ringed Dragonfly | Skimmer |
| Location | |||
| Name | Common Hawker | Yamamoto Dragonfly | Relic Dragonfly |
| Location | |||
| Name | Scarce Swallowtail | Vivid Green | Camberwell Beauty |
| Location | |||
| Name | Eggfly | Golden Butterfly | Silver Butterfly |
| Location | |||
| Name | Yuke Butterfly | Rainbow Butterfly | Golden Dragonfly |
| Location | |||
| Name | Bell Cricket | Cricket | |
| Location |
Times of the Day[edit]
Bugs stay in the same place, throughout the day and night. If you catch all the bugs in the area, the only way to make them reappear is to re-enter the area or trigger a cut-scene.
Bug Setups[edit]
When you enter a level, a setup is randomly selected. This means that if you find a bug in one place, you may be able to work out where other bugs will appear.
Where to find Bugs[edit]
Dolphin Coast[edit]

| Location | Setup 1 | Setup 2 | Setup 3 |
|---|---|---|---|
| A | Cabbage White | N/A | Cabbage White |
| B | Cricket | N/A | N/A |
| C | N/A | Cabbage White | Cricket |
| D | N/A | Swallowtail | N/A |
| E | Swallowtail | N/A | N/A |
| F | Golden-Ringed Dragonfly | N/A | N/A |
Jade Fields[edit]
| Location | Setup 1 | Setup 2 | Setup 3 |
|---|---|---|---|
| A (Across the first bridge, near a tree) | Bell Cricket | Scarce Swallowtail | Cabbage White |
| B (Behind a snake on the west of the area) | Gren Banded Swallowtail | N/A | N/A |
| C (South of the entrance to Lonesome Park) | Red Dragonfly | N/A | N/A |
| D (West of a boulder in the north of the area) | Scarce Swallowtail | N/A | N/A |
| E (In front of the southest bear) | Common Skimmer | N/A | N/A |
| F (near where you found the Chamomile) | N/A | Common Skimmer | N/A |
| G (on the corner of the path, east of the yellow snake) | N/A | Cabbage White | N/A |
| H (east of the cliff) | N/A | Green Banded Swallowtail | Scarce Swallowtail |
| I (west of the entrance to Lonesome Park) | N/A | Bell Cricket | N/A |
| J (west of the yellow snake) | N/A | N/A | Green Banded Swallowtail |
| K (near a dark green snake in the east of the area) | N/A | N/A | Red Dragonfly |
| L (in front of the northest bear) | N/A | N/A | Common Skimmer |
Lappy Lake[edit]
| Location | Setup 1 | Setup 2 | Setup 3 |
|---|---|---|---|
| A (On the south island near the entrance to South Pawville) | Oriental Clouded Yellow | N/A | N/A |
| B (To the north of the middle island) | Damselfly | N/A | N/A |
| C (The sandy part of the island in the northwest of the lake, leading to Tail Heights) | N/A | Skimmer | N/A |
| D (the north of the island in the southwest of the lake) | N/A | Cricket | N/A |
| E (the south of the middle island) | N/A | Damselfly | Damselfly |
| F (In the gress near area C) | N/A | N/A | Cricket |
| G (The Northest island) | N/A | N/A | Oriental Clouded Yellow |
Whisker Woods[edit]
Whisker Woods is different to other levels, as it has four bug setups.
| Location | Setup 1 | Setup 2 | Setup 3 | Setup 4 |
|---|---|---|---|---|
| A (slightly south and east of the south west bridge) | Vivid Green | N/A | N/A | N/A |
| B (near the curve on the bottom island) | Black Swallowtail | N/A | N/A | N/A |
| C (at the fork in the past on the west island) | Yamamoto Dragonfly | N/A | N/A | N/A |
| D (north of where saul was standing, around a tree) | Golden Dragonfly | N/A | N/A | N/A |
| E (south of the middle snake) | N/A | Vivid Green | N/A | N/A |
| F (near a tree in the south of the west island) | N/A | Yamamoto Dragonfly | N/A | Vivid Green |
| G (north from the bear, opposite the Hot Spring) | N/A | Giant Birdwing | N/A | N/A |
| H (north of the entrance to North Pawville) | N/A | Monarch | N/A | N/A |
| I (near the logs in the south of the area) | N/A | N/A | Monarch | Golden-Ringed Dragonfly |
| J (to the west of the bridge to the Hot Spring) | N/A | N/A | Black Swallowtail | N/A |
| K (behind the middle snake) | N/A | N/A | Yamamoto Dragonfly | N/A |
| L (in-between areas A and I) | N/A | N/A | N/A | Black Swallowtail |
| M (at the end of the path in the North-East of the area) | N/A | N/A | N/A | Monarch |
Tail Heights[edit]
| Location | Setup 1 | Setup 2 | Setup 3 |
|---|---|---|---|
| A (In the giraffe's valley) | Chestnut Tiger | N/A | N/A |
| B (North of the straight path from the village) | Pieridae | N/A | N/A |
| C (In front of the first boar) | N/A | Swallowtail | N/A |
| D (In front of the windmill) | N/A | Eggfly | N/A |
| E (Near the fishing pier) | N/A | N/A | Swallowtail |
| F (In the grassy area, near the path to the windmill) | N/A | N/A | Pieridae |
Sky Heights[edit]
| Location | Setup 1 | Setup 2 | Setup 3 |
|---|---|---|---|
| A (in grass, east of first bog) | Camberwell Beauty | N/A | Common Brimstone |
| B (far east of Theophilus' house) | Common Brimstone | N/A | N/A |
| C (west of first bog, directly across from A) | N/A | Common Brimstone | N/A |
| D (directly east of Theophilus' house) | N/A | Camberwell Beauty | Rainbow Butterfly |
Monolith Isle[edit]
| Location | Setup 1 | Setup 2 | Setup 3 |
|---|---|---|---|
| A (on the path, north of the vultures) | Blue Moon Butterfly | N/A | N/A |
| B (west of the snake) | Great Orange Tip | Yuke Butterfly | N/A |
| C (far east of the island) | Eggfly | Great Orange Tip | N/A |
| D (near warpstone) | N/A | Eggfly | N/A |
| E (directly north of A) | N/A | Red Butterfly | N/A |
| F (south of C) | N/A | N/A | Blue Moon Butterfly |
| G (east of the catchable kiwis) | N/A | N/A | Red Butterfly |
Bubble Cave[edit]
Crystal Caverns[edit]
Lonesome Park[edit]
Gongoro Peak[edit]
| Location | Setup A | Setup B | Setup C |
|---|---|---|---|
| 1 (Off the path, to the left, bottom right of the map) | Chestnut Tiger | N/A | N/A |
| 2 (Top center of the map, path to the left of the snake to the left, before where you find Bartholomew) | Pieridae | N/A | N/A |
| 3 (Center right of the map, after both snakes, hidden behind a 4-paw stone, in clearing with two treasure chests) | Purple Spotted Swallowtail | Camberwell Beauty | N/A |
| 4 (Bottom left of the map, past the chicks, below the black chickens) | N/A | N/A | Chestnut Tiger |
| 5 (Center of the lower part, in the middle of the bulls) | N/A | Chestnut Tiger | Camberwell Beauty |
| 6 (Above the area with the warp stone and the buildings, go out of the path, up and to the right, to the right of the bull) | N/A | N/A | Pieridae |
Zoo[edit]
The zoo is different to other levels, as it has two bug setups.
| Location | Setup 1 | Setup 2 |
|---|---|---|
| A (in front of the area where the vulture, gorilla, and buffalo are located) | Scarce Swallowtail | N/A |
| B (between where the bear and penguin are located) | N/A | Rainbow butterfly |
| C (in front of the lion) | N/A | Morpho |
| D (between the boar and elephant) | Scarce Swallowtail | N/A |
Mistakes in the Magic Encyclopedia[edit]
1. The Magic Encyclopedia says that the Yuke Butterfly is caught on Monolith Isle. It is actually caught in Bubble Cave.