Call of Duty 2/HUD
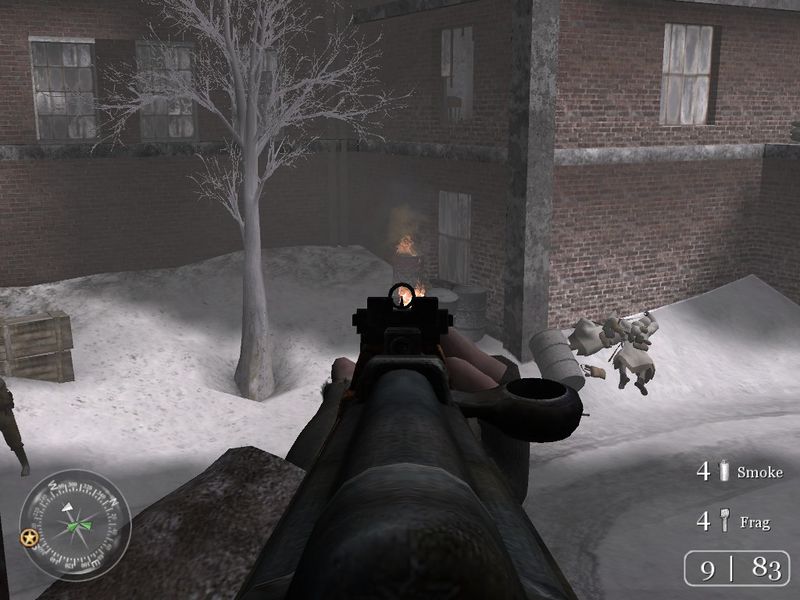
Screenshot One
Compass
On the bottom left of the picture is the compass. As well as giving you directions you'll see green triangles and red circles. The green triangles represent your team mates and the direction of the pointy end of the triangle is the direction in which they're facing. The red circles represent your enemies, but only if you can see them or they're firing. If an enemy is behind a crate or another obstacle and is not firing or creating any noise, then it won't be shown on the compass. The star on the compass represents the direction of your objective. So if the objective is to blow up a tank, then the tank is in the direction of the star. If the objective is to secure a building, then the direction of the building you need to secure is shown by the star.
Ammo Gauge
On the bottom right is the ammo gauge. It is split into two halves, the left tells you how many bullets have been loaded into the gun, the right half tells you how many bullets you have left. By walking over guns you will pick up ammo if that gun is the same as the one you're holding.
Grenade Gauge
Slightly above the ammo gauge but still in the bottom left corner is the grenade gauge. On the top it shows how many smoke grenades you have, on the bottom it shows how many frag grenades you have. You can only ever carry 4 of each grenade at the same time, but the number gets renewed every time you complete a mission. Occasionally, you will also see bags near fallen enemies that contain Stielhandgranate ammo.
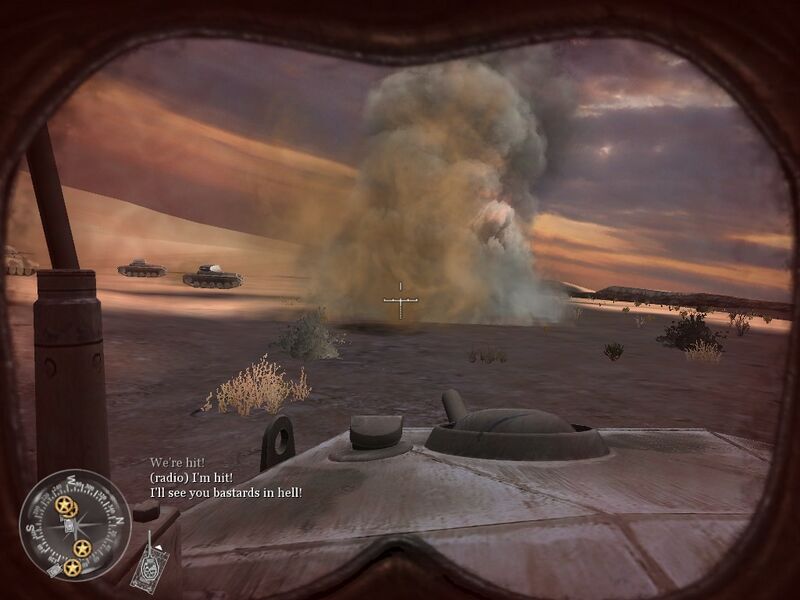
Screenshot Two
Crosshair
Although this is an image of the view out of a tank, the picture has the crosshair. When your weapons do not have your sights aimed down, a crosshair will also appear in the middle of the screen. Use the crosshair to aim more precisely and it'll always show you where your bullet is going to. If the crosshair turns red, it means it's over an ememy. Use this to your advantage when you can't see your enemy.
Tank Icon
On the mission "The Tank Squadrons" only, to the left of the compass is the tank icon. It basically shows what direction you're tank is going in and what way the barrel is pointing in relation to the tank.
Other Indicators
Text
In the top left corner there'll occasionally be messages like "Objective complete" or "Checkpoint reached". Once an objective has been completed you'll also see details of the new one in this area of the screen too. In the middle of the screen at the start of every mission only they'll be details of the mission (name/place/date). You may also see dialogue from your allies.
Grenade Indicator
This will point to wherever a grenade is. If you see one of these then it means the grenade could potentially kill you. You could throw the grenade back, run in the opposite direction of where it's pointing, or hide between crates/walls/drums etc.
Damage Indicator
When hit, a red arrow shows the direction of the soldier who hit you. If you are hit repeatedly, your screen will turn red and you will be able to listen to your heart beating and heavy panting. If this happens, you are seriously hurt and need to take cover to replenish your health.


