(→Brecconary: note about Repel) |
m (→Kol: moving {{-}} up a bit) |
||
| Line 5: | Line 5: | ||
There are two locked doors in Kol. To unlock one of them would be a terrible waste since you can freely access the other side. However, if you use a key to talk with the man behind the second door, he will ask you if you found the flute. If you say no, he'll tell you that the man he owns it left for Rimuldar. If you respond positively, he will tell you to head to Cantlin, a town you have yet to visit. But what is the purpose of this mysterious flute? One warrior in town lets you know that Golem is afraid of the music of the flute. Although, you have never encountered a Golem before. | There are two locked doors in Kol. To unlock one of them would be a terrible waste since you can freely access the other side. However, if you use a key to talk with the man behind the second door, he will ask you if you found the flute. If you say no, he'll tell you that the man he owns it left for Rimuldar. If you respond positively, he will tell you to head to Cantlin, a town you have yet to visit. But what is the purpose of this mysterious flute? One warrior in town lets you know that Golem is afraid of the music of the flute. Although, you have never encountered a Golem before. | ||
{{spoiler|title=A lost item in the grass|content=[[Image:DW1_Snap_Flute.png|thumb|right|Searching the grass south of the bath]] | {{spoiler|title=A lost item in the grass|content=[[Image:DW1_Snap_Flute.png|thumb|right|Searching the grass south of the bath]] | ||
If you used a Magic Key in Rimuldar to speak with the man in the Inn, he will have told you to search a location exactly four squares south of the bath. Should you happen to search in the location depicted in the image to the right, you will indeed find an item: the Fairy Flute. | If you used a Magic Key in Rimuldar to speak with the man in the Inn, he will have told you to search a location exactly four squares south of the bath. Should you happen to search in the location depicted in the image to the right, you will indeed find an item: the Fairy Flute. | ||
{{-}} | {{-}} | ||
}} | |||
== Brecconary == | == Brecconary == | ||
There is one locked door in the town of Brecconary. If you decide to open the door to the building in the north east corner of town, you will find a shop tended by a woman. If you talk to her across the counter, she will offer Fairy Water to you for the price of 38 gold. Fairy Water has the effect of scaring many of the weaker monsters like Slimes and Drakees away from you as you wander across Alefgard. This can spare you the constant interruption of incredibly easy battles that yield little experience and gold. However, you will earn the ability to tap into this power through the spell of Repel when you reach level 15, so Fairy Water may not be a worthwhile investment. Unfortunately, if you leave the town and come back, the door will be closed again, so buy a lot of Fairy Waters in advance if you intend to use them. | There is one locked door in the town of Brecconary. If you decide to open the door to the building in the north east corner of town, you will find a shop tended by a woman. If you talk to her across the counter, she will offer Fairy Water to you for the price of 38 gold. Fairy Water has the effect of scaring many of the weaker monsters like Slimes and Drakees away from you as you wander across Alefgard. This can spare you the constant interruption of incredibly easy battles that yield little experience and gold. However, you will earn the ability to tap into this power through the spell of Repel when you reach level 15, so Fairy Water may not be a worthwhile investment. Unfortunately, if you leave the town and come back, the door will be closed again, so buy a lot of Fairy Waters in advance if you intend to use them. | ||
Revision as of 19:07, 26 January 2008
This section of the guide contains a number of secrets about the game that you should attempt to find for yourself before you read any further. Now that you have access to Magic Keys through Rimuldar, you can explore more portions of the places that you have already visited like Tantegel Castle and Garinham Town. Take your time to explore those regions thoroughly, and use this page if you get stuck.
Kol
There are two locked doors in Kol. To unlock one of them would be a terrible waste since you can freely access the other side. However, if you use a key to talk with the man behind the second door, he will ask you if you found the flute. If you say no, he'll tell you that the man he owns it left for Rimuldar. If you respond positively, he will tell you to head to Cantlin, a town you have yet to visit. But what is the purpose of this mysterious flute? One warrior in town lets you know that Golem is afraid of the music of the flute. Although, you have never encountered a Golem before.

If you used a Magic Key in Rimuldar to speak with the man in the Inn, he will have told you to search a location exactly four squares south of the bath. Should you happen to search in the location depicted in the image to the right, you will indeed find an item: the Fairy Flute.
Brecconary
There is one locked door in the town of Brecconary. If you decide to open the door to the building in the north east corner of town, you will find a shop tended by a woman. If you talk to her across the counter, she will offer Fairy Water to you for the price of 38 gold. Fairy Water has the effect of scaring many of the weaker monsters like Slimes and Drakees away from you as you wander across Alefgard. This can spare you the constant interruption of incredibly easy battles that yield little experience and gold. However, you will earn the ability to tap into this power through the spell of Repel when you reach level 15, so Fairy Water may not be a worthwhile investment. Unfortunately, if you leave the town and come back, the door will be closed again, so buy a lot of Fairy Waters in advance if you intend to use them.
Tantegel
There are two doors to unlock in Tantegel Castle. One opens a treasure room, where the guard inside will admonish you for taking what isn't yours. All that you will find is barely enough gold to make up for the cost of the key that you just wasted. Save it for the door that is around the back portion of the castle. Enter inside and you will find a number of people. One man mentions that he can't find the entrance to the castle cellar. Surely it must be nearby. Another guard stands outside of a room that has an especially dangerous type of floor tile. Walking across that tile with anything but the strongest armor will cost you a number of hit points, but you should be able to survive one journey across and heal yourself. The man on the opposite side says something of interest: You must push against a wall of darkness to find the grave of Garin in Garinham. Remember that and proceed back across. Heading north a bit, you will find an outdoor shop selling, of all things, Keys! However, at 85 gold per key, they will set you back a bit more than in Rimuldar. Still, it's easier to stock up here than travel all the way east again. You've looked everywhere, and yet, there's still no sign of a cellar entrance.

The cellar is there alright, but it is in a very unlikely location. Remember how you had to travel just outside of the moat in Rimuldar to locate the entrance to the key shop? You'll need to do something very similar. The girl standing to the right of the Tantegel key shop tells you about the legend of the Rainbow Bridge. You can walk around her and down the side of the castle. Eventually, you will hit water. Be brave and travel just one more square to the right, and you can continue around the body of water where you will find the stairwell entrance to the cellar. A man inside will greet you happily and invite you to take the contents of the chest behind him: The Stones of Sunlight.
Garinham
Now that you have keys, you can finally explore that large building that occupies the north portion of Garinham. Stepping inside, you will find a number of people, as well as another odd site: a wall of darkness. Talking to the people inside, you will learn a few things: Edrick's Armor has been hidden, and there used to be a town to the south known as Hauksness. Do not waste a key on the door within the building as you will only encounter two bickering guards. The few treasure chests on the floor offer an herb, a torch, and a bit of gold. But is this all there is to this mysterious building?

If you braved the dangerous tiles that were on the other side of the door in Tantegel Castle, you would have spoken to a warrior on the other side who suggests that you push against the wall of darkness. There are no real visual indications of precisely where to look, so you must push against every square on the wall. Eventually, you will find an opening that was hidden from view. The opening leads to a path behind the building. As you follow it, you will come to a man who warns you of the evil of the Harp, but you can't afford to ignore it. Use the staircase to enter the Grave of Garin.
The Grave of Garin
In addition to any keys that you used to reach the grave, you will also need one more to proceed all the way to it depths. Keep a high MP count as well, as you will need the spell of Radiant quite a lot. It's far more useful for navigating dark corridors than a torch. It is highly recommended that you wait until at least level 12 before entering the grave so that you can make use of the Outside spell if you are in danger of dying. However, Outside requires 6MP to use, so if that's what you're down to, use it and rest up at an Inn. If you are at level 12, with Full Plate (or better yet, Magic Armor) and a Broad Sword, you'll be in good shape here.
Floor 1

Enemies that you encounter here:
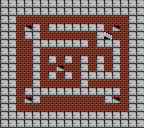
Floor one is quite expansive, with a number of twisting and criss-crossing corridors. There are three treasure chests stored in an alcove to the north, containing an herb and scant amounts of gold. The real goal is to reach the locked door in the bottom right corner. Unlocking that door with a key will allow you to travel along the souther branch of the floor to the staircase that leads to floor 2. Don't worry, the door will stay unlocked as long as you remain in the dungeon. However, if you leave, you'll need to bring another key with you.
Floor 2

Enemies that you encounter here:
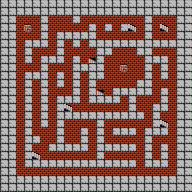
Floor 2 consists of an arrangement of five downward staircases, arranged in each corner as well as the center. The northeast and center stairwells lead to dead ends. The northwest and southeast stairwells lead to corridors that connect to one another. The only stairwell that allows you to progress deeper into the grave is the one in the southwest corner.
Floors 3 and 4


Enemies that you encounter here:
Of the enemies present down here, the Wraith Knight is the most fearsome. With a strong sword arm and the ability to heal itself, fights may last a little longer than you wish. Wolflords can be put to sleep, but Specters like to Sleep you, so be ready with a Stopspell unless you're confident that you can kill them quickly.
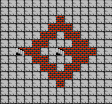
As mentioned above, if you took the northeast or center stairwell, you will find yourself in a dead-end. If you took the southeast or northwest stairwell, you will find yourself traveling most of the outer edge of this floor. From here, you can access a single treasure chest: the Curse Belt. Whatever you do, do not inspect the belt in your inventory. It will wrap itself around you and weaken you if you do. Then the only way to remove it is to visit the curse-breaker in Brecconary Town. The belt will sell for a worthwhile 180 gold. The only way to reach Floor 4 is to take the southwest stairwell from Floor 2 and follow the north path to stairs that lead down. Floor 4 is very small, and leads you to a rising set of stairs. Climb them, and you will reach the chamber containing the Silver Harp. Now you may cast Outside to leave the grave, or simply work your way back to the top for the extra battle experience.
Now that you have the Silver Harp, there are two things you can do with it. One is to use it in any outdoor or dungeon location. It will instantly summon a monster to the spot and you will be forced to fight it. This is fine if you're healthy and want to earn experience points. However, to use it for it's true purpose, you must fulfill your end of the bargain with the man in the Kol Shrine. He will trade the Harp for the contents of chest behind him, which happens to be the Staff of Rain.

