m (→Robot Master) |
(revamped) |
||
| Line 1: | Line 1: | ||
{{Header Nav|game=Mega Man 2}} | {{Header Nav|game=Mega Man 2}} | ||
[[ | [[File:Mega Man 2 portrait Flash Man.png|right]] | ||
Flash Man's stage is among the shortest in the game. The process of stopping time involves reducing the temperature to as close to zero degrees Kelvin as possible. As a result, the surfaces in the stage are frozen over and extremely slippery. To avoid sliding out of control, simply jump to stop Mega Man from sliding. Certain walls in the stage were constructed out of a material that is vulnerable to the explosions created by the Crash Bomb. If you defeated {{~|Crash Man}} already, you can use the bombs to create shortcuts by making holes in the walls. | |||
''' | == Stage == | ||
[[File:Mega Man 2 map Flash Man A.png]] | |||
[[ | * '''A''': Use the short enemy-free beginning to get used to walking on the slippery floors. The stage begins to branch into a small maze at point A on the map. If you don't have Crash Bombs, you're better off staying along the bottom path since any other path will force you to double back around. If you stand just the right distance from Shotman, his bullets will actually arc right over Mega Man's head. | ||
[[File:Mega Man 2 map Flash Man B.png|right]] | |||
{{-}} | |||
[[File:Mega Man 2 map Flash Man C.png|right]] | |||
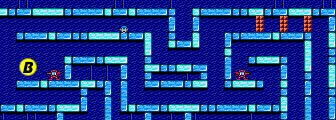
* '''B''': After removing the Shotman on this platform, consider using Transport Item 1 (if you have it) to rise up to the higher platform and collect the extra life stored there. Once again, unless you have Crash Bombs, you will be forced to take the lower path and take on one more Shotman. For the price of three Crash Bombs, the upper path lets you bypass a few enemies in the vertical portion of the stage, but nothing so terrible that you can't overcome the danger. | |||
* '''C''': Assuming you took the lower path to the vertical portion, you will have to contend with a Sniper Armor. It's usually quicker to take damage and run past the armor while you're invulnerable than to stand around and try to fight it. Just remember to get shot instead of getting stomped on or you'll take more damage than necessary. Once you drop off the platform, you can hug to the right as you fall to enter into the right channel and bypass some enemies, or fall straight down to face another Shotman. Be aware that falling down the right channel will ultimately send you through a passage containing Scworms unless you have Crash Bombs and can open a passage to avoid them. | |||
<br/><br/><br/><br/><br/><br/><br/><br/><br/> | |||
* '''D''': It's decision time again. If you take the right path, you will eventually end up in a corner of a room containing a large health capsule. But you will also be forced to contend with another Sniper Armor. If you take the left path, you'll have a bit more control over your fate. You can still get the health, or you can avoid the Sniper Armor. Most importantly, if you wish to collect another E-Tank, fall down the chute just behind the Sniper Armor, and not the chute on the far left. | |||
{{-}} | {{-}} | ||
== | [[File:Mega Man 2 map Flash Man D.png]] | ||
[[ | * '''E''': Assuming you took the correct chute and landed here, you can bypass at least two of the three Sniper Armor battles by sticking to the path along the top. In the middle, you must carefully hop from one small block to the next in order to reach the other side where an E-Tank is waiting. If you fall off the platforms before you reach the E-Tank, you can try to return with the aid of Transport Item 1. From the E-Tank, you can either blast a hole in the wall to the right with a Crash Bomb, or you must drop to the floor and deal with the last Sniper Armor. However, this Sniper Armor can be avoided as well if you stand on the floor beneath the ledge it stands on, and lure it far enough to the left. Then run below the ledge to the right and the Sniper Armor should not be able to keep up with you. | ||
==Flash Man == | |||
[[File:Mega Man 2 boss Flash Man.png|left]] [[File:Mega Man 2 battle Flash Man.png|right]] | |||
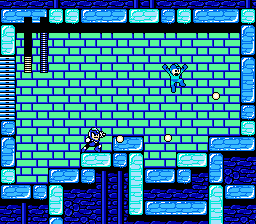
In addition to the slippery surface of the floor, Flash Man's lair has the distinction of being particularly uneven. This gives him an advantage due to the fact that it's much harder to jump over him than it would be if the floor were level. Flash Man runs back and forth in his room, occasionally stopping to freeze time. When he does this, Mega Man is rendered helpless while Flash Man sprays the room with his rapid-fire gun. Your only hope of escaping this attack is if Mega Man managed to jump high enough in the air to avoid Flash Man's bullets. You'll have to get all of your attacks in while time is flowing normally. Once Flash Man is defeated, you will earn the ability to use his Time Stopper weapon, as well as the third Transport Item, the wall climber. | |||
' | {{spoiler|title=Flash Man's weakness|content=Flash Man has two weaknesses although one is more practical than the other. Flash Man is weak to the Crash Bomb and the Metal Blade. But the fact is the Metal Blade does more damage to Flash Man than the Crash Bomb. On top of this, you can fire many more Metal Blades before you run out of energy than you can Crash Bombs (only seven), and you can aim the Metal Blades in eight different directions. In fact, on the Difficult setting, you are likely to run out of Crash Bombs before Flash Man is even defeated, and that's assuming you didn't use any Bombs to break holes in the walls. As a result, the use of Metal Blades is highly recommended over Crash Bombs.}} | ||
{{Footer Nav|game=Mega Man 2|prevpage=Crash Man|nextpage=Quick Man}} | {{Footer Nav|game=Mega Man 2|prevpage=Crash Man|nextpage=Quick Man}} | ||
Revision as of 04:40, 16 December 2015

Flash Man's stage is among the shortest in the game. The process of stopping time involves reducing the temperature to as close to zero degrees Kelvin as possible. As a result, the surfaces in the stage are frozen over and extremely slippery. To avoid sliding out of control, simply jump to stop Mega Man from sliding. Certain walls in the stage were constructed out of a material that is vulnerable to the explosions created by the Crash Bomb. If you defeated Template:~ already, you can use the bombs to create shortcuts by making holes in the walls.
Stage
- A: Use the short enemy-free beginning to get used to walking on the slippery floors. The stage begins to branch into a small maze at point A on the map. If you don't have Crash Bombs, you're better off staying along the bottom path since any other path will force you to double back around. If you stand just the right distance from Shotman, his bullets will actually arc right over Mega Man's head.


- B: After removing the Shotman on this platform, consider using Transport Item 1 (if you have it) to rise up to the higher platform and collect the extra life stored there. Once again, unless you have Crash Bombs, you will be forced to take the lower path and take on one more Shotman. For the price of three Crash Bombs, the upper path lets you bypass a few enemies in the vertical portion of the stage, but nothing so terrible that you can't overcome the danger.
- C: Assuming you took the lower path to the vertical portion, you will have to contend with a Sniper Armor. It's usually quicker to take damage and run past the armor while you're invulnerable than to stand around and try to fight it. Just remember to get shot instead of getting stomped on or you'll take more damage than necessary. Once you drop off the platform, you can hug to the right as you fall to enter into the right channel and bypass some enemies, or fall straight down to face another Shotman. Be aware that falling down the right channel will ultimately send you through a passage containing Scworms unless you have Crash Bombs and can open a passage to avoid them.
- D: It's decision time again. If you take the right path, you will eventually end up in a corner of a room containing a large health capsule. But you will also be forced to contend with another Sniper Armor. If you take the left path, you'll have a bit more control over your fate. You can still get the health, or you can avoid the Sniper Armor. Most importantly, if you wish to collect another E-Tank, fall down the chute just behind the Sniper Armor, and not the chute on the far left.
- E: Assuming you took the correct chute and landed here, you can bypass at least two of the three Sniper Armor battles by sticking to the path along the top. In the middle, you must carefully hop from one small block to the next in order to reach the other side where an E-Tank is waiting. If you fall off the platforms before you reach the E-Tank, you can try to return with the aid of Transport Item 1. From the E-Tank, you can either blast a hole in the wall to the right with a Crash Bomb, or you must drop to the floor and deal with the last Sniper Armor. However, this Sniper Armor can be avoided as well if you stand on the floor beneath the ledge it stands on, and lure it far enough to the left. Then run below the ledge to the right and the Sniper Armor should not be able to keep up with you.
Flash Man


In addition to the slippery surface of the floor, Flash Man's lair has the distinction of being particularly uneven. This gives him an advantage due to the fact that it's much harder to jump over him than it would be if the floor were level. Flash Man runs back and forth in his room, occasionally stopping to freeze time. When he does this, Mega Man is rendered helpless while Flash Man sprays the room with his rapid-fire gun. Your only hope of escaping this attack is if Mega Man managed to jump high enough in the air to avoid Flash Man's bullets. You'll have to get all of your attacks in while time is flowing normally. Once Flash Man is defeated, you will earn the ability to use his Time Stopper weapon, as well as the third Transport Item, the wall climber.
Flash Man has two weaknesses although one is more practical than the other. Flash Man is weak to the Crash Bomb and the Metal Blade. But the fact is the Metal Blade does more damage to Flash Man than the Crash Bomb. On top of this, you can fire many more Metal Blades before you run out of energy than you can Crash Bombs (only seven), and you can aim the Metal Blades in eight different directions. In fact, on the Difficult setting, you are likely to run out of Crash Bombs before Flash Man is even defeated, and that's assuming you didn't use any Bombs to break holes in the walls. As a result, the use of Metal Blades is highly recommended over Crash Bombs.

