Jump to navigation
Jump to search
Notmyhandle (talk | contribs) (fixed link) |
Notmyhandle (talk | contribs) (→Dungeon Walkthrough: another fix, previewing this time) |
||
| Line 19: | Line 19: | ||
#To enter this dungeon, you must discover the secret to climbing to the top of the [[The Legend of Zelda/Overworld/Hyrule 3|Lost Hills]]. | #To enter this dungeon, you must discover the secret to climbing to the top of the [[The Legend of Zelda/Overworld/Hyrule 3|Lost Hills]]. | ||
#From the entrance, go right and clear this room to obtain a {{im/loz|Item|Key}}. You may bomb the top wall to expose a passage to the man with information about this dungeon's boss's weakness. | #From the entrance, go right and clear this room to obtain a {{im/loz|Item|Key}}. You may bomb the top wall to expose a passage to the man with information about this dungeon's boss's weakness. | ||
#Enter the room above the entrance and defeat the {{im/loz|Enemy|Gibdos}} for another {{im/loz|Item|Key}}. You may bomb the left wall to provide yourself with a shortcut to the left which bypasses the '''[[The Legend of Zelda/Bosses#Dodongos]]''' in step ??. | #Enter the room above the entrance and defeat the {{im/loz|Enemy|Gibdos}} for another {{im/loz|Item|Key}}. You may bomb the left wall to provide yourself with a shortcut to the left which bypasses the '''[[The Legend of Zelda/Bosses#Dodongos|Dodongos]]''' in step ??. | ||
#If you enter the room above, you must face three {{im/loz|Boss|Dodongos}}. Defeat them in the usual manner, either feeding them two bombs, or stunning them by exploding a bomb in their face. If you unlock the north door, you can obtain the dungeon's {{im/loz|Item|Map}}. | #If you enter the room above, you must face three {{im/loz|Boss|Dodongos}}. Defeat them in the usual manner, either feeding them two bombs, or stunning them by exploding a bomb in their face. If you unlock the north door, you can obtain the dungeon's {{im/loz|Item|Map}}. | ||
#From the Dodongo room, enter the left room, and obtain a {{im/loz|Item|Key}}. Then enter the room below and defeat the {{im/loz|Enemy|Gibdos}}. To access the room to the left, you must bomb the left wall. | #From the Dodongo room, enter the left room, and obtain a {{im/loz|Item|Key}}. Then enter the room below and defeat the {{im/loz|Enemy|Gibdos}}. To access the room to the left, you must bomb the left wall. | ||
Revision as of 01:42, 8 May 2014

Objectives
- Obtain the Whistle
 .
. - Expand your Bomb
 carrying capacity.
 - Defeat Digdogger
 .
. - Obtain a Heart Container
 .
. - Obtain the fifth Piece of Triforce
 .
.
Walkthrough
Advised Preparation
- Use the ladder to collect the Heart Container at D-2 in section 2.
- By now you should have twelve heart containers in total. Head to the cemetery, where at B-3, the Magical Sword
 can be found.
Dungeon Walkthrough
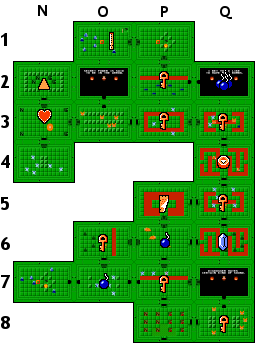
- To enter this dungeon, you must discover the secret to climbing to the top of the Lost Hills.
- From the entrance, go right and clear this room to obtain a Key
 . You may bomb the top wall to expose a passage to the man with information about this dungeon's boss's weakness.
 - Enter the room above the entrance and defeat the Gibdos
 for another Key . You may bomb the left wall to provide yourself with a shortcut to the left which bypasses the Dodongos in step ??.
 - If you enter the room above, you must face three Dodongos
 . Defeat them in the usual manner, either feeding them two bombs, or stunning them by exploding a bomb in their face. If you unlock the north door, you can obtain the dungeon's Map
  .
. - From the Dodongo room, enter the left room, and obtain a Key . Then enter the room below and defeat the Gibdos . To access the room to the left, you must bomb the left wall.
- Enter the left room and defeat all of the Darknuts
 . When the room is clear, push the leftmost block aside and enter the stairwell. Take the passage, and you will arrive in the right top most room of the dungeon.
 - From there, head left and defeat all of the Dodongos . When the room is clear, push the single block to reveal a stairwell that leads to the Whistle
 . Collect it and return to the right.
 - Now head to the room below, and collect a Key . Bomb the right wall to discover a passage to a room where a man will add four Bombs to your bomb storage capacity for 100 rupees.
- Return through the underground passage, and back to the room with three Dodongos.
- From the Dodongo room, head right, and then above to collect another Key . Head up again and defeat the Dodongos to discover the Compass
 .
. - From the compass room, head up and obtain a Key . Head left, and defeat the Gibdos to receive another Key .
- Head left once more and you'll encounter the Pols Voices
 . The top wall can be bombed to reveal a path to a man who is knowledgeable on the weakness of Pols Voice.
 - If you head left, you will encounter the boss. There is a room below the boss room that contains nothing but Gibdos .
Boss
- The boss is Digdogger . While large, Digdogger is invincible. You must collect the Whistle in this dungeon in order to defeat it. Blow the Whistle and it will shrivel up in to a tiny version of itself, which can be stabbed by your sword.
- Defeat it to earn a Heart Container . Continue on to the room above to obtain the fifth Piece of Triforce .
Resupply
Dungeon 5 is isolated, and as such, you may want to look at the supply points before heading to the dungeon.
- A woman selling Water of Life
 is 4 screens west and 1 screen south of the Lost Hills.