<div style="text-align:center">[[The Legend of Zelda/Underworld/Dungeon1|<< Dungeon 1]] | [[The Legend of Zelda/Underworld/Dungeon3|Dungeon 3 >>]]</div>
*'''Location''': The entrance to this dungeon is easily found at '''A-1''' of [[The Legend of Zelda/Overworld/Hyrule 2|section 2]]. Approach it from the area to the south. If you have the {{im/loz|Item|Power Bracelet}}, the closest [[The Legend of Zelda/SPG|Secret Passage]] is S4B2.
{{GFDL_Article}}
== Prerequisites ==
*None.
{{floatingtoc}}
<center>[[File:LOZ_Dungeon_2.png]]</center>
== Objectives ==
* Obtain the {{im/loz|Item|Magical Boomerang}}.
* Beat Dodongo.
* Obtain a {{im/loz|Item|Heart Container}}.
* Obtain the second {{im/loz|Item|Piece of Triforce}}.
== Dungeon Walkthrough ==
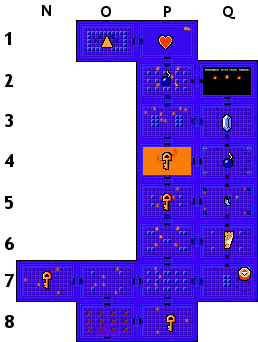
*'''Entrance room''': O8 (bottom left).
===Get the first key, the second key, then the compass===
*From the entrance room (O8), head north, then west, and pick up a key in room N7.
*From the first key, head east, then south to room P8. to collect the {{im/loz|Item|Compass}} in room Q7.
**The north wall of the compass room can be bombed. Head north to Q6.
===Get the map and the hint from the man===
*Go north of room P7, clear the Goriyas and go through the locked door to the right to reach the {{im/loz|Item|Map}} in room Q6.
*Bomb the north wall of the map room (Q6) and head north. Defeat the three blue Goriyas in room Q6 to obtain the {{im/loz|Item|Magical Boomerang}}. Be careful of the energy orbs fired from the statues in the four corners. Bomb the north wall and head through into room Q4.
*In room Q4, grab the bomb in the center of the room and ignore the keese. Bomb the north wall and head through to room Q3.
*In room Q3, clear all five Gels and head north to room Q2 to see the hint from the man, "Dodongo dislikes smoke."
===Collect the third and fourth keys ===
*From the man in room Q2, to save a key head all the way back south to P6.
*From room P6, head north to acquire two keys: one in room P5 and one in P4.
**The left wall of the man's room can be bombed, but it isn't necessary.
*Head north to P2, defeat the 5 orange Goriyas with the locked door. After defeating them, collect the bomb that appears in the top right corner.
[[File:LOZLinkgetsthesecondpieceoftheTriforce.png|thumb|right|The second Triforce piece]]
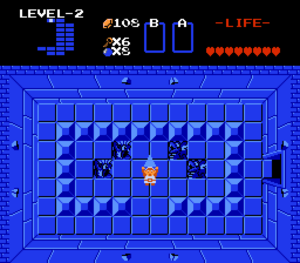
The boss is [[The Legend of Zelda/Bosses#Dodongo|Dodongo]]. There are two ways to hurt him. He must be damaged twice.
#Place a bomb in front of Dodongo so that it walks into it and eats it.
#Place a bomb so that it blows up on Dodongo's face as it is walking by. Dodongo will be stunned, leaving it vulnerable to a single slash from the sword. Bombs are guaranteed as a reward for striking Dodongo down with the sword.
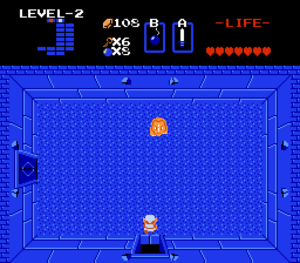
*Defeat it to earn a {{im/loz|Item|Heart Container}}. Continue on to the left room to obtain the second {{im/loz|Item|Piece of Triforce}}.
{{-}}
== Resupply ==
* A replacement shield is one screen south and one screen east, as is Monster Bait. You can buy health here.
Location: The entrance to this dungeon is easily found at A-1 of section 2. Approach it from the area to the south. If you have the Power Bracelet, the closest Secret Passage is S4B2.
Go north of room P7, clear the Goriyas and go through the locked door to the right to reach the Map in room Q6.
Bomb the north wall of the map room (Q6) and head north. Defeat the three blue Goriyas in room Q6 to obtain the Magical Boomerang. Be careful of the energy orbs fired from the statues in the four corners. Bomb the north wall and head through into room Q4.
In room Q4, grab the bomb in the center of the room and ignore the keese. Bomb the north wall and head through to room Q3.
In room Q3, clear all five Gels and head north to room Q2 to see the hint from the man, "Dodongo dislikes smoke."
The boss is Dodongo. There are two ways to hurt him. He must be damaged twice.
Place a bomb in front of Dodongo so that it walks into it and eats it.
Place a bomb so that it blows up on Dodongo's face as it is walking by. Dodongo will be stunned, leaving it vulnerable to a single slash from the sword. Bombs are guaranteed as a reward for striking Dodongo down with the sword.
 , the closest Secret Passage is S4B2.
 .
. .
. .
. in room Q7.
 in room Q6.
