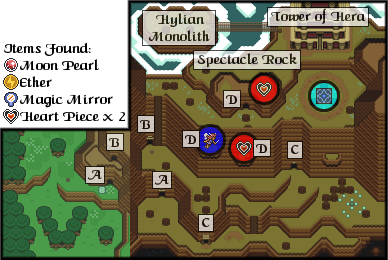
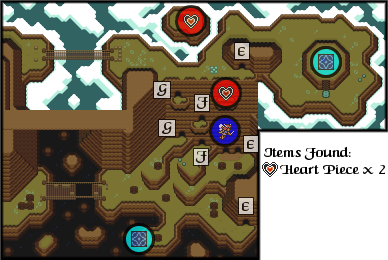
You first discover how to travel between the Dark and Light Worlds when you reach the summit of Death Mountain. There, you will come upon a mysterious tile that glimmers in the light. Step on it to discover it's mysterious properties.
The Western Mountain

The lonely tunnel
The sign outside the Mountain Tunnel (A) forbade travelers to pass unless they had permission from the King. Knowing that the King has been deposed by Agahnim, feel free to forge ahead, pull up the big stone that blocks the path and enter the tunnel. Inside, you will find an Old Man who needs help. If you escort him to a cave further up the mountain, he will give you the ![]() Magic Mirror. The Mirror is used for warping to the Light World from the Dark World or to the beginning of a dungeon.
Magic Mirror. The Mirror is used for warping to the Light World from the Dark World or to the beginning of a dungeon.
Mountain caves
The caves, long thought to be refuge for early Hyruleans, have been taken over by mountain beasts. Many of them still hold treasures and tools left by the Hyruleans when they moved to lower ground. Some of the caves were single dwellings, but others are multi-leveled networks of rooms. You should also seek refuge and treasure in the caves during your long climb to the top of Death Mountain.
A tower of terror
Carefully make your way through the dark mountain tunnels towards the top of the mountain. Explore the many caves and ledges along the way, uncovering treasures and clues as you go. Boulders many times larger than you crash down from above. An odd formation of rocks at the top of the mountain, which looks like a pair of eyeglasses, is dubbed Spectacle Rock. It stands between the climber and the Tower of Hera, and it appears that there is no way to scale its sheer sides. When you finally climb to the high plateau near Spectacle Rock, you'll see the glimmering tile that transports you to a different, but strangely familiar, world. You will find yourself transformed as well.
Into the darkness
When you reach the top of Death Mountain, you will discover that there is no way to reach the Tower of Hera. You will find a circle of stones surrounding a Warp Tile to the dark dimension where you will be turned into a helpless rabbit. To the left of the place where you appear in the Dark World, you will find a patch of ground that looks mirrors the shape of Spectacle Rock. Use the Magic Mirror there to warp back to the Light World. When you arrive, you will be able to collect a ![]() Piece of Heart. By jumping off the north side of Spectacle Rock, you can now reach the Tower of Hera.
Piece of Heart. By jumping off the north side of Spectacle Rock, you can now reach the Tower of Hera.
A Hylian Monolith
A bridge stretches from the west of the Tower of Hera to an island in the clouds. Cross the bridge after defeating a Moldorm. You will find another Hylian Monolith that was erected by the Hylian people on a peak west of Spectacle Rock. Like the others, this Monolith is inscribed with a message in the old tongue, so only one who has the Book of Mudora can decipher it. By translating the message with the Book, it advices you to return when you have the Master Sword.
The mysterious Moon Pearl
Legends tell of a magic Moon Pearl that allows people to retain their human forms in the Dark World. There are many tales about the location of the pearl, and one of the most persistently retold is that it lies in a chest somewhere in the Tower of Hera. Sahasrahla will send you a telepathic message urging you to find the famous pearl.
The Eastern Mountain

Caves found in the crags
A portion of the bridge that leads to the eastern peak had long ago washed out, making it impossible for anyone to explore that area. You will eventually discover a way to cross the gaping hole in the bridge. When you reach the other side, you will discover another system of caves and tunnels.
More Dark World doors
While exploring the Death Mountain region, you will discover more tiles that you can use to travel back and forth between the Dark and Light Worlds. One is hidden under a rock, one is situated in plain sight (on the west side), and another appears only after you pound pegs into the ground.
Tower of Hera
The multi-leveled Tower of Hera is an intimidating structure that has many block barriers controlled by Crystal Switches. It also has Star Tiles that suddenly change the floor plans, sometimes creating pits that have claimed many intruders. You enter the tower in the 2nd floor. From the grand foyer, a stairway on the left leads down, another on the right leads up to the 3rd floor and beyond. The huge Moldorm, which is not fond of guests, occupied the entire 6th floor.
