
The well of Kakariko Village is a very strange place. At first glance, it looks harmless, but evil beasts inside make it a land of doom.
In the past seven years, Ganondorf's dark aura has crept into places beyond imagine, rooting up many evils. Your quest is about to lead to one of those places.
Warning: This scene won't be activated until you finish Water Temple.
A Beast in the Well
Head for Kakariko Village. Upon entering the town, Link finds it ablaze. Sheik is there, looking at the village well. Something of great evil is trying to get out, and Sheik warns Link to stay back from the well. Suddenly, the wooden frame above it gets thrown into the air!
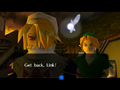
An invisible force comes out of the well, picks up Sheik, throws him around in mid air, and finally tosses him to the ground a fair distance away. A dark slime-like mist rushes out of the well and across a building. It circles around the village before heading straight at Link who takes a defensive stance. Although the beast rushes into his shield, Link gets overtaken as the screen goes black and you hear him scream in agony.
-
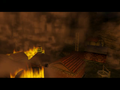
The village... it's on fire!
-
The well's deadly secret is emerging...
-
Sheik is helpless before an invisible evil.
-
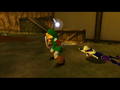
Link is soon in its path of chaos as well.


The Nocturne of Shadow

Link regains consciousness with Sheik kneeling over him. Sheik explains the situation to Link: an evil that was sealed inside the well has escaped to the Shadow Temple in the Graveyard. Impa, Zelda's former attendant, leader of the Sheikahs, and Sage of the Shadow Temple, has gone to the temple to battle it.

Impa needs help to vanquish the monster, but entering the Shadow Temple is so dangerous, no one can get in except people with special abilities. All Sheik can do is teach Link the melody that will lead him to the temple, the Nocturne of Shadow.
The Nocturne of Shadow:
![]()
![]()
![]()
![]()
![]()
![]()
![]()
The Song of Storms
Before you enter the temple, you will need an item that will allow you to see invisible items, enemies and passages: the Lens of Truth. It lies at the bottom of the well. Unfortunately, the well is sealed off, so you will need to return to the past and retrieve the item as a child.

Enter the windmill that is directly in front of the well. Guru-Guru, the angry music man inside, claims that seven years ago, a child with an ocarina played a strange song that messed up the windmill.

Pull out your ocarina. The sight of it jogs his memory. The man will remember the song and teach it to you (it is the same melody playing in the background).
The Song of Storms:
![]()
![]()
![]()
![]()
![]()
![]()
Strange things will happen to the windmill, causing Guru-Guru to get angrier than ever. Apparently, you played the song in the past and caused trouble, but for what reason?
The Bottom of the Well

Head to the Temple of Time and return the Master Sword to it pedestal. Return to Kakariko Village (You can use the Nocturne of Shadow you just learned.) Enter the village windmill and play the Song of Storms. The song will make something very startling happen. The crank will spin much faster and the music in the windmill will get more frantic. Then, something even crazier will happen!

The windmill will drastically speed up and churn out all of the water in the well. You are now free to explore it, but beware.
Special note: You can do this after Forest Temple. This is the earliest point to do it. If you finish "The Bottom of the Well" prior to Shadow Temple, you can skip this and continue on your quest.
Deceptive Illusion
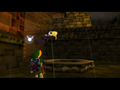
Crawl through the tunnel at the well's entrance. Drop down the ledge with the ladder in front of you, then kill the Big Skulltula. You will see a skeleton lying against the left wall. If you Z-Target it and use Navi, she'll tell you that the spirits are saying "Look for the eye of truth..."
Walk through the section of the wall between the skeleton and the mound of the dirt; it is not real. The Lens of Truth in this dungeon, when you get it, will allow you to see what is real and what is not.
Warning! If you happen to fall into one of the holes in the middle area between the fake wall and the Triforce symbol (the room with the Wallmaster), you'll end up in a room with acidic water, a re-dead, three silver rupees on the floor, and five pathways (the ones without torches are useless unless you need to stock up on supplies - one has grass, and the other has pots - the pathway with torches contains the Dungeon Map).
Climb up the ladders and grab the fifth silver rupee to unlock the door. Head through it to re-enter the main room and entrance to the dungeon.
Hidden Pitfalls
Go across the pool of water in front of you (notice the crawl space at the bottom of the pool, on the right) and wait a bit. You'll hear the flapping of some sort of wings; unfortunately it's a giant Green Bubble patrolling the shallow trench that wraps around this room. If you watch the Green Bubble, its fire will extinguish once in a while; use this time to shoot it with a bullet from the Fairy Slingshot.
There are two ways to go from here:
1. Go left or right (right is easier as the Green Bubble won't be coming straight at you) down the trench, and follow it around two corners. After the second corner, run halfway down the hall until you reach an area where there is a Triforce inscribed on the floor (the middle of the hallway, opposite the fake wall you entered from). Stand on the symbol and play Zelda's Lullaby. The water on this floor will stop flowing and drain.
2. Alternatively, you may simply run straight into the wall directly ahead of the entrance. It's a fake wall, and will take you into the central room of the dungeon. Keep going straight (going around the big "X" in the middle of the room, as there is a pit underneath it). Keep going straight, being mindful of the Wallmaster lurking on the ceiling of the northern part of this room, and through the second false wall. You'll now be in front of the fountain with the Triforce symbol on the floor in front of it. Play Zelda's Lullaby to drain the water.
After draining the water, return to the pool of water you passed near the dungeon entrance (with the crawlspace). It is now an empty pit, so drop down into the pit and head through the crawlspace (there's a chest opposite the crawlspace with some bombs in it). Go forward slightly, kill the Big Skulltula, climb the wall, and then go through the door straight ahead.
Miniboss: The Dead Hand
On the map, you'll now be in the large room that's the farthest to the east on level B1. You'll see four white pillars located around the room; however they're quite peculiar. If you approach one, it will bend over and grab you! They aren't pillars, they are arms! After you are grabbed, a nasty monster will come out of the ground and try to eat you. This beast is the demented Dead Hand, the mini-boss of the well.
Tap buttons to breakaway from the hand you trapped yourself in. Ignore the hands but stay clear of them unless you need to call Dead Hand back again; they can't harm you, but they might hold you long enough for Dead Hand to. Note that the arms can be destroyed, but they don't drop anything or help defeat Dead Hand any quicker, although they may drop hearts which are useful if you are low on health.
Dead Hand's weakness is its face, so you have to wait for it to bend down to attack you before you can strike it (just stand in front of Dead Hand and wait for it to lower its head). It takes about 9 hits to the face to kill Dead Hand. After striking it about three times, Dead Hand will retreat into the ground and cause a shockwave-like effect made of dirt or some sort of energy; avoid this or defend to avoid taking damage.
Truth within the Eye

Open the chest that Dead Hand left behind to obtain the Lens of Truth. Try looking through the Lens before you leave this room: behind the big chest, against the wall, will be another chest with a Huge Rupee (200)!. You've done what you need to here, but there are still more places in the well to explore if you wish (there's also more treasure).
The Dungeon Map and a dangerous basement
If you happen to fall into one of the holes (skip this section if you didn't) in the middle area between the fake wall and the Triforce symbol (the room with the Wallmaster), you'll end up in a room with acidic water, a re-dead, three silver rupees on the floor, and five pathways (the ones without torches are useless unless you need to stock up on supplies; one has grass, and the other has pots).
One of the pathways has yellow torches in front of it: head through the boulders there, kill the re-dead, then grab the Dungeon Map from the chest. Head back into the main part of the room and you'll notice the fourth silver rupee at the top of the ladder, above the blue torches.
Climb up the ladders and grab the fifth silver rupee to unlock the door. Head through it to re-enter the main room and entrance to the dungeon.
Optional: Small Keys, Skulltulas, Bombchus, and Other Treasures
Bombchus
In the main room, notice the mounds of dirt to either side of the false door which leads to the center room with the prison cells, locked doors, and Wallmaster. The mound on the left can be destroyed with a bomb to reveal a pit. This pit will NOT lead to the basement, and will instead lead to a small room with a chest containing Bombchus.
The Dungeon Map
Head into the middle room and deliberately fall into one of the pits. In the basement, head into the path with the lit torches in front of it (bomb the boulders if necessary). Kill the re-dead and grab the Dungeon Map from the chest.
Small Keys 2 and 3
Keys #2 and #3 are both in small chests very near the main entrance behind fake walls. Use the Lens of Truth to find Key #2 to the left of the central room (northwest from the entrance) just before the corner. For Key #3, round the corner to the right (northeast) and look immediately to your left using the Lens of Truth.
Now that you have both keys, head into the central room to unlock both of the locked doors, both of which contain a Gold Skulltula. The locked room to the left has a Deku Baba and three flying pots. The room on the right has four Keese and a giant pit with an invisible pathway (use the Lens of Truth to see the pathway along the right-hand side).
When you've had your fill of this dungeon, get ready for your next one; it's sure to give you chills.
The Path to Shadows

Return to the Temple of Time and retrieve the Master Sword (make sure you have the Lens of Truth!), then play the Nocturne of Shadow and Warp to the Graveyard. You'll end up somewhere new: a ledge high above the graveyard beyond the Royal Family's Tomb. Head down the tunnel behind you.


You'll come to a large chamber with a spellcasting circle and unlit torches. At the end of this room is a large sealed door. Stand in the center platform and use Din's Fire to light all of the torches at once. The door will rise up and reveal the path forward.
You are now free to enter the Shadow Temple. However, once you enter this temple, your fears will be put to the test...
Special note: You can go through the Shadow Temple as a child but you'll be limited to the entrance. Better stick to being the adult for this dungeon.