This is the conclusion of the walkthrough for Chip's Challenge. Levels 141 (UNDERGROUND) through 149 (SPECIAL) will be discussed on this page.
| Level 141: UNDERGROUND Level 142: PENTAGRAM Level 143: STRIPES? |
Level 144: FIREFLIES Level 145: Thanks to... Level 146: CAKE WALK |
Level 147: FORCE FIELD Level 148: MIND BLOCK Level 149: SPECIAL |
Level 141: UNDERGROUND[edit]
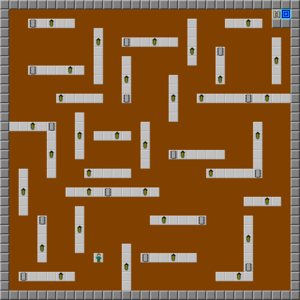
The structure of Underground is composed of 32 strips of four to six floor spaces, with paramecia bouncing around them, and chips in 15 of them. Chip must use what he knows about paramecia, and also what the dirt and chips do, to play through Underground. The level, however, can be completed in 31 seconds!
The route through this level, to each chip and with explanations, is D 8L D, 6U (releasing another paramecium out of the way) 2R, 4U L (as U would cause a collision) 5U 2R U, 2U 2L 4U, 5U, D (the paramecium holds to the north, so go south!) 6R D 4R, L 6D (to release the paramecium from the blunt side) R, 2R 2D RD 2R (this paramecium is out of the way now) 3D, D 2L (allows the paramecia to circle around without chasing you!) 2D 3L [1] 2L D, 2D 4R 5D, 2U 6R 2U (this path to the chip allows the paramecia to move somewhere else) 2R 2D 2R (this allows safe entry for you and safe exit for them) 2D RD, R 5U L 5U R, UL 7U, and 4U 2L UL. Now, the paramecia behind you are approaching you, with one from the last chip, and there is a paramecium in the way of the exit. Chip cannot wait a single move. To avoid running into the final paramecium, Chip must run on the blunt side: 2U 5R, while the paramecium is following to the north. Now, exit the level before you're squashed!
Level 142: PENTAGRAM[edit]
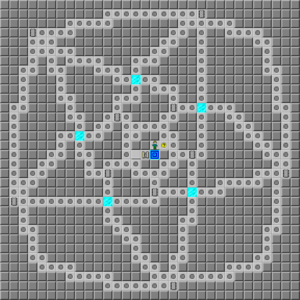
Begin the route through this cellblocked pentagram with 2R 2D LDL 2D, and then play all the way to the east, zigzag northwest, then DLD and left to another chip. Now, continue playing all the way to the far left of the level, then up to the northwest corner, and then east to the top center. Finally, play all the way down to the bottom for another two chips, and then zigzag northwest again, which leads to the exit.
Level 143: STRIPES?[edit]
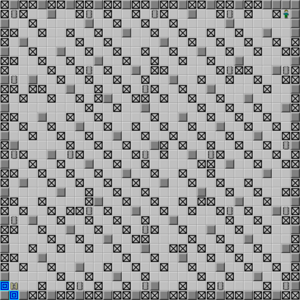
The entire level is composed of invisible walls that are not a maze, but a collection of "stripes" that move from northwest to southeast, with occasional breaks in between that allow you to either pick up a chip and then retreat, or to break through the stripe altogether.
Many moves in Stripes? will be diagonal or zigzag moves; the notation for this is comparatively rare, and is (X)A-B, where X is the number, A is the first direction and B is the second direction. As Stripes? is a maze level, the full route is spelled out:
D 5L UL 6R-D U 4L (4U-L L 2D 3D-R) 3R-D D 2L U 2L D (5D-R) 5L-U (4L-U) 2D 2L (3U-L 3L 3U-L) 11D-R 4D R D 5U-L (6U-L L D 4D-R) 3D 4R-D D 2L 8U-L L [A] 3U-L 4U 7L-U U (2R 7D-R) L 2D L 3U-L [return to A] 5D RD 2R (2R 7D-R) 2D 4R-D (D 2L) 22U-L (2L D) R 2D-R 2D (2D 11R-D 3D R 2D 2L 7U-L) 3L 2D R 2D-R (9D-R) 2L 2D 3R-D DL 2L-U (2L-U) 4D 5R-D (4R 3D-R) L 2D R D 7U-L R 4D R 3D 3L, which exits the level.
Level 144: FIREFLIES[edit]
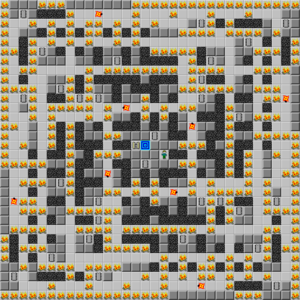
This is the last level...or is it? Remember Cypher.
The trick to Fireflies is that it is mostly symmetrical, so you should collect the chips on the top end and then play around clockwise to the next. There are only eight fireballs, but they are on very long tracks, which makes it quite difficult to tell when one is attacking you on the road ahead. Therefore, the time going counterclockwise is minimal.
Start moving counterclockwise, ignoring the chips, until a fireball blocks your path on the turn west. Here, take the chip above, then continue to walk all the way around and collect the chip at [2, 10]. Now, backtrack all the way to the start and collect the chips on the way, and now turn right from the first intersection and continue to walk through, this time collecting each chip as you reach it. The exit is opposite Chip, and at the end of this level, the game "ends" with an animation that includes the exit expanding to "deposit" Chip into Melinda's club - although the Challenge is not actually finished! Either type TONY to see level 145, or use JHEN from Cypher to skip to level 146.
Level 145: Thanks to...[edit]
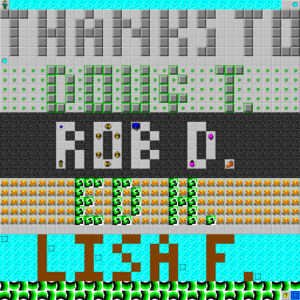
Thanks to... is notable for being the only level without outside borders, the only CC1 level not in all capitals, the fastest untimed level in existence, and being a commemorative composition - as well as being completely omitted from the Lynx version of CC. Instead, the password MAND will bring you to a Mandelbrot generator, and you have to use the JHEN password from Cypher in order to access the remaining levels of the game.
The password (TONY) could be Tony Garcia or Tony Krueger, and is generally assumed to be the former, although Tony K. was the author of the game. Ed H. (in random force floors) is probably Ed Halley, who was the artist. The other three names are Doug T. (toggle walls), Rob D. (floor spaces within the gravel) and Lisa F. (dirt) receive no other mention.
Now, to complete the level: Step onto the ice, and then exit the teleport either all the way past DOUG and take the fire boots, then slide to the exit, or for a speed solution, walk between the D and O, over Rob's R, and onto Ed's E, which will cause death quite often! Just continue to hold down, and you will succeed about 1/64 of the time. In addition to the faster force floor moves, you can start sliding east faster (at 20 squares a second for perpendicular moving!) and reach the exit in eight seconds. Beside the exit is a hint which also thanks the WEP 4 test team!
Level 146: CAKE WALK[edit]
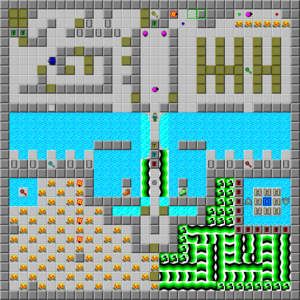
The route through Cake Walk, shown on video.
Cake Walk. What a malapropism! Cake Walk is extremely tedious, very long, and full of block pushing. This guide will be stretched to its limits describing this route. For a fully detailed video solution, watch the above.
33 blocks are required to collect the eight chips and red and blue keys below, and you have exactly 33 in the east section, plus one to the right of the start. You will need to use one to block out the fireball cloner, but since you are going to the left side anyway to collect the chips, you can use the one to the left of the start as an extra, allowing Chip to waste one block on the right side.
Begin by moving the first extra 2R 2D to cover the first water, then play 2U 8R 6U R (this is the block wasted) U 8L RDLUL 7D, which sends the fireballs into the ball room, messing up their moves a bit and allowing Chip to get through it quicker. Snuff out the cloner at the top with block 1, then play D 5R D 2L 2D LRU 2L UL and then down; both blocks open the water below them. Play block 3 into the water below it, then block 6 L, block 5 2L, block 6 4D, and then block 5 into the water to allow block 6 to move R; leave the dirt alone. Do the same thing with blocks 12 and 13 to open up the water spaces underneath the other two, remove all the dirt, and now move blocks 20 and 19 5L each. Now, collect the green key and continue 3U 2L 3D U 2L DUL 2D L 4D, move the block on the left next to the other, and play RDLD 2R. Play the block furthest south L, the one UR from that 2L, and continue 2U 3R U 2L UL 4D L 4D, the block to the left 6D, and then continue RD 2L U to free up the path to the left. Collect a block from the top, move it all the way south, and play 2R D and left to begin bridging to the west. Now, whenever you are in this position, or later D from here, play RUR instead of U 2R across the ice, which maximizes the boosts collected. At this point, do so with RU 2R, play to the far north and collect this block, stuff it into the floor hole in the water, and now play to the ball area. Thanks to the fireball diversion, it's a bit easier to sneak in on the right side.
Collect the yellow key on the top end, then continue 2L D, take the five chips on the left, and play the extra block on the left of the start 6R 4D 3R to begin turning south. Continue by moving the nearest block L, the block on the row above 5L, the first one 4D, the second 5D 3L into the water to the left, and then play the loose block under that into the water under that. Since you have a yellow key, play RU 4R to begin the next phase. Move to the next tower on the right side, play blocks 26 and 25 7L, then play 5R 2U 3L DU 2L 5R U 4L 2R U 3L 4D L to begin the next block move. Play the block under you 4D, the one on the west edge 6D, and then onto the fifth water to the left of the ice track. Go back to the top, take the second block on the second column all the way down, then play 2R D and the other block 4L 2D onto the fifth row, ready to begin bridging to the west. Take the block on the far north and wedge it under the top dirt and D to continue the bridge east, then play the near two blocks L and 4L, 4D and 5D, then walk RD and west to start moving the bridge west. Use the other block to fill in the water on the right side; at this point, the remaining blocks will continue to move to the right and left in order to collect the remaining chips.
Move blocks 33 and 32 9L, then continue 7R ULRU (7L) U (6L) U 7L to create the five-block stack again. Continue with 4D L, use the block D and block L on their respective bridges, then the second block on the top to the left and the top block to the right. Now, play the single loose block L, then move all the way to the right, 3U 4L 2D U (5L) U 6L, and use this block and the lower stacked block on the left, then finish the right side with the other stacked block. You now have a red key and four more chips. Only three blocks remain; play the one on the bottom 6L, the one above that 9L, and the top one 10L, and use the top block, the lower block, and then the center block to finish the run. You now have all the chips; the final stage is exiting the level.
Play through the two remaining locks, shove the block on the right R and U, and then play it north as it slides back, after half a move. After this, wait [1/2] again because the block will push itself over the force floor if you don't, to [17, 19], and then follow it and collect the suction boots. Continue to play 2L D 2L D to reach the fire boots, waiting in the same way, then move the block under this 2D 14L and up to reach a red key. Run out of this 2D and to the right, then step on the force floors and open the fourth red lock on the bottom. Now, shove the block R, where it will take a path right to the open red lock, allowing you to bridge to the exit for a time of 712.
- NB: Instead of going out to open the lock and then coming back, it is thinly possible to play the block onto the random force floors and that it will stay on them long enough for you to open the lock and play DL safely, allowing it through the lock and saving up to five seconds. This is a very unlikely route, and just one attempt at it takes about 4 1/2 minutes. You could play it your whole lifetime and not get it. But it's nice to speculate...
Level 147: FORCE FIELD[edit]
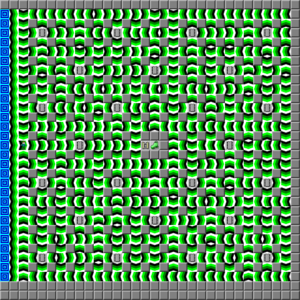
As mentioned in one of Melinda's special dispatches, this level is not referred to by number, only by "XXX", by a reference to its title, and that it will come near the very end. It should therefore come as no surprise that Force Field was the last of all levels to be completed for a large section of the major players of the game. Reports of somebody leaving their computer on overnight with Force Field half-finished (!) exist in CC lore; fortunately, this solution plays out in 29 seconds.
In this guide, the force floor sliding will be referred to by the rare notation of >X, where X is either numbers or directions. When [chip] is read, no moving is required; continue next from when the chip is picked up.
Immediately play RD, hold to the second chip, and then play L. Step R onto the first chip's location, then RD >6D2R U to the next chip, then 2R >2U R >4R D 2L D to the next two. Continue with L >2L4U R [chip] 2L [chip] 2U [chip] D [chip] L >2L2U2L U 2L [chip] U. This section is a critical jump to the east side of the level; in total, slide >2U2L4D, then step on the east key full-throttle to break through four vertical force fields. Land on the chip above, then continue DR >4R 2D R >2R2D R 2U [chip], and then drop back down with L >2L8D R. From here, clear out the northeast except for one chip: 2D [chip] R [chip] U >2U2L U >4U2R U 2R [chip] R >2R4D LD [chip]. Break through two more force fields below, take the chip in the corner, and clear out the bottom area with U L >4L L >2L2U L 3D, which leaves one chip left. This chip is in the very top right, which was left behind because it leads directly to the suction boots. Reach this chip with L >2L4U4R2U U [slide to floor] U >2U2L U >4U2R U 3R [chip]. Finally, take the suction boots; U >2U10L10D 2L D will access them on the right side, and then clamp to the exit on the far left.
Level 148: MIND BLOCK[edit]
The quickest route through Mind Block.
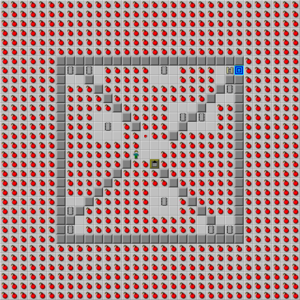
Noticeably, Mind Block is a symmetrical square except for a couple off-kilter chips and the squares around them, and the clone machine and red button in the center.
The simplest solution to Mind Block is to build double bridges in all four directions, starting from the eight bombs nearest to the center, to collect five chips and also to free the two side paths to seven more chips. Start by removing the bomb UR from the cloner, then L from the cloner, start building south, and then return one of the blocks north to knock out the bombs 2U 2L and 2L from the cloner. You can now build bridges in all four directions with ease. On the turn right in the north section is the exit, so finish that section last. I advise south, east, west, north. For a fully detailed solution, watch the video link.
Level 149: SPECIAL[edit]
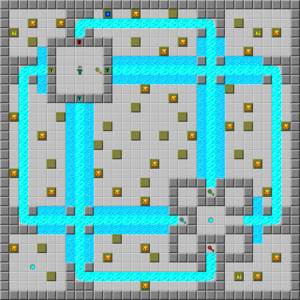
The grand finale of CC1 has a secret trick to it. First, swap the keys until you can teleport west, and take stock of the situation: The area outside of the keys and locks has nine islands with water separating them from each other, and not all the blocks are usable - some are rather hot.
But where is the exit? It's not in any of the other corners. In fact, if you build there, one of the blocks in each corner has a hint that says "This spot would be too obvious!"
Therefore, other means must be tried. Build up to the center island first as thus: Play 2D 3R 3U, use the two blocks on the water above to reach the next spot above, and then run block 3 R 4U to begin the bridge, accompanied by block 1. You are now in the center of the level; since the corners of the level don't work and the center doesn't, the sides must have the exit somewhere. You are near the top edge (seen from the red lock pathway), so build there first; blocks 5 (R 5U), and then 3 (2L 3U) on this island take Chip to the top. Continue to slide to the north, and then slide block 1 on the very edge L, which has the exit under it. This is the only CC1 level with the exit on the lower layer of the grid, making it deceptively difficult!
When this happens, as seen in Fireflies, the exit enlarges, Chip does a bit of a victory dance, and Melinda tells Chip congratulations. Chip is then lifted by the club members en masse as one of their own, and the following message is displayed: "Melinda herself offers Chip membership in the exclusive Bit Busters computer club, and gives him access to the club's computer system. Chip is in heaven!"
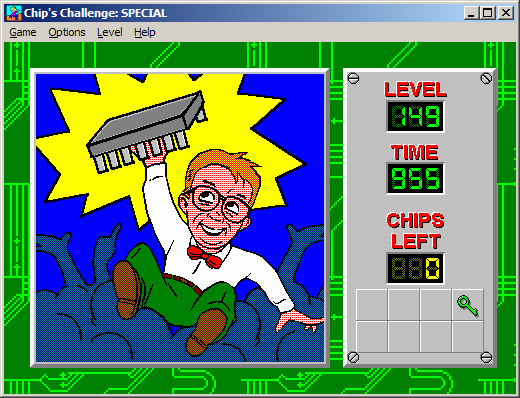
Chip's Challenge then also specifies how many levels were completed, your current score, and then allows you to then go back to improve your score if you desire. Then, the game shows the ending image, shown at the bottom of the page, until you select a different level or end your session.
And thus ends a fabulous game. Happy Chipping.
