Opening[edit]
You are Snake - also known as Big Boss - the legendary soldier who killed your turncoat mentor The Boss and saved the world from nuclear annihilation. Your legend has grown larger than you and you have amassed a following of soldiers. With the help of your right-hand man Kazuhira Miller, you have built this following into a highly-trained force of mercenaries who will fight any enemy without consideration to the state or ideology of the client. At this time, your men are training on the beach and you are on your way to join them.
- Participate in the training exercise and show your men who is Boss.
Barranquilla Coast, Colombia[edit]
The soldiers of Militaires Sans Frontieres or "MSF" are training on the beach, practicing the art of Close Quarters Combat developed by Big Boss himself. It is here that you can join your men in this training session which operates as an introduction to the game's basic mechanics. A drill instructor will introduce a mechanic, tell you and the men how to do it, and then ask you to demonstrate it for your men.
- You can skip this training exercise at any time by pressing
 . Consult CQC for a reference on CQC. Consult Controls for a reference on controls.
The first thing the drill instructor will teach you is how to manipulate the camera.
The drill instructor will order you to press the Action Button to move on to the next training section.
The drill instructor will order you to look left and right.
The drill instructor will teach you how to change your stance. You can stand and you can crouch. You can move, hide, and attack in either of these states. You can also lie down, but you are immobile while in this state. You cannot crawl in this game.
Next, the drill instructor will go over basic movement with the analog stick. A full tilt will move at full speed. A partial or gentle tilt will have you walk or stalk. Your footsteps while running produce noise that attract enemy attention. Stalking produces no noise.
- Tilt the Analog Stick fully to run
- Tilt the Analog Stick gently to stalk
You will next be instructed on how to use the rolling technique. Rolling has limited uses in this game but is effectively this game's dodge maneuver. Use it to get away from attacks you can see coming your way.
Often, the game will register a press rather than a tap, forcing you to throw a punch rather than roll. It is good practice to double-tap the button to execute the Roll.
You will next be taught how to use the basic melee attack. Tap the Attack Button while standing still to perform a basic melee.
The basic melee attack has extremely limited use in this game and this walkthrough does not recommend using it.
You will then be taught how to attack with a weapon, in this case, the Stun Rod. You will always have the Stun Rod in your inventory. Weapons are prepared by holding down the Aim Button, then pressing the Attack Button.
At last, the drill instructor will bring up CQC. The most basic CQC maneuver is the Throw.
Often, you might just tap the Attack Button, which will make you roll rather than execute the Throw. It is good practice to hold the Attack Button rather than tap it when you are trying to throw an enemy to the ground with CQC.
Next will be the core technique of CQC, the Restraint. The Analog Stick must be neutral before you press and hold the Attack Button.
Restraining an enemy will cause them to take nonlethal damage every second. You can speed this process up by mashing the Attack Button to choke them out.
You will then learn how to execute a more powerful Throw after Restraining an opponent.
You can also throw Restrained opponents at other enemies, damaging both of them and knocking them down. You will be required to demonstrate this twice. Tilt the Analog Stick at the enemy at whom you wish to throw your restrained enemy.
Finally, you will be asked to demonstrate Consecutive CQC. Consecutive CQC occurs when you're surrounded by multiple enemies in CQC range and you are throwing one of them. Press the ![]() when the icon appears to quickly grab and throw the next enemy. You can mash the
when the icon appears to quickly grab and throw the next enemy. You can mash the ![]() for the same results. You will be asked to do this twice.
for the same results. You will be asked to do this twice.
Once the training exercise is complete, Miller will arrive with a client and MSF will be offered a mission.
Playa del Alba[edit]
Having accepted the clients' mission, you have set foot on the soil of Costa Rica. Snake personally takes point on this mission while Miller and the men support you from behind the scenes. Miller will offer instruction and advice through the radio.
Take a moment to consult the map below.
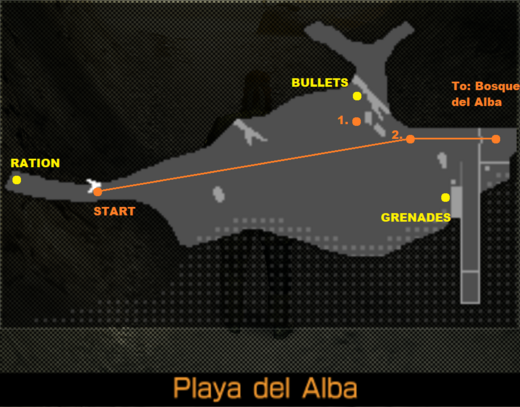
The orange line represents the path you should take to reach your objective. It is simple now, but routes will become more complex as you get later into the game. The numbered dots represent places where you should stop, pause, and consult the walkthrough for further guidance. The numbers on the map correspond with numbered paragraphs on the walkthrough page. The yellow dots represent item pickups. Pickups labeled "bullets" will yield a somewhat randomized ammunition that usually corresponds to the weapons you are currently carrying.
For now, just follow the path from west to east. Rather than "left" or "right" to describe directions, this walkthrough will use cardinal directions; left and right are relative, but north is always going to be north.
- 1. Get Some Target Practice
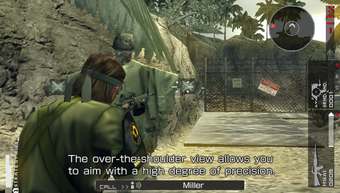
You can accustom yourself to the game's gunplay at one of these scarecrows. To fire your currently-equipped ★1 M16A1, press and hold ![]() to aim and press
to aim and press ![]() to squeeze a round off. Shooting the helmets off of the scarecrows will add Weapon Experience to whatever weapon you use to shoot it. You can restock your ammo at the respawning Ammo Pickup just north of your position. However, if you practice with your Mk.22, your Suppressor will run out and will not be replenished during this mission.
to squeeze a round off. Shooting the helmets off of the scarecrows will add Weapon Experience to whatever weapon you use to shoot it. You can restock your ammo at the respawning Ammo Pickup just north of your position. However, if you practice with your Mk.22, your Suppressor will run out and will not be replenished during this mission.
- 2. Throw a Grenade
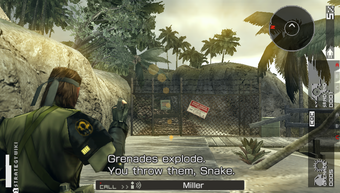
To move to the next area, you will have to destroy the obstacle in front of you: the chain-link fence. You are equipped with ★1 Grenades for this purpose, though Grenades will not be used often in this walkthrough. First, you must equip the grenade by holding down ![]() to open the Weapon Menu. Next, you must highlight the ★1 Grenade on the Weapon Menu by pressing
to open the Weapon Menu. Next, you must highlight the ★1 Grenade on the Weapon Menu by pressing ![]() or
or ![]() and then release
and then release ![]() to close the Weapon Menu and equip the Grenades.
to close the Weapon Menu and equip the Grenades.
To throw a grenade, use it like any other weapon by pressing ![]() to prepare the grenade and pressing
to prepare the grenade and pressing ![]() to toss it where indicated.
to toss it where indicated.
Once the gate is destroyed, you can move onto the next area where the first mission will officially begin. First, you will see another cutscene of the meeting between Snake and Gálvez explaining your rationale for accepting the mission.
Investigate the Supply Facility[edit]
An armed group is secretly occupying Costa Rica. One of their bases - where Paz was held and from where she managed to escape - has been identified and is your best source of intel for finding out who these people are and why they're here.
- Infiltrate and gather intel in the enemy supply facility.
Bosque del Alba[edit]
The mission proper begins here. From this point forward, the mission timer is running. There's no reason to go back to Playa del Alba.
Press ![]() to open the Start Menu and consult your map. You should consult your map every time you enter a new area.
to open the Start Menu and consult your map. You should consult your map every time you enter a new area.
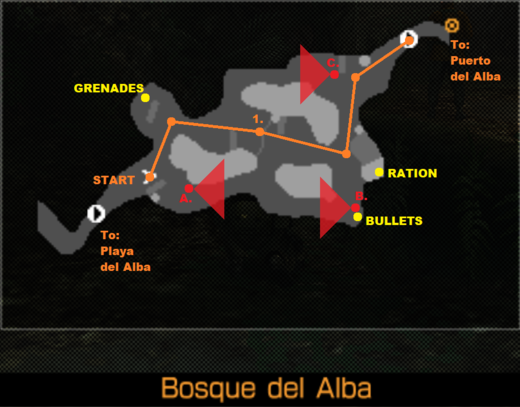
There's also no reason to interact with any of the enemy soldiers; the best path avoids them altogether. Simply move north and turn east before you move into the northern alcove with the Grenades. Keep moving east until you reach a small ledge after a fallen log.
- 1. Climb Up the Elevated Terrain
Tilt the Analog Stick in the direction of the elevated terrain and you will climb it.
Keep moving east until you reach a small series of ledges and turn north. As you approach a fallen log with Soldier C nearby, gently turn northeast to reach the next area.
Puerto del Alba[edit]
The supply facility from where Paz escaped is here. Security is tighter than in the Jungle; there are three enemy soldiers patrolling the staging area and a fourth up the stairs of the admin building to the east edge of Puerto del Alba. To avoid detection, you'll need to stop and watch enemy patrols for the coast to be clear before moving forward. Move past the fence and turn north to start.
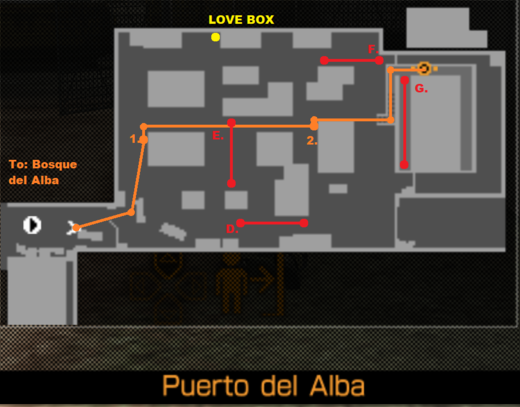
Consult your map. You'll want to keep the camera pointed to the east as you go past the gate and turn north to the first set of containers. There, move to the northeast corner of the container.
- 1. Wait for Soldier E.
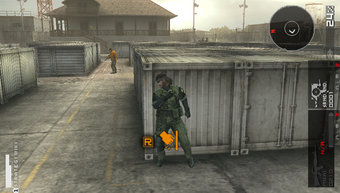
Face the corner until an Action Icon appears. Press and hold ![]() to flatten yourself against the container. Then press and hold
to flatten yourself against the container. Then press and hold ![]() to zoom the camera onto Soldier E and watch his movements. Watch him turn around and walk south and out of your line of sight. Release
to zoom the camera onto Soldier E and watch his movements. Watch him turn around and walk south and out of your line of sight. Release ![]() to get off the container.
to get off the container.
Round the corner and move east in a straight shot to the east-most container. Try to follow the yellow line on the ground. The staircase up to the admin building should be straight ahead. Soldier E should be out of earshot as you move.
- 2. Wait for Soldier G.
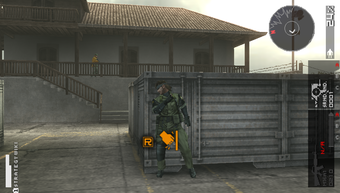
At this point, press yourself against the corner with ![]() and observe Soldier G up on the patio of the admin building. Watch him until he passes the bottom part of the staircase. One he does, you can get off the wall and move up the stairs, turn north and move straight to your goal.
and observe Soldier G up on the patio of the admin building. Watch him until he passes the bottom part of the staircase. One he does, you can get off the wall and move up the stairs, turn north and move straight to your goal.
Completion[edit]
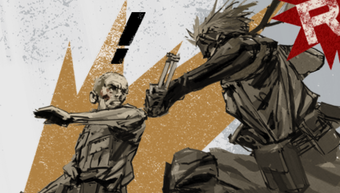
The graphic novel cutscene will have interactive elements, so watch for the button prompts. Press ![]() to engage the radioman. Mash
to engage the radioman. Mash ![]() to submit him. After a brief interrogation, Snake will get distracted and you'll have to press
to submit him. After a brief interrogation, Snake will get distracted and you'll have to press ![]() again to throw the radio man into a stack of boxes and follow up with a
again to throw the radio man into a stack of boxes and follow up with a ![]() to hit him with the Stun Rod.
to hit him with the Stun Rod.
If you followed the instructions, you should get an S-Rank even if you viewed all the cutscenes.
Rewards:
- CO-OPs message "Here" is infused with heroic spirit.
- M1C Design Specs RANK 1
- Smoke Grenade Design Specs RANK 1
You should check out the Introduction to Mother Base and begin [010] Fulton Recovery before moving on to the next mission.
