< Metroid
Jump to navigation
Jump to search

The battle against Ridley will be a real test for Samus. Ridley is a mutant dragon who is a servant of the Mother Brain. Although Ridley's lair is called Hideout II, you can visit it before you beat Kraid if you prefer. Ridley's hideout is wide and expansive, although only a fraction of it needs to be visited. Follow the map and guide below to tackle this region in the most efficient way possible. If you came with the Screw Attack, you have little to fear.
Points of interest[edit]

- 1) Missiles hidden in the ceiling
- As soon as the elevator drops you off in Ridley's hideout, drop down and head through the left door. Run through the tunnel and through the next door. The next room will look identical to the first, but this one contains a secret. Shoot at the ceiling near the right door. A column of blocks will break away giving you access to an upper floor. You won't be able to reach the door that you find without High Jump boots, but that shouldn't be a problem for you by now. Jump up and traverse the corridor to find a Missile Pack towards the very end. Then return to the bottom tunnel and continue left.

- 2) The Energy Tank trap
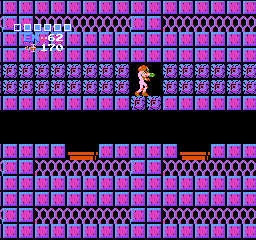
- In order to reach the energy tank at the other side of the long green corridor below the hidden Missile Pack, you're going to have to find a way over the very large column at the left end of the room. See the Notes section below for more information. Once you do, you may think the hardest part to reaching the Energy Tank is over, but you'd be wrong. The bridge area that you arrive at contains a secret pitfall. The stone floor may look solid but it isn't. The screenshot to the right shows you the placement of the pit. In order to collect the tank, you have two choices: either you make a perfect jump over the two false blocks and land on the other side, or you drop down the pit and attempt to reach the tank from the other side. Be forewarned, however. The shaft that will allow you to climb back up to the tank's level is incredibly difficult, as it involves jumping from one single width column to another, and if you miss a landing, it's a long drop down with no way to get back up.
- Alternatively, roll into a ball, and lay one bomb in the middle of the last solid square, then tap left. The explosion will loft you over the gap easily, and you can then collect the tank.

- 3) The hardest Missile Pack of all
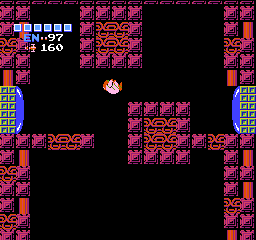
- If there is one Missile Pack that players miss the most, it's this one. In order to reach it, you must make your jump from the left platform to the higher right platform with perfect timing. If you jump too early, you will hit the blocks above you and fall before you reach the other side. If you jump too late, you may fall off the left platform and lose your opportunity to make the jump again. If you have good timing, you will spin right across the gap and reach the other side, allowing you to continue through the door, and on to the Missile Pack found inside. If you fall down, look on the bright side: you've just taken a short cut to Ridley's lair, which is to the left. If you want to try again, you'll have to travel across the hideout in order to set yourself back up for another attempt

- 4) Another long corridor for missiles
- Just like Hideout I, there is one particularly out of the way, remotely placed Missile Pack. Approach the bottom corridor from the left by falling down the empty vertical shaft. After running through a series of Multiviolas, Zebos, and Dessgeegas, you will come to the Missile Pack. After you collect the missiles, you should escape this corridor by continuing to the right. You will pass a series of Zebo emitting pipes, until you reach a section where the ceiling tiles are slightly different. You can jump into this strange section to get some distance from the pipes while you continue your trek to the right.

- 5) Face to face with Ridley himself
- Whether you came from the shaft on the far right, or you took the shortcut and fell from the corridors up above, the time has come for you to face Ridley and take him down. He certainly won't go without a fight. His only real attack is to jump up and down and spit a series of bouncing fireballs at you. These fireballs can block your missiles, so you need to stand very close to Ridley in order to hit him if missiles are your weapon of choice. Most players like to strike Ridley from a location that he has no defense against: below him. If you have the Varia Suit, then you don't have to lot to fear from the lava at the bottom of his chamber. It will probably do far less damage to you than Ridley would. If you stand beneath Ridley, aim up, and fire the Wave Beam at him, he'll take every hit. It will take a while to kill him this way, so continue to jump up and down to minimize the damage from the lava. With this very easy strategy, Ridley will be destroyed in no time, granting you an additional 75 to your missile capacity in the process. The door to the left is one of two very odd doors that require 10 missile hits to enter. Beyond it lies another Energy Tank. Head in here and grab it if things go very badly for you during the fight with Ridley.
- Sometimes, the fireballs will bounce almost vertically, and sometimes they will coast a ways. If they are coasting, you can safely stand right next to him. You can also screw attack Ridley when he jumps for massive damage. Naturally this is a lot easier if the fireballs are cooperating. If they are bouncing vertically, then you must let them bounce about six times or so, then freeze them if you still have ice beam, before approaching. If you have wave beam, it's probably easier to just attack from the lava.
Destinations[edit]
- A) Back into the fire
- Once you are finished in Hideout II, or if you forgot an important item and need to go back, you have only one option out of here: the way you came in. The only elevator out of Hideout II leads back to the fiery region of Norfair.
Notes[edit]

- Getting over the tall column
- Finding a way to get past the tall pipe at the end of the hallway (to the left of the elevator) can be tricky. Some players get lucky and manage to freeze one of the hopping Dessgeegas at a height that they can bomb jump over the column from, but there's a much more sophisticated method. Back towards the right end of the room are a few floor tiles that can be bombed, giving you access to a secret tunnel that travels the length of the corridor. When you roll beneath the column, bomb the left end of the tunnel to make the opening appear.