USS Lexington accompanies USS Jericho on a scientific mission (Mission 161) on Deneb Kaitos. UNS Dharma awaits them on the other side and after a battle, Lexington surrenders. Captain Dayna leaves you behind, while Lieutenant Tran leaves some messages for you. As the crew are transferred to the enemy ship, Dayna suicides in an explosion that kills all crew as well as Dharma. You wake up alone on Deck 2 with some messages left for you, in order to complete the mission.
First things first, you must repair the ship.
Deck 2[edit]
Read the captain's NOTE he left on you. He gives you the VIS override code (A3X5). Go forward and turn right; enter captain's stateroom using the code. Take the CREW MANIFEST and use the computer terminal in order to hear his last Captain's Log. Read the CREW MANIFEST for information on the Lexington crew, their names, and Mission 161 details. The final pages have sketches with the stateroom map and their VIS override codes.
Exit and go forward to the Wardroom. Approach the screen and touch the controls in order to see Tran's message. She tells you to repair the reactor and the central mainframe where her earlier message awaits you. As the video ends, you receive a YELLOW STRIPE CARD.
You can explore the deck and enter some of the rooms. If you visit the Storage Area, you can take some modules but you can also do it later. You can also visit the Communications Center now, and you will see a video with the repeating distress signal sent by Falcon during the battle. For now, you cannot override it.
Hull Puncture[edit]
Return to the point where you woke up in the corridor and turn to the computer terminal. Talk to it and use all available replies. Deck 2 is isolated because of oxygen leak; a hole caused by the recent battle. Open the Emergency Stores Cabinet, right above the terminal, then take the HULL PATCH KIT, and open it.
Enter Renato Olivar's stateroom (2B) using VIS override code B29X. Spray the GEL-FOAM SPRAY on the hull puncture, then put the MOLECULAR GLUE on the PATCH, and plug the hull puncture with the PATCH. Oxygen loss is remedied and you can go to the other decks.
Now exit, and you can talk to the computer terminal about the repair.
Radiation Leak[edit]
Go to the elevator, open it with the button and go inside; use the YELLOW STRIPE CARD and use the controls. Since Engineering is blocked, you can go only to Reactor Spaces.
Deck 5[edit]
Turn right and go forward, then turn right again and enter the Medlab. Go on the left where the doctor's console is. Read the note and note down the code 911 for the remote autodoc. Leave the room and go forward to the Science Lab.
Open the storage cabinet marked "FRT" (Fire Research Team) and take the GEIGER COUNTER and the SCANNER. Go to the Elevator and use the controls.
Reactor Spaces[edit]
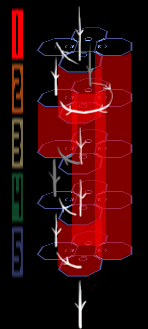
Turn right and go forward.
Talk to the terminal and use all replies to learn about the damage, how it can be corrected and how can you reach the Core. Since the shaft is contaminated, the elevator has no access.
Go down the ladder to the access tunnels and turn on GEIGER COUNTER.
You must take the safest route, judging by the counter beeping. It is a cylindrical shaft of five levels (1–5) and 4 sections (A–D). Note that the D section shafts are fully contaminated. Of the C section, only the first shaft is safe. You must traverse mainly between A and B.
One safe way is the following:
- 1
- A: Left
- B: Down
- 2
- B: Right
- A: Down
- 3
- A: Down
- 4
- A: Left
- B: Down
- 5
- B: Right
- A: Down
Engineering[edit]
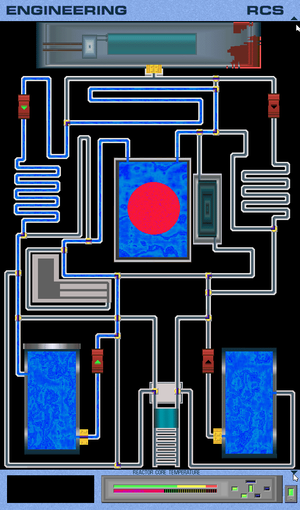
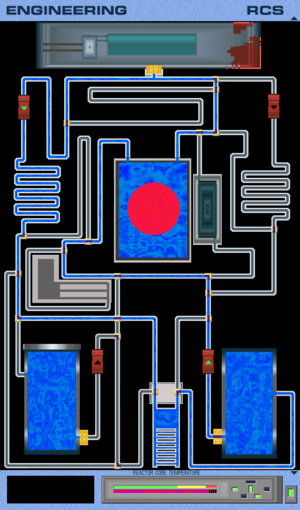
Enter the reactor operations room, go to the ladder and open the equipment storage cabinet. Take the CUTTING TORCH and go up the ladder. Go to the end of access tunnel 2 or 3 and open the manual valve. Return down the ladder and enter the alloy framework to use the engineering console.
You must repair the reactor coolant feeding. The fluid must flow from the Auxiliary Tank to the Reactor Core, then to one of the Heat Exchangers, and then back to the Tank, optionally through the Ion Control Pool. You have limited time till the Reactor heats up. Note that when the fluid reaches the Core, it will cool down a bit, buying you some time. However it will start heating up again, if you don't complete the circuit soon.
There are at least two solutions, depending on which manual Valve you opened previously. Their only actual difference is on two valves at the lower left part of the schematic.
Leave and talk to the computer terminal to learn about the condition change.
Computer malfunction[edit]
Go to the elevator.
Deck 3[edit]
Enter Kimberly Falcon's stateroom (VIS override code L6EC). Open the desk drawer and look in it. Read Falcon's note, and you learn James Poole's VIS override code (IH31)
Enter Hideki Miura's stateroom (VIS override code F111), take the NECKLACE with the pi symbol, and the SOURCE CODE. Use the computer terminal and program it with the SOURCE CODE, you get the pi result
If you want, you can enter Mary Quan's stateroom (VIS override code JU88), take and read her JOURNAL for some background information, especially concerning the possible traitor.
Deck 5[edit]
Turn left and go forward to the wreckage in the corridor. Ignite the CUTTING TORCH and clear the wreckage with it; then put it out. Open door to computer room where Miura's voice asks for a code; enter the first 4 digits of the Pi code: 3141. Go forward to the mainframe and open the panel in the Cyber Systems control console
Read the Post-It which says that the rightmost of five switches is for emergency. Press it; the system is rebooted clean. Watch Tran's first message about contacting the headquarters. You also learn the code "MELISSA" to override the distress call in order to gain access to the TCS (Tachyon Communication System) and ths IPS (Interstellar Positioning System).
You now have full access from each computer terminal. Find one and use all available replies to learn about the Ship and Persephone. You will learn about the malfunctioning parabolic dish and the defective modules (EC2001 and EC2010; possibly a reference to Arthur Clarke). You will also learn about the shuttle Ariadne, the code "JACOB'S LADDER", and how to bring her in the Shuttle Bay.
Communications malfunction[edit]
When you finish go to the elevator.
Deck 2[edit]
Turn left and go to the Communications Center. If you use the TCS controls, you will override the loop distress message and gain access. You can see the Diagnostics and you will once more see the defective modules. Enter the electronic spares storage area across the hall and open the boxes of EC2010 and EC2001 spares. Read the note from the Spares box; Mark Mulroney took the last spare is in the VR system. Take the elevator.
Deck 3[edit]
Turn right to the Mess Hall. In order to see the game's backstory, use the VR system and watch the two videos concerning the war and information of the ship Lexington. Pull the power and data cables, and remove the VR system CPU and open it. When you're done, go out and take the elevator.
Deck 6[edit]
First, visit the Cargo Bay and pick up the MULTITOOL from the floor. Then go to the Shuttle Bay control room and open the suit locker, then take the VACUUM SUIT and the VACUUM SUIT HELMET. Disassemble the CUTTING TORCH with the MULTITOOL and attach the OXYGEN TANK to the VACUUM SUIT. Put on the VACUUM SUIT and the VACUUM SUIT HELMET. Use the controls to depressurize the Shuttle Bay (you can skip depressurization; nothing will be affected).
Open the Shuttle Bay door and depressurize the Control Room. Open the Control Room door and exit the Control Room to the right and walk across the Shuttle Bay to exit the ship.
Extra-vehicular activity[edit]
Now you walk on the hull of Lexington. Walking is a bit confusing here and you have no map. Note that at some points you can't control with the keyboard; mouse is required for the points you have to "climb" up or down.
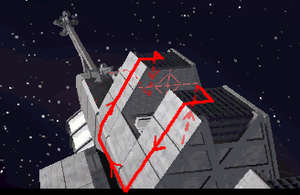
As you are outside, three times you'll need to: go left or right, then forward (left, forward, etc.) in order to walk around the side of the Shuttle Bay exterior. Then turn to the bow of the ship (the dish should be visible by now) and go forward. You have reached the TCS dish.
Approach it from the other side, turn left and face the access panel and open it. Remove the defective EC2001 and EC2010 modules and plug the E2001 and EC2010 modules from your inventory into the panel (they will be placed automatically in the appropriate system bus).
Close the access panel and return to the Shuttle Bay.
Inside the ship[edit]
Walk across the Bay and into the Control Room. Use the Controls to close the Control Room Door and pressurize the Control Room. You automatically toss away the oxygen tank and remove your helmet.
Go to the elevator.
Deck 2[edit]
Go to the Communications Center and use the TCS controls. If you want, you can run the Diagnostics (3) to verify that you repaired the dish. Choose Establish Relay Link (1).
The point is to choose a TRB and Establish Link until you reach the Erebus colony, and the only way to this is the TRB at 70 Ophiuchi. There are several routes to reach it.. In order to choose the correct TRB, you can click each one, consult the Starchart and see if the suggested communication line is any closer to your target (already marked inside a green). Whenever you find one of the three that seems best to you, press Establish Link and repeat until you reach Erebus.
Note that there are several UN TRBs and if you reach them, they will start tracing your signal back, resulting in game over. Press Back One Node as soon as possible and if they still trace you, log off to the actual game. Then try again.
With each established link, you also receive some bulletin "News" concerning the war, which disappear after a few moments. However they add to the realism and the backstory feeling of the game.
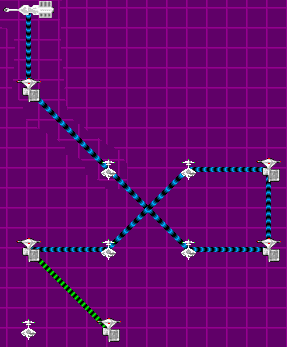
The briefer sequence is:
- LEXINGTON
- TRB010
- TRB291
- TRB695
- TRB333
- TRB905
- TRB869
- TRB061
- TRB442
- TRB801
- EREBUS
Once you make it, press Main Menu button and choose Transmit Over Link (2).
You have a dialog with Admiral Decker who tells you about the mission, the supposed alien presence on the planet, and finally the "secret weapon" developed by the rebels which can turn the war in favor for your side. Your replies must say that you must disobey orders and stay and fight in order to complete the mission. Do not accept to be removed. Finally Decker will give you the release codes.
The Bomb[edit]
Enter James Poole's stateroom (VIS override code IH31) and take the SHIP MODEL. Disassemble it with the MULTITOOL. Listen to the TRANSMITTER and turn it off. Open the ENVELOPE and read the LETTER. Poole was the traitor.
Go to the wardroom and approach the right wall with the display case with the ship model. Put the KEY in the keyhole, take the SHIP MODEL and once more disassemble it with the MULTITOOL.
Read the METAL CYLINDER and open the ANTIMATTER BOMB. If you want, you can talk to the computer terminal about it for more information.
Simply press the large button on the left to stop the counter.
Ariadne[edit]
Now, access the Communication Controls once more, and Establish Relay Link (1). Choose once more TRB010 and then SV33 USS Jericho. Press Main Menu and then Transmit Over Link (2). Enter the Command Patch: JACOBSLADDER and choose Intership Transfer (using homing beacon) (Flightplan Bravo) and Exit (4).
Deck 6[edit]
Go to the Shuttle Bay Control Room and use the controls. Activate NDB Homing and Ariadne will come.
Close Shuttle Bay door, pressurize Shuttle Bay, and open Control Room door
Enter planetary lander, open the door and enter the lander midships compartment. Open the storage cabinet and take one OXYGEN TANK.
Close the storage cabinet, exit and once more go to the Shuttle Bay Control Room. Attach the OXYGEN TANK to the VACUUM SUIT, put on the VACUUM SUIT HELMET and again use the controls to depressurize both rooms and then open Shuttle Bay door.
Re-enter planetary lander and proceed to the flight deck. Use the flight controls. Preflight checklist is initiated which will take some time, and will finish after the upcoming battles.
Now for one more time, return to the Shuttle Bay Control Room and use the controls to close the Control Room door and pressurize the Control Room. Remove the VACUUM SUIT.
Space battles[edit]
Now it is time to prepare for the upcoming UN ships and the secret weapon of the Alliance.
Deck 2[edit]
Enter Michael Dahl's stateroom (VIS override code DC22). Turn on the DEVICE you found in Poole's SHIP MODEL and look in it. It is a retinal scanner with which Poole has stored the retinal patterns of several crew persons. The code names resemble or simply have the same initials with their names
- Marvel Quarry
- Mary Quan
- High Mirror
- Hideki Miura
- Jewel True
- Jennifer Tran
- Miracle Dark
- Michael Dahl
- Target Nautilus
- Taewon Narang
- Kingdom Fallen
- Kim Falcon
- Pale Mantis
- Paul Mandon
- Thistle Random
- James Randall (?)
- Stone Daedalus
- Steven Dayna
- Remote Olympus
- Renato Olivar
In order to open Dahl's safe, select Code Miracle Dark and click Exit. Put the DEVICE on the Eyepiece, open the safe and get everything there, the CABLE, the HEADSET, the FOLDER, the AMPULE, the HYPO and close the safe.
Bridge[edit]
Traverse the corridor and enter the Bridge. Move right forward and use the Tactical Console.
The system performs 3 checks:
- Reprogram the drones (it's where you learn the code 1-8-0)
- Connect the cable
- Use the hypo and wear the headset.
If you haven't performed any of them, the program won't start: do them now:
Weapons Bays[edit]
Go to any one of the three branches of the corridor and enter Weapons Bay One, Two or Three control room. Use the weapons control system and choose For each drone: Select, Program, type 180, Load, Activate. Now Exit.
The narrative says that you perform the same to the other two bays.
Bridge[edit]
Attach the CABLE to the HEADSET and then the Console. Then use the HYPO and the AMPULE and use them on yourself. Put the HEADSET on.
Now, you must perform 8 scenarios of historical missions. If you fail a mission, you can replay it but you won't proceed unless you win it. The good news is that you can set the Difficulty Bar. If you move it to the full left, play will be automatic with 100% success for all missions.
Once you finish all of them, you will encounter 2 actual fights with the UN ships. The first one will come in 75 minutes, and the second after 50 minutes. You can use this time to explore the ship and/or do some things you missed earlier, like loading Ariadne. You can also use the "Wait" command (5 minutes each) to advance the time.
Of course, if you lose any drones in the first actual battle, it won't be available in the second one. If you fail a battle, the game will end.
Descent to Persephone[edit]
Deck 6[edit]
Remove the HEADSET, and go to the Shuttle Bay Control Room. Attach the OXYGEN TANK to the VACUUM SUIT, put on the VACUUM SUIT HELMET and again use the controls to depressurize the control room and then open the Control Room door.
Exit and enter the planetary lander. Open the left storage cabinet and take the PROBE LAUNCHER and the SEISMIC PROBE. Open the right storage cabinet and take the GAS CARTRIDGE and the WIRE SPOOL. Enter the cockpit; the initialization is complete by now. Use the flight controls and watch animation of your landing to Persephone.