Walking on water[edit]

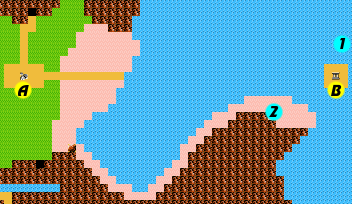
| A | Nabooru Town |
| B | Ocean Palace |
| 1 | Heart Container |
| 2 | Points bag |
Once you are safely back at Nabooru Town, you can begin your search for the next palace. A man in Nabooru speaks of being able to walk on water with the boots. If you follow the trail that leads east out of Nabooru, you will find that you can indeed walk on the water. You are only permitted to walk on certain sections of it, however, but it is enough to get you to where you want to go.
Before you go directly to the palace, there are two locations worth checking out. It's difficult to find, but there is a small path that branches north out of the path to the palace, and then heads east. Just above the palace, you will find a small uncharted island (label 1 on the map) where you can find the third Heart Container ![]() , which will extend your health meter from six to seven bars. Additionally, if you search the desert below the palace, you can find a P bag worth 500 points, but you'll need to cast Jump in order to collect it.
, which will extend your health meter from six to seven bars. Additionally, if you search the desert below the palace, you can find a P bag worth 500 points, but you'll need to cast Jump in order to collect it.
Ocean Palace[edit]
This is one of the largest palaces in the entire game, second only to the Great Palace itself. As a matter of fact, there are two useless dead ends that you can avoid if you are trying to complete the palace quickly. Many point bags lie tantalizingly out of reach. Only expend the energy to collect them if you can afford it.
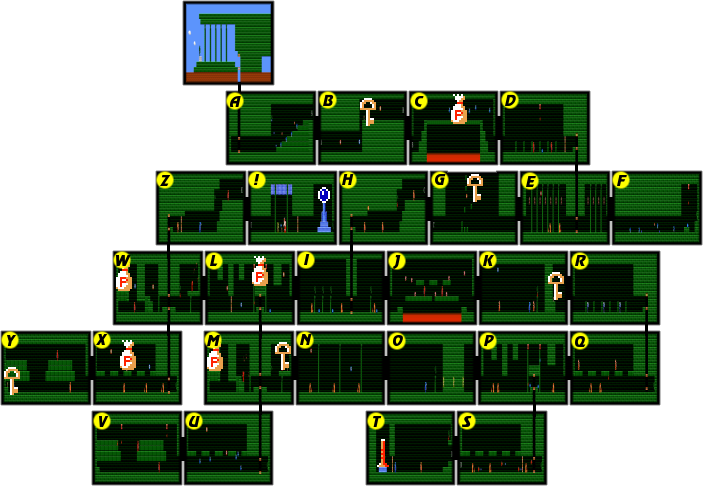
- A: Defeat the Blue Arnels that occupy each step of the staircase and advance to room B.
- B: You will have no choice but to cast Fairy in order to get up and over the high tunnel. In the process, you will notice that you will pass a key which you will have to leave the room and come back for. Watch out for the Bubbles which interfere with your flight path. Once you are in room C, come back to collect the key, and then return.
- C: Ra statue heads will attack you as you cross the crumbling bridge. Don't jump high unless it is to jump over them, or they will appear in a high location as well, making them more difficult to dodge. Collect the 200 point bag along the way to room D.
- D: You may find the two Red Ironknuckles in this room easier to beat if you remove some of the small stone columns that litter the floor. Defeat them, unlock the door, and take the elevator down to room E.
- E: There is nothing to collect to the right, so start out by heading left. You will meet the Margos here, a variety of wizard capable of casting fire magic at Link. They are slower than Wizzrobes, however, and can be taken out with quick sword attacks. At 200 experience points apiece, they are definitely worth fighting. Head to room G.
- F: There is little to no reason to enter this room. All you will find are some Blue Arnels, some Myus, and a dripping statue that creates Bots occasionally. Even the statue at the end of the room will not provide a red potion. Return to room E.
- G: In the middle of the room, you will see a key perched aloft a high platform while blocks rain down from the ceiling while a Fire Moa floats around the room. They fall randomly, so it's difficult to predict a safe place to stand, but you must ultimately allow enough blocks to fall so you can rise up to the location of the key and collect it. Once you have it, continue left to room H.
- H: Defeat the first of three Orange Ironknuckles and continue to the steps. Strike the statue head on your way down for a Red Potion. Cast Life if you need to before collecting it. Then defeat the remaining two Ironknuckles and head down the elevator to room I.
- I: Upon arriving here, you may wish to explore rooms J and K to the right, but they contain no items of value. Take out the valuable Margo enemies and head left to room L when you're ready.
- J: This is a rather dangerous room filled with Bagobagos and two Red Ironknuckles. Fight very carefully here. No matter how tempted you are to use a Downward Thrust, try to avoid it, as you can poke a hole in the very platform you intend to stand on. Clear the room as quickly as you can.
- K: All you will find here is a Bubble, some Kobolds, and a Blue Ironknuckle. After defeating the Ironknuckle, you may see a key beyond the other side of the wall, with no way to reach it. You'll have to find another way around. If you use an Upward Thrust on the statue by the dead end, you may be able to get a Red Potion from it.
- L: Watch out for the two dripping pillars on either side of the elevator. If you cast Jump, you can collect the 200 point bag up above. Then ride the elevator down to room M.
- M: When you arrive, you can optionally start by heading left, defeating the Gooma, and collecting the 200 point bag at the end of the room before turning around. Then head right from the elevator, and cast Jump so that you can reach the platform with the Red Ironknuckle and the key. Defeat the enemy and collect the key, and head to the right to room N.
- N: This room contains nothing but Margos and Bubbles. Take out the Margos as you encounter them and continue right to room O.
- O: When you enter this room, you will have to face off with a deadly Blue Ironknuckle. Do your best to defeat it. When you are done, it may appear as though you have reached another dead-end. However, if you recall, there was a man in Nabooru who mentioned something about walking through walls. If you give it a try here, you may be surprised to find that part of the wall is an illusion, and you can walk right through it and on to the other side to room P.
- P: Defeat the Margos that appear here as well. Pass the elevator for now and advance to the right to room Q.
- Q: Along with Margos, you will also run into some Kobolds which can make fighting conditions difficult. Don't stick around if you're too low on health. Instead, head straight to the elevator and ride it up to room R.
- R: Three blue Stalfos will drop from the ceiling to attack you. Quickly kneel down and strike them as you approach each one to dispatch them quickly. Advance to the left side of the room and enter the right side of room K where you can finally collect that elusive key. Now you must return all the way back to room P and ride it down to room S.
- S: Margos and Mau statue heads make a very deadly combination. If you have to focus on one or the other, focus on the Maus as they are more prevalent and dangerous than the Margos. Unlock the door by the elevator and race to the other side to room T.
- T: Defeat the Orange Ironknuckle, followed by the Blue Ironknuckle which guards the door. Unlock the door to gain access to the Flute
 , the tool which is needed to reach the southern region of East Hyrule. Cast Jump and attack the statue just above the entrance for a valuable Red Potion.
 - Now return to the elevator in room S, take it up to room P, return through the illusion wall in room O, and head back to the elevator in room M. You can explore rooms U and V if you like, but there is nothing of value in them. Your next destination is room W, so ride the elevator in room M up to L and head left.
- U: This room combines Ra statue heads and Bubbles. Both are equally dangerous and should be avoided.
- V: There are three Red Ironknuckles here, some dripping pillars, and not much else. There is, however, a red potion hidden away in the first block of the highest row of blocks just to the left of the last dripping pillar. You'll need to cast Jump to collect it.
- W: Cast Jump if you wish to fight the Gooma above the entrance, although it's not required. Also, there is a red potion hidden in the statue head. You only need to pass the elevator if you wish to fight the Red Ironknuckle to the left, and collect the 200 point bag beyond him. Otherwise, ride the elevator down to room X.
- X: Another deadly combination of Bubbles and Margos will try to prevent you from reaching the other side. A 50 point bag can be easily collected along the way. Head left to room Y.
- Y: A trio of Ironknuckles guard the last key that you need to collect, one of each kind. The Red Ironknuckle is perched high atop the blocks and may not necessarily face off with you. Collect the key, then return to the elevator in room X, ride it back up to room W, and beyond to room Z.
- Z: Beyond the locked door awaits another trio of Ironknuckles. You'll face an Orange one first, followed by a Blue one, with a Red one waiting for you at the top before the entrance to the room of the palace boss.
- !: Boss Gooma is one of the tougher bosses in the game. He is exclusive to the NES version of the game (he does not appear in the original Japanese disk version). He is a large enemy with a ball and chain that he swings briefly before launching forward. It is a damaging attack that is difficult to avoid. A Downward Thust is useless against him. To attack him safely, you'll have to dash in, perform a low squatting stab, and immediately retreat before he has a chance to throw his ball and chain. If you miss or attack late, he will almost certainly hit you. Only by striking him and pushing him backwards can you be assured of a safe escape. Repeat this process until he is defeated, collect the key, and place the fifth crystal in the statue.
Heading south[edit]
You have left the fifth palace with the very tool (Flute ![]() ) that you need to explore the remainder of Hyrule. You have heard many rumors about the River Devil, and its weakness to sound. Now is the time to put those rumors to the test.
) that you need to explore the remainder of Hyrule. You have heard many rumors about the River Devil, and its weakness to sound. Now is the time to put those rumors to the test.

