Controls[edit]
- Joystick: Use the joystick to move your craft in any one of eight directions throughout the screen. You can occupy most of the space on the screen.
- Fire: Press the fire button to shoot a single twin shot up to the top of the screen. The motion of your ship has an effect on the distance that your bullets will travel. As you move down, your bullets won't travel as far up the screen. As you move up, your bullets will fly up a little higher.
- Bomb: Press the bomb button to use one of your Mega Crush bombs. When you use the Mega Crush bomb, all of the enemy bullets (and any large insect bombs) on the screen instantly vanish. In addition, the enemy will not be able to fire another bullet for a few seconds. The Mega Crush bombs have no effect on the actual enemies.
- 1-2 Players: Press either button to start a one or two player game.
Characters[edit]
Players[edit]


These are the NEG-NIN's last resort weapons against the EXES insect horde, the Colonel Issue (silver, first player) and the Sargent Issue (gold, second player). They are extremely maneuverable and are equipped with twin particle cannons, and contain storage for up to nine Mega-Crush electromagnetic bombs. (When playing a two-player game, both players have access to the same Mega-Crush supply.) The particle cannon can be upgraded through the collection of various power-up orbs to a double or triple wave beam gun. When the guns are upgraded, the crafts take on a slightly different look, as illustrated by the Sargent Issue on the right. The Colonel and Sargent Issues are destroyed by contact with the enemies or any projectiles.
Small Insects[edit]
 |
Bees are the first small insect type that you will encounter. They approach your craft from the top of the screen, and from the sides. They tend to move at a slow pace, and they never make any changes in direction. They fire two bullets out at slight angles to their current direction. |
 |
Beetles tend to appear later on in the stage. Like Bees, they appear from the sides of the screen. They zoom towards you, but after they pass you, they stop and begin to reorient themselves in your direction. When they are facing you again, they take off once more in your direction. This behavior can repeat itself for a number of times. They do not fire at you. |
 |
Flies tend to appear just before a stage boss is about to appear. They fly out in large group formations, either from the top left, or the top right of the screen. They fly diagonally across the screen until they are just past the center, and then they begin to arc back to the side they appeared from, rolling in to a spin as they leave. A couple of flies may fire at you as they pass. |
 |
Dragonflies are especially deadly, since they appear exclusively from the bottom of the screen. They rise up from the bottom and attempt to lock on to your position. When they pass you, they begin to arc around in a circle trying to lock on to you once more. They fire infrequently, but when they do, they fire a spread of three bullets. |
 |
Stingrays usually appear at the very beginning or very end of a stage, including during a boss battle. A squadron of 8 of them fly up from the lower level of the screen into a line formation at the top of the screen before peeling out and attempting to crash into your craft. |
Large Insects[edit]
Larger insects will appear from time to time, making your battle very difficult. They typically take ten shots to destroy, although some might require more. After receiving six shots, they turn from green to yellow. After two more shots, they turn purple. Two more shots will destroy them. They can appear alone or in groups of two or four. They follow very precise patterns across the screen and do not deviate from them unless they turn purple. Some large insects that turn purple will break from formation and execute a dive attack in a last-ditch effort to destroy you before you destroy them. Large insects lob bombs at your craft which can be destroyed by both your regular gun and by Mega-Crush bombs.

|

|

|

|

|

|
Desura[edit]
Desuras are objects which warp on to the screen in a squad of 8 and appear in a particular formation. Each kind of Desura will always appear in one particular formation. They fire at you for a brief amount of time, and then they disappear. If you do not destroy all eight of the Desura, the remainder of the squad will reappear and fire at you again before disappearing for good.
 |
The round Desura will appear in a circle formation. |
 |
The diamond Desura will appear in cross formation. |
 |
The X Desura will appear in an X formation. |
Misc[edit]
 |
Skulls will initally appear as an enemy during the first Hi-Point area of the first Stage, where you can collect the POW icon and turn them into fruit. They take five shots to destroy and they are worth 500 points. Later on, they will appear in a rotating circle formation, which you must destroy or avoid. The first four that you kill are worth 500 points, the but last four are worth 1000, 2000, 3000, and 5000 points if you manage to destroy every one. You must fire quickly, however, and be on the look out for any bullets that they fire on you. |
 |
Skullcoins replace normal Skulls as the typical fodder for Hi-Point areas in later stages. They also take five shots to kill, and each one is worth 500 points. |
 |
The Yashichi (seen at least once in nearly every early Capcom game) is a formidable enemy in Exed Exes. They tend to appear before or during boss fights. A group of Yashichis ranging anywhere from four to eight will drop down from the top of the screen, and stall somewhere for a brief moment before charging directly at you. If you are a fair distance away when they charge, they will advance very quickly. If you are nearby, they approach you more slowly. |
Cannons[edit]
Cannons appear on the ground as targets that your regular gun can strike at any time. They fire very well aimed shots at you, so the faster you remove them from the screen, the less of a threat they can become. You can also collide with them if you're not careful. Most cannons require two shots to destroy.

|

|

|

|

|

|

|

|
Ground Domes[edit]
Ground Domes are even more harmless than Cannons. They primarily serve as an annoyance by getting in the way of a shot that you might be taking at a higher airborne enemy. With a few exceptions, the domes usually only require one shot to remove. They may even produce fruit when destroyed which can be collected for a good amount of bonus points.

|

|

|

|

|

|

|

|

|

|
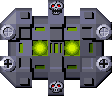
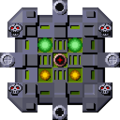
Stage Bosses[edit]

The stage bosses are composed of four elements that can be arranged in nine different ways, with the ultimate arrangement being the EXED EXES, shown to the right. The elements that make up two identical boss arrangements may not be the same from stage to stage, but the radars are usually consistent. Every skull and gun must be destroyed in order to advance to the next stage. However, the boss will not truly be beaten until the radars are destroyed as well. If any radars are left as the last elements, the boss can escape.
|
Skulls on the boss ships are no different from the skulls you would encounter elsewhere. They fire bullets infrequently, and they require five shots to destroy. |
 |
These guns are much tougher than skulls. They fire more frequently, and they require ten shots to destroy. |
 |
The toughest guns found on the bosses require a full 25 shots to destroy. Destroying them is absolutely necessary, but if weaker guns exist, focus on the others first to cut down on the shower of bullets that you will receive. |
 |
Radars, also known as cores, are the only elements of a boss that are not required to be destroyed in order to advance. In fact, if you destroy every other element and fail to destroy the radar, the boss may escape, causing you to lose out on a considerable bonus. Be sure to destroy the radars before the last gun is removed. Radars will go through four colored stages before being destroyed. Each stage takes five shots to defeat. The stages are ordered from Dark Green to Light Green to Yellow to Purple. You will gain 1,000 point for every color that you had to transition through in order to defeat it. |
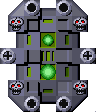
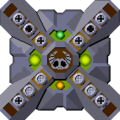
Arrangements[edit]
-

Hepcon
-
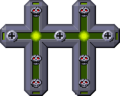
TwinCross
-
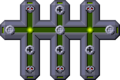
TriCross
-

EXED1
-
EXED2
-
EXED3
-
Super EXES
-
Prototype EXED EXES


Items[edit]
Power-Ups[edit]
 |
The flashing Pow is different from all other Pows. It does not upgrade your craft's weaponry. Instead, it transforms every single enemy, in the air or on the ground, that is present on the screen at the time that you touch it into bonus point fruit. Large insects will also be transformed in to equally large Strawberries. They primarily appear during Hi-Point sections in a number of stages, but they can also occur elsewhere. Use them to rack up high scores. |
 |
The yellow Pow is the lowest level upgrade that you can receive for your craft. It will transform your current gun into a double wave beam gun, which has a slightly better range than the regular particle gun. Note this gun does not increase your weapon's strength, and it will replace a triple shooting power-up if you have one when you pick it up. |
 |
The white Pow in the yellow circle is the second level upgrade for your craft. It transforms you current gun into a triple wave beam gun that has a better range than the double wave beam gun. Note that it does not increase the strength of your gun, and it will reduce the range of the extended range triple wave beam power-up if you have that when you pick it up. |
 |
The white Pow in a green circle is the highest level upgrade for your craft. It transforms your current gun into a triple wave beam gun that has the best range of any upgrade that you can collect. Note that like the other upgrades, this does not increase the strength of your gun. You do not need to have collected any of the other power-ups to gain the benefit of this one. |
 |
The backwards Pow icon, or woP, is a weapons downgrade, which transforms your guns back to the original double particle gun that you start out with. For your sacrifice, however, you are awarded 10,000 points for collecting the icon. |
 |
The flashing star Sakachi is extra ammunition for your Mega-Crush supply. They initially appear one time for every 50,000 points that you collect until you reach 250,000 points. At that time, they begin to appear only once for every 250,000 additional points that you accumulate. You can store a maximum of 9 Mega-Crushes. Any Sakachi that you collect after that does not count towards your supply. You earn 5,000 points for every Sakachi that you capture. |
Bonus[edit]
Fruit appear as bonuses throughout the game. When you touch the flashing Pow icon they always appear. Some can be found by shooting certain ground domes, cannons or radars. One particular fruit will be chosen for all of the enemies to transform into. The only exception is the Giant Strawberry, which is worth 10,000 points, and what all large insects will transform into.
 |
 |
 |
 |
 |

|

|
 |
 |
 |
 |
 |

|
 |
The cow is the most valuable Bonus item in the whole game, earning you 50,000 points for every one that you find and collect. They are known to be found once toward the end of Stage 5 and once toward the end of Stage 14, although more may exist. |