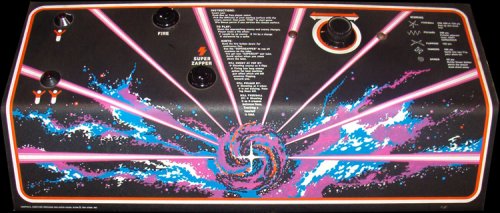
Controls

- Spinner: This super-sensitive spinner knob will send your blaster rapidly around all the open lanes. Learn how to control this knob precisely, to both move quickly and to enter any lane at will. You must learn to control the knob for three situations:
- Learn how to operate the knob at lightning speed. That means running it rapidly around the electric field.
- Learn accuracy. You must be able to stop on a dime -— at will. Stopping accurately means the difference between high and average scores.
- Learn to cross lanes when traveling down the lane, to a new electrical pattern. If, when moving down a lane, you witness an impaling Spike, switch lanes. This trick will ensure your safe journey to a new electric field or level.
- Fire: You have an unlimited amount of fire. At the beginning, fire constantly, keeping your finger down on the button. On later screens, when accuracy is of prime importance, it's dangerous to fire constantly. Plan your shots for the best impact.
- Super Zapper: You have the use of one Super Zapper per pattern. Before you enter a new pattern, the Super Zapper will recharge. They aren't cumulative. By all means, use one Super Zapper per pattern, but use it intelligently. The Super Zapper will destroy every enemy in every lane -- except the Spikes. After you use it once, you may use it one more time, but with an extremely reduced effect. It will only kill an enemy that is practically on top of you and nothing else.
- 1 or 2 Players: Push these buttons to begin a one or two player game.
Characters
Blaster

You energize this player though the electrical field. The trick is to keep moving. Your fire power is unlimited, but comes in a volley of shots that must hit something before you can fire again. On the entry-level screens (1, 3, 5, 7, or 9), it's best to fire constantly, in order to keep the enemy under control. You'll have to plan your fire more strategically on later screens. Your path is limited to the perimeter of the different playing fields.
Flippers

These hourglass-shaped enemies are very quick and very dangerous. They can flip from lane to lane rapidly. Spawned by Tankers, Flippers progress quickly towards the ends of the lanes. Try to kill them while they're in this process. When they've reached the top of the lanes, they chase you with lightning speed. You can kill them then, but it's tough—you must fight fire with fire. It's always preferable to kill them when they're still in the lanes.
Tanker

In and of themselves, Tankers present minimal danger. They become dangerous either 1) after you jolt them or 2) when they reach the top of the lane. In either situation, they split into two Flippers. And Flippers are dangerous. Kill the Tankers as close to the bottom of the well as you can. Don't let them get too high. If you kill them near the top of the well, the Flippers will be on top of you. Tankers move slowly, in one lane only. Tankers begin to appear on the third level of play.
Spikers

These are slow-moving, predictable enemies that never cross lanes. They never reach the top. Spikers have but one purpose: to create Spikes—as long as possible. Spikes cannot be killed; they are simply destroyed. Enemies can use Spikes for protection since your shots can't go any lower than the tip of a Spike. Spikes also cause problems at the end of an electrical pattern—after all the animated enemies have been dealt with. In order to reach a new electrical pattern, you must travel down through a lane. If there's a Spike in the lane, you'll be impaled. If you fry the Spikers fast enough, the Spikes they leave will be short, and you can quickly chip away at them. Destroy Spikers as quickly as you can or you'll have to contend with longer Spikes. Watch out for the bullets that Spikers shoot at you as well.
Fuseballs


Fuseballs first appear during level 11. They're slow, but unpredictable. They constantly change lanes, and move up and down to dodge your shots. They're aggressive, but they aren't fast. They're very clever. Destroy them at the first opportunity. If ignored, they will eventually get out of hand. The Fuseball Tankers won't appear until level 33. Like regular tankers, these break apart into two enemies (Fuseballs), when shot or when they reach the edge of the well. If you shoot a Fuseball Tanker, move immediately out of the way or the Fuseballs that appear will charge your Blaster and destroy it.
Pulsars


First appearing during level 17, these enemies attempt to short-circuit lanes within the electrical field. You'll know they've completed short-circuits once they start pulsating. It is impossible to cross lanes that Pulsars have effectively short-circuited. You must destroy them when they're in the process of crossing lanes -- while they're still not pulsating. If you're in a lane when a Pulsar short-circuits it, you're dead. Pulsar Tankers are the very last enemy to arrive in the game, appearing at level 41. They split up into two Pulsars, when shot or when they escape the well,. Unlike when fighting Fuseball Tankers, it's important to remain perfectly still when you destroy a Pulsar Tanker. The Pulsars they emit will appear on either side of the lane that the Tanker was in, and may immediately short-circuit either lane.
Scoring
| Flipper | 150 |
| Tanker | 100 |
| Spikers | 50 |
| Pulsar | 200 |
| Fuseball | 250, 500, or 750 |