(the typo is dead now) |
m (fix) |
||
| (6 intermediate revisions by 4 users not shown) | |||
| Line 1: | Line 1: | ||
{{Header Nav|game=Zanac}} | {{Header Nav|game=Zanac}} | ||
== Forest Green == | |||
[[Image:Zanac Area2 A.png|right]] | |||
The 2nd Area begins over a forested area of the planet, which will come and go throughout the course of the stage. Purple platforms are interspersed throughout the stage, and the contrast between the green and purple can look rather stunning at high scroll speeds. But do not let it distract you from your mission or your survival. This stage is fairly short compared to others. | |||
One thing to be aware of is the presence of the E-Fains which appear by flying up through the background. Though you will see them flying back and forth above you, you will not be able to attack or destroy them until they have fully risen to the air with you. They will take on a more blueish hue at that time. Consequently, they will be unable to attack or harm you either until they have fully risen into the air. | |||
{{-}} | |||
will | |||
the | |||
== Collecting weapons == | |||
[[Image:Zanac Area2 B.png|right]] | |||
Early on, you will encounter sections where two or more Weapon Distros will go scrolling by at high speeds. You will also see this around the second half of the stage. At one point, three distros will appear in a straight line. Whether you know what's coming or not, you can plan to position yourself to collect the tiles you need. If not, don't get distracted and try to collect them. By the time you notice them on the screen, it is already too late to do anything about it. Just continue on with your current strategy. | |||
{{-}} | |||
== Maseru Battle== | |||
[[Image:Zanac Area2 C.png|right]] | |||
Your first Capital Ship battle will occur not long after the stage begins. The Maseru will appear. It will warp onto the screen and solidify. Once it's solid, you can shoot at it, but it's strong exterior will appear to repel all weaponry that you fire at it. Despite watching your weapons bounce off of it, you are still damaging it, so don't give up. | |||
Once it's hung around for a little while, it will discharge a string of Leads in a wide line that will fall to the bottom of the screen. If you are using a Special Weapon that can eliminate Leads, you have little to fear. If not, you will have to position yourself so that the Leads scatter around you. The Leads will deviate horizontally the least directly below Maseru. | |||
{{-}} | |||
=== Battle conclusion === | |||
to | [[Image:Zanac Area2 D.png|right]] | ||
the | Eventually, you will damage the ship enough that it will begin to change colors. It will go from a blue color to a yellow color, and eventually to a red color, indicating that it is nearly defeated. Finally, it will take enough damage and trigger a chain reaction of explosions along its body. Once this begins to happen, prepare to move out of the way. The body of the Maseru will explode to reveal 8 Sig missiles that fire off in a different direction. They aren't hard to eliminate or avoid, but they can take you by surprise if you're not prepared. | ||
Again, do not allow the dazzling effects of the high speed scrolling in the background to distract you and take your eyes off the Maseru, or any other enemy, for too long. | |||
{{-}} | |||
== Aggression intensity == | |||
[[Image:Zanac Area2 E.png|right]] | |||
Whether you defeat the Maseru, or if it flies away on it's own, you'll have to stay sharp immediately following the battle. The enemy aggression level will begin to rise quite rapidly at this point, and you will need to stay sharp in order to survive. Just about any upgrade to your ship will trigger a massive response from the System at this point. | |||
You may begin to see the appearance of the Yellow Golgos if you haven't seen them already. They drop down from the top of the screen, firing a good number of Leads in three directions. It's not hard to defeat, but it's ability to flood the screen with bullets means that you will not want to put off defeating it for very long. As soon as you see one appear, move into the same vertical column with it and blast away before it has a chance to make your progression treacherous. | |||
{{-}} | |||
== More forest == | |||
[[Image:Zanac Area2 F.png|right]] | |||
Once you leave the zone of panels, you will return to a forested area. You will be whizzing by at high speed, and Duster meteors will appear and cross the screen. Do everything you can to destroy them or dodge them, along with the rest of the System's attack force. There are a number of Weapon Distros that appear here, so you can make a weapon switch if you feel that is a good strategy. | |||
Keep a sharp eye out for the Degids which appear in halves on either side of the screen, and approach to meet up with one another when they reach your height along the screen. Move out of their way when they begin to close in, or your ship will be destroyed. | |||
{{-}} | |||
and | |||
== A difficult warp == | |||
[[Image:Zanac Area2 G.png|right]] | |||
to | Once you're clear of the forest, and you can see the ground below, it won't be long before you see not one, but two Icons back to back. The first statue is a regular Icon, but the second one is smiling, meaning it's possible to produce a Warp Ball from this Icon. You will still be moving at a very fast pace, so you'll need to be prepared if you intend to make an Enemy Eraser appear from both statues. | ||
{{Footer Nav|game=Zanac|prevpage= | If you don't position your Zanac correctly, or possess the right weapon, you are likely to dislodge an eraser from the first, normal statue, and not the second. If you do manage to knock an eraser out of the second statue and wait a while, it will hollow out and turn into a Warp Ball that will send you on to [[Zanac/Area 3|Area 3]]. As with the first Area, however, you are so close to the final fortress of this area, and will lose the benefit of the aggression reduction that it provides for conquering it if you warp ahead. You may choose, instead, to use the orb that is created by the second Icon as a regular Enemy Eraser by touching it before it hollows out. | ||
{{-}} | |||
== Final Fortress == | |||
[[Image:Zanac Area2 H.png|right]] | |||
* Core composition: 1 Round Core, 2 Panel Cores | |||
* Time Limit: 60 | |||
* Bonus: 20000 | |||
The final fortress of Area 2 also happens to be the first and only one that you will encounter. It contains a number of turrets, all of which fire Light Bars which are easy to defend against. It may help you to eliminate the turrets and keep the general flood of bullets to a minimum. Destroying the turrets will not intensify the offensive level of the cores, nor is it required. | |||
Of the three cores, the Round Core in the center is the most dangerous, as it shoots strong and defensive Berou orbs. As such, it should be the first core that you take out before moving on to the two remaining Panel Cores. Panel Cores fire Sig missiles which, while dangerous, are far easier to deal with when using your standard guns. Once the Panel Cores are destroyed, the screen will flash, you'll receive your bonus, and it's on to the next area. | |||
{{Footer Nav|game=Zanac|prevpage=Area 1|nextpage=Area 3}} | |||
Latest revision as of 03:31, 20 November 2012
Forest Green[edit]
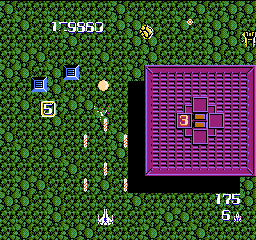
The 2nd Area begins over a forested area of the planet, which will come and go throughout the course of the stage. Purple platforms are interspersed throughout the stage, and the contrast between the green and purple can look rather stunning at high scroll speeds. But do not let it distract you from your mission or your survival. This stage is fairly short compared to others.
One thing to be aware of is the presence of the E-Fains which appear by flying up through the background. Though you will see them flying back and forth above you, you will not be able to attack or destroy them until they have fully risen to the air with you. They will take on a more blueish hue at that time. Consequently, they will be unable to attack or harm you either until they have fully risen into the air.
Collecting weapons[edit]
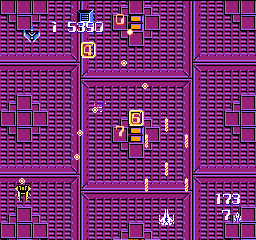
Early on, you will encounter sections where two or more Weapon Distros will go scrolling by at high speeds. You will also see this around the second half of the stage. At one point, three distros will appear in a straight line. Whether you know what's coming or not, you can plan to position yourself to collect the tiles you need. If not, don't get distracted and try to collect them. By the time you notice them on the screen, it is already too late to do anything about it. Just continue on with your current strategy.
Maseru Battle[edit]
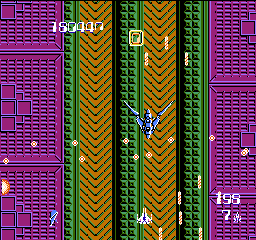
Your first Capital Ship battle will occur not long after the stage begins. The Maseru will appear. It will warp onto the screen and solidify. Once it's solid, you can shoot at it, but it's strong exterior will appear to repel all weaponry that you fire at it. Despite watching your weapons bounce off of it, you are still damaging it, so don't give up.
Once it's hung around for a little while, it will discharge a string of Leads in a wide line that will fall to the bottom of the screen. If you are using a Special Weapon that can eliminate Leads, you have little to fear. If not, you will have to position yourself so that the Leads scatter around you. The Leads will deviate horizontally the least directly below Maseru.
Battle conclusion[edit]
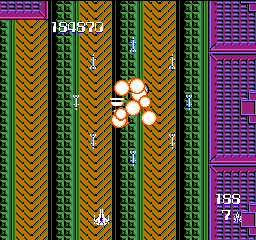
Eventually, you will damage the ship enough that it will begin to change colors. It will go from a blue color to a yellow color, and eventually to a red color, indicating that it is nearly defeated. Finally, it will take enough damage and trigger a chain reaction of explosions along its body. Once this begins to happen, prepare to move out of the way. The body of the Maseru will explode to reveal 8 Sig missiles that fire off in a different direction. They aren't hard to eliminate or avoid, but they can take you by surprise if you're not prepared.
Again, do not allow the dazzling effects of the high speed scrolling in the background to distract you and take your eyes off the Maseru, or any other enemy, for too long.
Aggression intensity[edit]
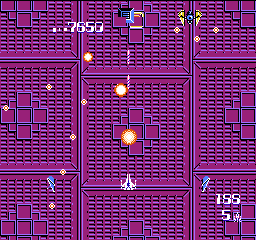
Whether you defeat the Maseru, or if it flies away on it's own, you'll have to stay sharp immediately following the battle. The enemy aggression level will begin to rise quite rapidly at this point, and you will need to stay sharp in order to survive. Just about any upgrade to your ship will trigger a massive response from the System at this point.
You may begin to see the appearance of the Yellow Golgos if you haven't seen them already. They drop down from the top of the screen, firing a good number of Leads in three directions. It's not hard to defeat, but it's ability to flood the screen with bullets means that you will not want to put off defeating it for very long. As soon as you see one appear, move into the same vertical column with it and blast away before it has a chance to make your progression treacherous.
More forest[edit]
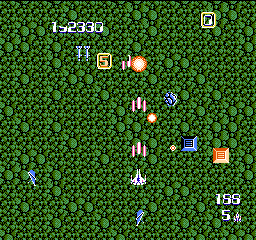
Once you leave the zone of panels, you will return to a forested area. You will be whizzing by at high speed, and Duster meteors will appear and cross the screen. Do everything you can to destroy them or dodge them, along with the rest of the System's attack force. There are a number of Weapon Distros that appear here, so you can make a weapon switch if you feel that is a good strategy.
Keep a sharp eye out for the Degids which appear in halves on either side of the screen, and approach to meet up with one another when they reach your height along the screen. Move out of their way when they begin to close in, or your ship will be destroyed.
A difficult warp[edit]
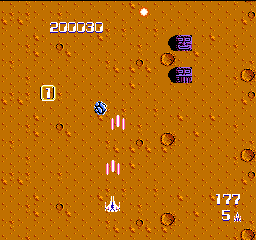
Once you're clear of the forest, and you can see the ground below, it won't be long before you see not one, but two Icons back to back. The first statue is a regular Icon, but the second one is smiling, meaning it's possible to produce a Warp Ball from this Icon. You will still be moving at a very fast pace, so you'll need to be prepared if you intend to make an Enemy Eraser appear from both statues.
If you don't position your Zanac correctly, or possess the right weapon, you are likely to dislodge an eraser from the first, normal statue, and not the second. If you do manage to knock an eraser out of the second statue and wait a while, it will hollow out and turn into a Warp Ball that will send you on to Area 3. As with the first Area, however, you are so close to the final fortress of this area, and will lose the benefit of the aggression reduction that it provides for conquering it if you warp ahead. You may choose, instead, to use the orb that is created by the second Icon as a regular Enemy Eraser by touching it before it hollows out.
Final Fortress[edit]
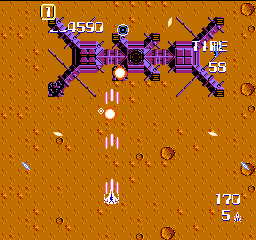
- Core composition: 1 Round Core, 2 Panel Cores
- Time Limit: 60
- Bonus: 20000
The final fortress of Area 2 also happens to be the first and only one that you will encounter. It contains a number of turrets, all of which fire Light Bars which are easy to defend against. It may help you to eliminate the turrets and keep the general flood of bullets to a minimum. Destroying the turrets will not intensify the offensive level of the cores, nor is it required.
Of the three cores, the Round Core in the center is the most dangerous, as it shoots strong and defensive Berou orbs. As such, it should be the first core that you take out before moving on to the two remaining Panel Cores. Panel Cores fire Sig missiles which, while dangerous, are far easier to deal with when using your standard guns. Once the Panel Cores are destroyed, the screen will flash, you'll receive your bonus, and it's on to the next area.