After waking up from a dream about an ancient battle, your journey begins in Paseo. You first visit the Commander of Mota in the Central Tower to learn the reason for your first journey. The Commander asks you to go to the Biosystems Lab where the Biomonstaers are created, and bring back a Recorder. Unfortunately, he does not know where the Biosystems Lab is located. You need to talk to the townspeople and obtain that information. They will also give you some hints for your journey. Back in your home awaits Nei who will insist on accompanying you. Visit the stores and buildings of Paseo. They sell various weapons and devices which you will need. Purchasing medical supplies is highly advised. Remember that in this game, you can wield a weapon in both hands. Don't settle for one when two is more effective. Venture forth only after obtaining your supplies and as much information as possible.
Paseo[edit]
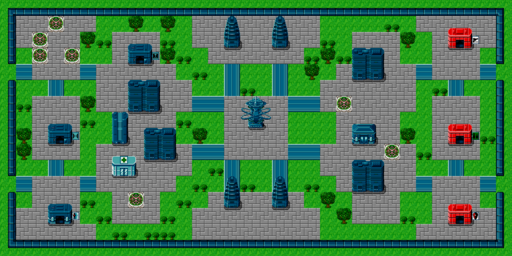
| Item | Cost | Description |
|---|---|---|
| Monomate | 20 | Heals 20 HP |
| Dimate | 60 | Heals 60 HP |
| Antidote | 10 | Cures poison |
| Telepipe | 130 | Teleports the party back to the last place game was saved |
| Escapipe | 70 | Automatically transports party out of dungeon back to entrance |
| Item | Cost | Description |
|---|---|---|
| Knife | 100 | Everyone except Nei Attack +5 |
| Dagger | 200 | Rudo Hugh Kain Shir Attack +8, Defense +1 |
| Scalpel | 180 | Amy Hugh Attack +7 |
| Steel Bar | 80 | Nei Attack +7, Defense +2 |
| Bow Gun | 300 | Rolf Rudo Hugh Kain Attack +16 |
| Sonic Gun | 640 | Rolf Rudo Hugh Kain Attack +17 |
| Item | Cost | Description |
|---|---|---|
| Headgear | 120 | Everyone except Nei Defense +3 |
| Carbon Suit | 128 | Everyone except Nei Defense +4 |
| Carbon Vest | 120 | Nei Defense +4 |
| Fiber Coat | 300 | Rolf Rudo Hugh Kain Defense +8 |
| Carbon Shield | 540 | Rolf Rudo Hugh Kain Defense +8 |
| Carbon Emel | 420 | Amy Anna Shir Defense +7 |
When you gain control of Rolf, head to the upper right and enter the weapon shop. Purchase two Steel Bars and then leave. Equip them into each of Nei's hands. She can now attack twice. The best thing to do next is level Rolf and Nei up a bit.
Go outside and walk around the grass area (do not enter the tunnel to the north yet) and battle biohazards until either character's HP drops to 5. When that happens, press ![]() to stop fighting, select STGY from the menu, and use Nei's RES tech to heal them back to full. Continue fighting until Nei runs out of TP, then go back into the town to the lower left and enter the Hospital. Spend 16 Meseta there to heal HP and restore TP. Leave the hospital and head north and save your game. Then leave Paseo and repeatedly hunt biohazards until Rolf reaches level 5 and you can purchase and equip another Knife (100m), Headgear (120m), and Fibercoat (300m). Ignore the other items here as they cannot be equipped by Rolf or Nei.
to stop fighting, select STGY from the menu, and use Nei's RES tech to heal them back to full. Continue fighting until Nei runs out of TP, then go back into the town to the lower left and enter the Hospital. Spend 16 Meseta there to heal HP and restore TP. Leave the hospital and head north and save your game. Then leave Paseo and repeatedly hunt biohazards until Rolf reaches level 5 and you can purchase and equip another Knife (100m), Headgear (120m), and Fibercoat (300m). Ignore the other items here as they cannot be equipped by Rolf or Nei.
When you're ready, head north through the tunnel, then north across the bridge (ignore the tunnel on the left for now), east past the forest, south across another bridge, southeast around a forest, and then into Arima.
Arima[edit]
Arima has been blasted with dynamite and destroyed by scoundrels. Although Arima is devastated, you can get a lot of information, so talk to the townspeople. They tell you that the daughter of Darum has been kidnapped by scoundrels from Shure. Now your next task is to find Shure.
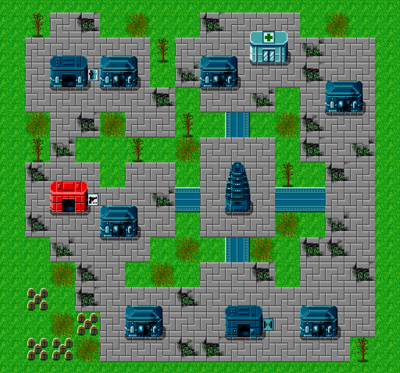
| Item | Cost | Description |
|---|---|---|
| Dagger | 200 | Rudo Hugh Kain Shir Attack +8, Defense +1 |
| Steel Bar | 80 | Nei Attack +7, Defense +2 |
| Sword | 1200 | Rolf Attack +36, Defense +8 |
| Ceramic Knife | 2800 | Everyone except Nei Attack +20, Defense +3 |
| Sonic Gun | 640 | Rolf Rudo Hugh Kain Attack +17 |
| Shot Gun | 800 | Rolf Kain Attack +20 |

Shure lies to the east of Arima, but before you head off in that direction, you should return to your home in Paseo (you can use the Teleport Station if you wish). There you find your friend, the Biomonster hunter named Rudolf Steiner, nickname Rudo. Select Reorganize and add Rudo to your party. Then change your party order so that Rudo is in front because he has the highest defense and HP.
Take the time to raise Rudo to level 3. Although he starts with a Bow Gun, he can do more damage if you buy him a pair of Daggers. There are a few more steps you should take before you venture out to Shure, in order to increase your odds of survival:
- Try to level Rudo up to level 7 or so. In doing so, you should save up quite a lot of Meseta.
- Spend 1200 Meseta on the Sword in Arima, and equip Rolf with it.
- Make sure you buy a Telepipe and Escapipe just in case you need it. Let Rudo carry them as he is the most likely to survive if a battle goes bad.
- It's also not a bad idea to buy everyone several Monomates and an Antidote.
Shure[edit]
Leave Arima and continue northeast. You will see Shure near a beach. Shure is a four-level dungeon. As you go higher, the power of your enemies becomes stronger. Follow the map carefully when you enter Shure. It's easy to get lost. Return by the same route to get back to the ground, or use the Escapipe to return to the outside at once.
Floor 1[edit]
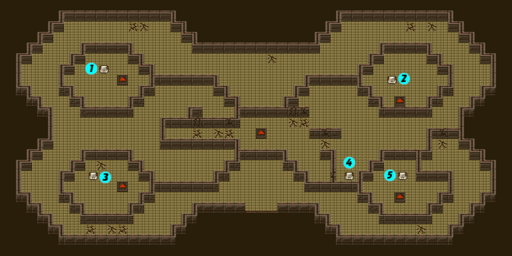
| Item | Notes | |
|---|---|---|
| 1 | Monomate | Heals 20 HP |
| 2 | 150 Mesetas | |
| 3 | Dynamite | Key item |
| 4 | 40 Mesetas | |
| 5 | Dynamite | Key Item |
Turning right at the entrance leads to a dead end, so go left. Take the long way around to the left to get up to the second level.
Floor 2[edit]
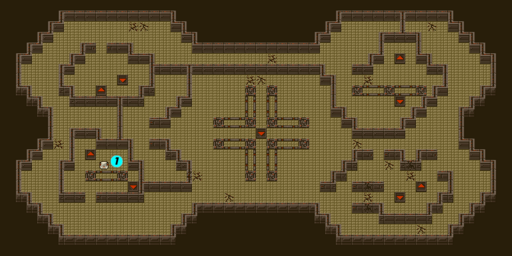
| Item | Notes | |
|---|---|---|
| 1 | Dimate | Heals 60 HP |
Only one of the chutes which leads to the third floor will actually allow you to access the fourth floor. Naturally, it's the hardest one to reach, in the upper right corner. While you can go down to check out some of the chests on the first floor, most of them are locked and require a key to open them, which can only be found above.
Floor 3[edit]
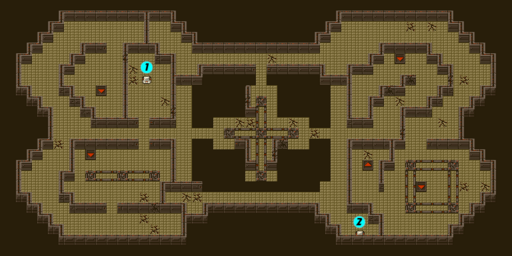
| Item | Notes | |
|---|---|---|
| 1 | Headear | Everyone except Nei Defense +3 |
| 2 | 200 Mesetas |
This is the most difficult part in your journey to the fourth level. The only thing of interest on the left side of the map is the free Headgear that you can find in a chest. Be careful not to fall over the sides of the center section, and drop to the second floor by mistake.
Floor 4[edit]
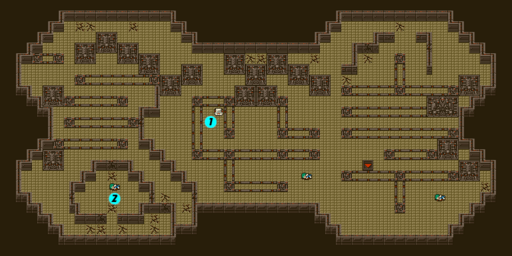
| Item | Notes | |
|---|---|---|
| 1 | Silver Ribbon | Nei Defense +12 |
| 2 | Small Key Letter |
Key items |
The toughest monsters of Shure tower wander around here. You'll see bodies scattered about on the fourth floor. You won't find anything of interest on any of them except for the one who is most difficult to reach. Search the body in the lower left corner of the map to kind the key that you need to open other chests, and a letter indicating the fate of Darum's daughter. Also don't miss the chest containing a Silver Ribbon, which Nei can equip for an extra 12 points of Defense. Once you have the key, it's time to return to the second floor so that you can access all of the chests in the enclosed chambers on the first floor, which was your goal all along.