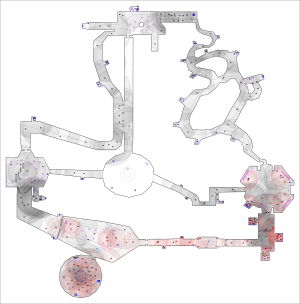
In this sector, a coding sector, viruses have altered a gate password and a door password, sealed off a lift with parity errors, and reprogrammed a bridge control code. Your objective is to gain access to all four.
Continuing the theme from Rael, energy grows ever more scarce for those playing at higher difficulties. Conserve your fire and always check the Skaphander's batteries carefully before entering new areas, or your ammo may run dry midbattle.
Nexus[edit]
You begin in a central room looking north at a double eraser; you are at the top of a pillar surrounded by a ring-shaped lift. Turning east, leave the weapon for when you need energy and ride the lift down. Don't worry about being careful yet as there are no enemies in this room.
It would also appear that there are no doors, but in fact the brighter-lit segments of wall to the east, west, and north are "curtains", intangible walls that neither you nor the viruses can see through, but which can be driven or shot through.
Your first order of business is to secure various useful resources: a green pool, a recharging station, a repair station, and a heavier weapon. All four fall along an arc to the northeast, so turn right and head into the east hallway.
East hallway[edit]
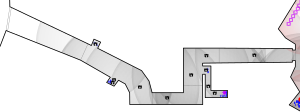
The hallway east of the nexus makes a sequence of turns and climbs up four widely-spaced steps, each step the site of a viral ambush. There are alcoves with stashed resource items that you can sample along the way to keep your data and energy at healthy levels.
Coming from the nexus, don't charge headlong into danger, but instead glide to a stop before the first step and gun down one, two, or four clamps as they try to jump you. On easy the leading threat will be on the right; on medium and hard it will be on the left despite the clamps to the right being more overt. Similarly, on hard at the second step, where the hallway juts to the south before angling east, strafe around that turn to catch another clamp in your crosshairs. On medium and hard, repeat that strafing tactic—more carefully this time—at the third step, which will have one or three clamps above it. Before continuing, flush out the false alcove on the right, which on all difficulty levels is actually a corridor leading to one or two more clamps, a stash of data, and a breakpoint. Back in the hall, the turn just past that side path will put you immediately in front of a fourth step and a final clamp on hard, so once more take the corner with caution. You'll arrive at the entrance to the parity room.
Parity room[edit]
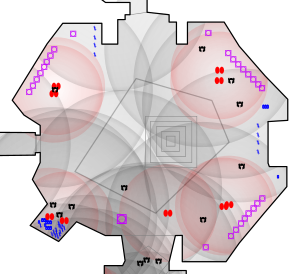
The parity room is a larger room with a rectangular green pool in its center and nine bits (one byte plus a parity bit) of stanchions in each of the northwest, northeast, and southeast corners. While access to a green pool will give you a way to survive barnacles, you should still think of it as a last resort and strive not to get barnacled in the first place. The barnacles on this level mostly fight alongside clamps, which are pretty deadly if you're blinded and losing energy. Nonetheless, if you are later caught, you can return here, submerge the Skaphander in the pool, and wait patiently for about ten seconds for the barnacle to be washed off. In such an emergency, remember that strafing uses less energy than driving forward or backward.
Before opening the door to the parity room, check that you're sitting at almost 300 energy, and backtrack to the nexus to fill up if not—now is a good time to snag the double eraser and its 200 energy. Then pop the doors and erase anything at the entrance, likely one or three clamps and maybe your first barnacle depending on how well the viruses heard you coming. Prioritize the clamps with your shooting, but prioritize distance from the barnacle with your driving. You don't have a clear path to the pool just yet, so getting barnacled now would make things pretty tough.
When those guards are gone, peek around the door's corners and clear the groups to the north and south, each of which may be a strong as two barnacles escorted by a clamp on hard. Then recharge with the items in the southwest corner, or you may not have enough ammo to make it through the rest of the room. Finally, eliminate the remaining targets, two or four barnacles and one or five clamps in an arc around the east side. Top off your resources once more.
There is obviously a puzzle in this room, but it leads to one of the toughest fights on the level, so save it for later. Rather, head north into the meanders, minding the step.
Meanders[edit]
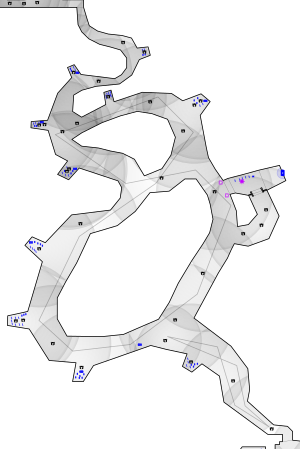
The meanders are gently curving hallways that form a pair of wavy loops with sinusoidal branches north and south. Use strafing turns to maintain good visibility as you explore these clamp-patrolled passages.
Right out of the parity room, possible enemies on hard include a clamp around the first turn, two more at the second bend, and then a fourth in the open to distract you from a fifth ambushing from your left. (One of these is a patroller, so the exact placement may vary.) Medium difficulty omits the patroller and the distractor, and easy omits everyone but the ambusher. Getting through that crowd will bring you to the first ring and some ceiling-mounted devices that make noise when you're nearby, but don't waste any energy disabling them since the sounds are harmless. Instead, head right, toward the white globes, running into one, two, or four clamps (if you count one that might stop by as part of its long figure-eight patrol route). The passage to the right of the globes has one more on easy and medium and two more on hard (ignore the one-way door you cannot use yet), and then the globes themselves are watched by one or two further clamps. Energy is nearby, so you can let your ammo level run low even with so many enemies to deal with, but it is still better to retreat and refuel than to run completely dry.
Once the area around the globes is safe, follow the hint on the opposite wall and tap first the south one and then the north one to lower the barrier to the recharging station. Fuel up and leave through the one-way door and continue north. At the branch just north of the recharging station, first hold left twice to go around the southern loop, downing one, four, or six more clamps. Recharge again if need be, and then follow the other two branches to clean out 3, 6, or 12 clamps from the northern loop. Recharge another time and find a narrow offshoot north of that second cycle that will lead you to the kiosk room. There are one or two clamps loitering along the curved part, but pause when the route is about to stop curving, the moment you can see it take a step down into a sharp left. The kiosk room lies ahead.
Kiosk room[edit]
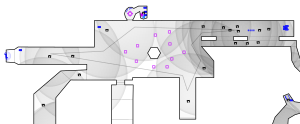
The kiosk room has a floor-to-ceiling hexagonal kiosk with twelve monitors at its center, a constellation of letters ringing the kiosk, and various open-plan rectangular areas jutting off its sides. Coming from the east you will be barging into a crowd of zero, one, or three clamps with more to come, so strafe-turn out of the meanders and handle those targets quickly. Don't advance yet; there will be as many as one, two, or seven clamps immediately to your right ready to shoot from storage-area windows, but if you keep east, you can pick them off one-by-one as they drift west trying to get a bead on you. On hard there might also be one more clamp to the west through the window. After all that ruckus, top off your data and energy levels back in the meanders before returning.
You are now ready to push into the main kiosk space. When you enter, watch for one or two clamps to your left and then cut south, toward the orange-and-blue sign, before anyone else notices you. From far away the sign will show half of the gate password, and from nearby it will show the other half. Put the two parts together in your mind, forming the word "check". Then about-face and trash as many as one, two, or four clamps on the west side of the room, depending on whether or not you took out the patroller when entering.
With the area secure, enter the gate password by tapping "C" in the southwest, "H" just east of it, "E" northeast of that, "C" again to the west, and finally "K" north of that. You may want to back away a little after each tap to avoid clipping the letter a second time by accident. If you mess up, start over spelling the password from the beginning.
Once the password has been entered, the force bars to the north will lower, granting you access to the interrupter, the heaviest weapon in the game. In an energy-sparse environment like this, it's probably best to stick with the eraser unless you really need the firepower, but it is nice that the interrupter comes with 100 energy. While here, also squash the clamp-guarded bug in the back.
Finally, replenish any resources you need with the repair station to the west or the storage area to the east and then depart southwest into the northwest tunnel.
Northwest tunnel[edit]
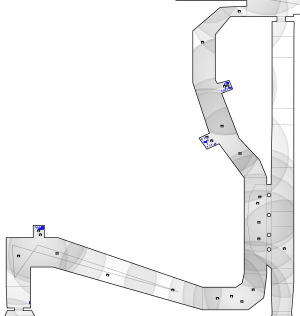
The northwest tunnel is a long, clamp-filled tunnel with alternating dark and light areas that runs for a while alongside windows to the north hallway. (Since the north hallway is so empty and has many annoying steps, it is simpler to just clear it through these windows.) While there is a nice stash of items near the tunnel's southern end, you can easily come up short on energy if you try to make it there in one trip, so don't take unnecessary risks with so many resources at your back.
There's not much else to say about this gauntlet except to detail what you're up against. In the worst case:
- The dark segment before the windows has one, three, or seven clamps: on hard, that's one in the middle, then three more in alcoves, and then four more in the middle.
- The light part with windows has one, two, or five clamps: on hard, one in the middle (which you can snipe from the end of the dark segment), one through the windows (which you can also snipe from the same place if you strafe right), and three more that tend to migrate to the right edge.
- The dark segment after the windows has two, five, or ten clamps: on hard, four as you curve the right, four more in the middle, and then a final two in the right alcove.
The doors at the end will take you to the four-slabs room.
Four-slabs room[edit]
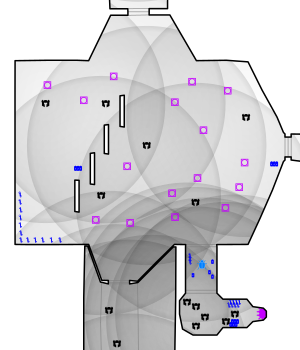
The four-slabs room is large green room dominated by the four domino-like slabs in the middle and holding even more letters than the Kiosk room. You can safely peek in the north door; if you stay in the shadows, you should not be noticed from there. So take a look around until you've scouted the room's one, three, or six clamps and have them appearing as white dots on your HUD map. From the doorway, pick off the ones not among the slabs, backing up to stay in cover if they return fire. Then, when their numbers are reduced, enter the room to hunt the survivors, holding to the slabs to cover your flanks.
There's a door here to unlock, and it will lead to danger, so refresh and refuel. Then make your way to the west side of the room, turn east, and look at the first letter on each of the four dominoes. Those letters should spell "ßOOT", which might be puzzling if you read German, but if you make a common English-speaker mistake and read the word as a stylized "boot", you'll get a computer-related term, the only one to be found on the walls. So tap "B" in the northeast once, "O" south of that and past the "F" twice, and the "T" southwest of that once. (As before, if you mess up, start over spelling the word from the beginning.) Look to the south where a secret room should have opened.
Squash the golden bug and drive to the pillar door at the back at full alert, maybe even with your interrupter selected for an opening salvo. (But remember that it's splash damage can hurt you too!) The pillar door will lower, revealing two, three, or six angry clamps. Just focus on surviving; you don't need to be efficient because there are refreshes, sixpacks, and two breakpoints stowed in the back. Switching targets often will help keep them disoriented. You can ignore the lift sounds coming from another area behind the wall.
Once fully restocked, head back into the wider room and face the normal door to the south. It leads around and up a ramp to a lift, but the lift right now is dangerous to use from this side, so your goal for the moment is just to empty the ramp, something that will make your life easier later on. First, open the door while sitting on its left side so that you have cover from one, two, or six clamps waiting for you, some of which are probably already poised to shoot. Engage these clamps one-by-one, slowly strafing right to bring each one into view. Keep tabs on your energy and go refill with a sixpack from the secret room if you drop below 150. On hard, the very furthest clamp in might not notice you. If that happens, it will be floating at altitude above Matma, so use pitched fire to hit it at distance. Even further in, at the top of the stairs, is another barnacle (except on easy), the last virus to destroy from this side. Get its attention and draw it back to flatter terrain so that you can finish it off with weapon pitch locked.
On a similar, but less challenging, clean-up operation, pop through the four-slabs room's east door to finish off zero, one, or two clamps in the middle of the hall and one in an alcove on the right. Continue on through the nexus to return to the parity room.
Return to the parity room[edit]
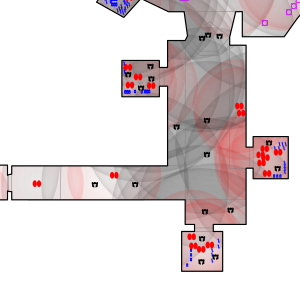
The parity room's puzzle is fairly simple: tap the stanchions so that the words "even" or "odd" behind each byte describe the number of lit or unlit bits in that byte. Then set yourself up facing the south exit, turn slightly right to shoot the switch to release zero, one, or three clamps on a lift, and turn back quickly to mow them down. (You could tap the switch with the Skaphander's body, but then it will be in your line of fire while the clamps are pummeling you from above. It's better here to use a little energy to be somewhere where you can get off clean shots.)
Now thoroughly stock up. If things go badly, the top of the lift can pit you against as many as 5, 12, or 30 enemies at once, so you'll need every edge you can get for that contingency. Don't even let yourself take a scratch from the step before the lift.
On hard, the plan is to stay on the lift and gun from the right to the left, hitting the three nearby clamps first and then the two nearby barnacles, all without any stray fire reaching the two sleeping clamps further behind or any of the side-bay doors. Striking a door can be especially dangerous since a door opening will unleash seven or eight new enemies. One or two interrupter shells might be justified if things get out of hand, but don't risk it if you'd be in the blast radius. Let your eraser do most of the talking. Once the front of the room is clear, don't go any further in, but turn west with a single debugger and use a lone one-energy shot to open it. Flip back to the double-eraser immediately and catch everyone at the door. You can then restock from that side bay before taking on the pair of viruses you left alone in the back. If by some misfortune you do get barnacled along the way, quickly scoot off the left side of the lift (the safest side) and back on to activate it, then take a dip in the green pool back in the parity room.
On medium and easy, you can be a little more cavalier; it should be no problem to knock out the clamp(s) you can see and open the west bay just by approaching it.
Next, follow the west wall closely, and strafe around the right turn to catch zero, one, or two clamp-barnacle pairs in front of a door. Recharge, about face, and approach the door on the east with your interrupter. That bay can have zero, one, or two clamps and two, three, or six barnacles, but the interrupter will soften up most of the latter, and your eraser will seal the deal. The story in the south is the same, this time with zero, one, or three clamps and one, two, or four barnacles.
Relax after all that carnage and prepare to open the west doors into the green-striped room.
Green-striped room[edit]

The green-striped room and the hall past it form the transition area between the parity room's lift and the eyeball room, also offering another green pool. Much like the northwest tunnel, you'll be clearing cliques of viruses mulling about the way and in its alcoves, though this time barnacles team up with the clamps. In particular:
- The front of the room features a clamp one medium and above and a barnacle on hard.
- The back of the room has another barnacle, plus a clamp-barnacle partnership on the right on hard.
- The middle of the hall has a similar team of one clamp and one or two barnacles, but only on medium and hard.
- The first alcove on the right has one barnacle guarding its sixpack and a second barnacle as reinforcement on hard. But the second alcove's sixpack is likely undefended since the barnacle stationed there tends to leave its post.
- The back of the hallway has a final single, duo, or trio of barnacles, including the aforementioned truant.
Take these groups on one group at a time, and you should have no trouble. Just be sure to renew your resources before heading into the eyeball room.
Eyeball room[edit]
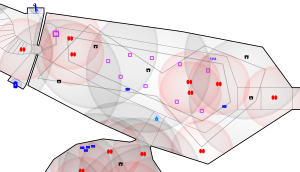

The eyeball room features a roughly oval-shaped plateau amid Matma, somewhat reminiscent of a sea stack. The plateau joins to a door on one end, leads to an alternating lift on the other, and has a bridge in the middle that can rise from the Matma with a valid control code. But, most noticeably, the center is surrounded by a ring of nine large eyeballs with colored splats set in white sclerae. The eyeballs change color when tapped, from green, to orange, to red, and back to green.
As you open the door to the eyeball room, be ready for a clamp (on medium and hard) and a barnacle (just on hard) right at the entrance. Then, before heading further in, glance to the sides for viruses from above the Matma that might have been alerted to your entry: a clamp on the right on hard and a barnacle on the left except on easy. With the entrance secured, you can take on the one or three barnacles in the center front, then the group in the back having one or two clamp-barnacle pairs, and finally, on medium and hard, drop the clamp in the back left, above the Matma.
Just past the eyeball room is the lift you saw earlier from the ramp when hopefully you cleared the viruses on the other side. But even with those enemies gone, this lift can be dangerous, because it is surrounded by gaps. Those gaps are narrow enough to drive over at speed, but also wide enough that you can fall into them if you're not careful or if you get tipped by the moving lift. So have a care crossing them. The first time you hop on the lift, you can at least position yourself so that, if you fall, you fall off the north side. That north side features an under-Matma lift that you can activate by pressing the nearby under-Matma button, which will pull you back to safety. But the other sides are all deadly.
With due caution, hop from the plateau to the lift. You then have access to both a repair station and a recharging stations, which you will need to make good use of once you raise the bridge. After topping off, head back to the plateau.
For the eyeball puzzle, the key thing is the number of each color. (Or, if you're colorblind, you can also use the differing number of arms on the splats to distinguish the eyes' states.) Obvious things to try include all eyes green, all eyes orange, or all eyes red, but none of those options do anything. So try the next-most obvious thing and make three eyes of each color. That will raise the bridge to the south.
With all codes cracked, all bugs squashed, full data, and full energy, you're ready to cross the bridge to the escape shaft.
Escape shaft[edit]
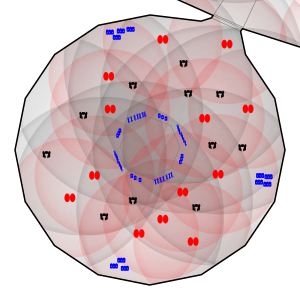
Unfortunately, leaving this level won't be easy. Past the bridge from the eyeball room, there's quite a crowd sitting behind the door: a vigilant welcoming party with zero, one, or three clamps and two, three, or four barnacles backed up by three, five, or eight more clamps and two, five, or eleven more barnacles further in. Recoil is also a serious problem in this fight since the bridge has no railings.
Start by lining yourself up to directly face the door, so that as you fire, you're pushed back to the plateau, not into the Matma. Also have your HUD map fully zoomed in case you need to check your position on short notice. Arm your interrupter, creep forward until the door opens, and let off two or three shots, making sure not to miss those at the door and wake the reinforcements. Switch to your double eraser, destroy the clamps posthaste, and then defend yourself from the barnacles as you rebound onto the plateau letting the door close. The step up to the plateau is actually quite nice for your aim, since it compensates for the barnacles' tendency to rise when under fire.
When the dust settles, use the stations to restore your resources and, in your next raid, gun for the clamps further back in the room, working your way from left to right to neutralize the most immediate dangers first. Again, mind your recoil direction and watch your position on the HUD. If you can't secure the room in two raids, don't worry; there's no rush. Stay calm, navigate the gapped lift safely when you use it, and keep yourself in the game with the two stations or, if you make enough inward progress, with the items around the escape shaft.
When the last virus is dead, top everything off to full, dive down the shaft, and enjoy your victory.