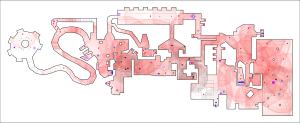
Your mission is to correct the reversed energy flow in the Rael sector. While there, you should also investigate why the bugs in the sector cannot be detected and devise a plan to locate and squash them.
This is the first level where energy is relatively scarce, at least on higher difficulty levels. You may need to conserve your fire and attack from closer range to avoid hobbling the Skaphander. (If you do run out of energy, you can still get around by strafing and still deal damage with breakpoints, but it will be dangerous to be both less maneuverable and virtually unarmed.)
Watchtower[edit]
The watchtower is a round room with a green pillar in the center, windows out to space, and waste barrels at the entrance. You begin on the south side, facing the exit. But, before leaving, there is a spiked virus on the opposite side of the pillar that you should kill. Switch to your double eraser, turn to face the pillar, and strafe left until you see your enemy. If you keep back, you can one-shot it before it even sees you. Once the danger is clear, snag the breakpoint on the west side if you have room, but leave the debugger to your northeast for later, and finally squeeze between the waste barrels and depart onto the serpentine ramp.
Serpentine ramp[edit]
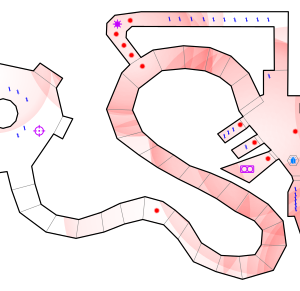
The serpentine ramp is a long winding passage leading down from the watchtower. It is populated by possibly two spiked viruses, one right after the first turn, and one more on hard in the middle of the second hairpin. You should be able to get close enough to them before shooting that you don't have to bother adjusting your weapon pitch. Also just off of the second hairpin is a window into an underground corridor where you can see a breakpoint and four spiked viruses clamoring for you. They are trapped, so use your pitch control to gun them down through the window. (Take your time lining up shots; you're not in danger, and you want to conserve energy. If you have the patience for it, you might even temporarily switch to debuggers.) As you round the corner past the window, you'll come to the end of the ramp and a door to the sublight room. On hard, a spiked virus is waiting there to ambush you from above; peer up to locate and destroy it.
Sublight room[edit]
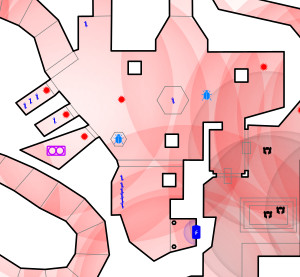
The bottom of the serpentine ramp opens into an oddly shaped room with three square pillars and two hexagonal platforms, the sublight room. Ignoring any exits for now, head east along the north wall to, on hard only, hunt down a spiked virus in front of the blue panel in the northeast corner. Turn to your right and find the windows south of the east side of the room. They overlook the prison, and through them you should see three spiked viruses and, at difficulties beyond easy, one clamp hovering above eye level. Starting with the clamp, destroy the lot so that they do not interfere with your other tasks here or give you trouble when you later visit the prison.
With a safe zone established, drive next to (but not on yet!) the small hexagon in the southwest, turn to face northwest, and then climb onto it without turning. The Skaphander's weight will trigger four walls to lower, including three in front of you, and one or three spiked viruses will pour out to attack you. Shoot them down before they can spread out and flank you.
Next, look to your left where the walls opened up. In the further two chambers are data refreshes if you need to heal—just be careful not to cross the large steps at the thresholds too fast—but in the nearest chamber has a sublight scanner. Pick it up and come back out into the open, minding the step. From now on, pressing will activate the scanner, which will let you can see and interact with invisible items, albeit at the cost of your color vision. Go ahead and turn the sublight scanner on for a bit in order to squash the two invisible bugs here, one of which is on the small hexagon, and the other of which is just east of the large hexagon.
Before going further, check up on your resources. If you at all need data (full health is important for the next room) or would like another breakpoint, cross a large step under a strobing light in the northwest, just right of the serpentine ramp and loot that stash. Don't forget to cross the large step carefully on your way back. On other hand, if you need energy (which is pretty likely), go south through the large opening that appeared in the wall to find a recharging station. Again, go easy on the Skaphander's suspension.
When you'll all full up, pop through the doors to the north and curve right to the energy chute.
Energy chute[edit]
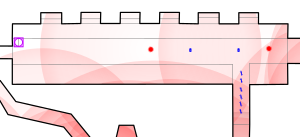
Positioned off a bend just north of the sublight room, the energy chute is a long canal-shaped corridor with sloping sides and strobing lights. The entire room will deal rapid environmental damage to you while the level's polarity is reversed, so you want to spend as little time in here as possible.
Before entering, snipe the two spiked viruses in the middle of the room, which should just be within your range from the doorway. Next, you'll want to trigger the switch on the west wall just north of the door you are facing, so turn the Skaphander around to face away from the room. Scoot backwards until your HUD map shows you just about to enter. When you're ready, pop backwards into the room, turn slightly right, ram the switch to open the polarization chamber, back up a smidge again, and jump back outside. If executed fast enough, you should be down less than 200 data.
Head back as if returning to the sublight room, but enter the revealed secret passage left of the door instead, which will lead you to the polarization chamber.
Polarization chamber[edit]
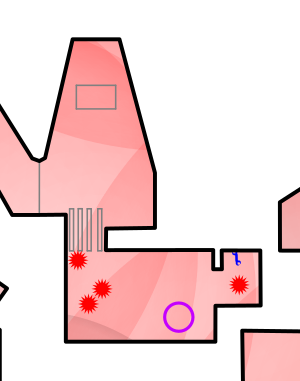
Follow the secret passage until you reach a room with rectangular platform and one, two, or four locked-in spiked viruses on the opposite side. Turn to face the viruses, back on the platform to lower the barriers, and start shooting. Use a strafing turn to make sure you've gotten all of them, since one of the viruses on hard has a habit of snagging on the column further back. Then continue to the polarization chamber proper and touch the white column to establish correct polarity. Pick up the data refresh in the corner to the left while you're here.
Retrace your steps to the energy chute. As you cannot pass the chain-link barrier at the far end, duck into a side passage on the right, collecting any items you need as you depart, scoot just onto the northwest corner of the lift, and ride it down to the basement. (If you confuse the lift into stopping, just back up and drive toward it again.)
Basement[edit]
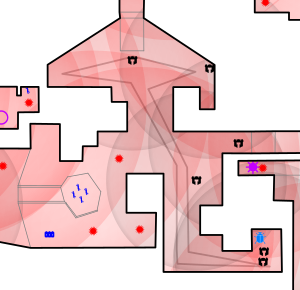
The basement is a deep space with high walls, an arrow-shaped north side with a tall square lift, a handful of alcoves on the other walls, another tall square lift on the east, and a third lift—this one hexagonal—in the back. As the north lift lowers you, be ready to be attacked from the south by a high-altitude spiked virus if the difficulty level is medium or hard, and you are unlucky enough for it to notice you, or else by a low-altitude patrolling clamp if the difficulty is easy, and you happen to have bad timing. But try not to move around much otherwise on medium or hard; if you stay fairly still on the northwest corner of the lift, you probably won't catch the attention of any of the other eight viruses yet.
Those potential eight are a clamp hanging out in the corner to your left, two more spiked viruses that like to lurk behind the wall on the right side of the passage in front of you, two clamps that sit opposite them, on the passage's left, and three clamps in the far back. After dealing with anyone who did notice you, pivot to shoot down the clamp on your left and then scoot forward and peek around the corners to get a bead on those on the sides. Try not to let any virus retreat, since there are a few alcoves for them to hide in. When the center of the room is clear, head for the southeast corner where you will find three more clamps guarding an invisible bug. (Only two show there on the map because the third is the patroller from the center north, which gets stuck in that corner on difficulty levels above easy.) Defeat them, use your scanner to make the bug squashable, and squash it.
After that, proceed to the west, where you will find a hexagonal pillar with some data on top and a sixpack hidden behind it. You almost certainly are running low on energy, so, if +150 will be enough, prioritize the sixpack, but watch your back—there's a nook east of it where a spiked virus could still be lurking if it chose to hide. Otherwise return to the energy station to fill up completely, saving the sixpack for later. When fully charged, approach the pillar. It ascends or descends when you are nearby (or when you drive onto it); after it stops, you can leave and reapproach to move it in the opposite direction. Lower the pillar, top off your data as needed, and then ride it up to the prison, keeping on the lookout for a clamp floating high to the west on medium and hard.
Prison[edit]
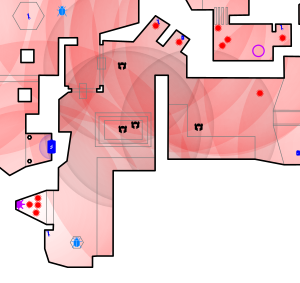
The prison is the area you saw outside the windows of the sublight room. On the way to a hexagonal platform, it has two cages, one on the left holding one or two clamps over a pool of Matma and the other, on the right, trapping two, three, or four spiked viruses.
The clamps are the most dangerous because their guns are mounted low enough to shoot under the cage walls, whereas you would have to pull off a quick succession of tricky pitch-down shots to retaliate. So ignore the items along the right wall for now, and run an erratic course all the way to the end of the hall, avoiding the hexagonal platform. The clamps shouldn't be able to keep track of you, and you'll be left with just the attention of the spiked viruses. (If for some reason you didn't clear out the uncaged viruses from the sublight room's windows, you'll also have to deal with them now.)
Turn the face the second cage. Take your time to make precise, pitch-down shots at the spiked viruses whenever they press against the wall hard enough that you can see more than just the very tips of their spikes, one-shotting each of them with the double eraser, but be careful not to let repeated recoil throw you into the Matma at your back. You can pull up your HUD map as necessary to help you keep track of your targets. Try not to let your energy run low from missed shots; trek back to the sixpack or the energy station if it does. If you're having trouble with the aim, you can also forgo killing the spiked viruses now if you're willing to face a little more danger in just a moment.
Once you're finished firing into the second cage, drive next to the hexagonal platform, rotate yourself to face the first cage to the north, enable the sublight scanner to see the bug on the platform, and squash that bug. The platform is weight-sensitive and will release the clamps when you mount it, and they will immediately deduce your location, so gun them down fast. If any spiked viruses remain, deal with them after the clamps; they're a definite nuisance, but not a fatal threat as long as you keep away from the Matma's edge.
Refresh, recharge, and rearm with the meager items along the west and northeast walls, return to the basement, and head east to a square pillar in the middle of a hallway that works the same way as the hexagonal lift. It will take you to the complex.
Complex[edit]
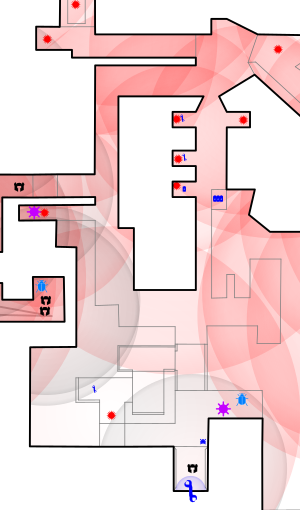
The complex is a defensible knot of corridors and alcoves that will hit you with a lot of spiked-virus ambushes from around corners. From here on out, information about virus's positions will be much less reliable because of their ability to communicate with each other. Even if you destroy everyone who notices you, word of your intrusion may have gotten out, and the other viruses might move around to look for you or to set ambushes. So check your surroundings and watch your radar as you move into new areas.
Your way in is a T-intersection, and you'll want to head left first, but, except on easy, two spiked viruses on the right are sure to notice you, so first make a hard-right U-turn to catch the one at eye level, and then spin a little left to be ready for the second one rising out of the pit. (The one in the pit actually begins the level far to the south, but it's detection range is so wide that it will come after you if you so much as poke your nose out of the hall. If you have extremely poor luck, it will also tell the clamp at the repair station about you and bring it along.)
Back in the left branch, after a turn east, you should come across a spiked virus struggling to float out of the traces. Get its attention, let it approach, and destroy it. By then it probably has up to three friends sitting in ambush, one or two around a U-turn to the left and perhaps one that's supposed to be helping a trio in a side path but likes to leave its post. Make the left U with a strafing turn to clear it out and then, on medium or hard, keep spinning left to be ready for anything coming from the south. Give the southern virus a moment to pop out; don't assume it hasn't noticed you if it doesn't attack at once. Also be cautious about straying too far east, or you might alert even more enemies in the traces.
Climb the large step in the northwest corner and head down that tunnel to the orange-striped room.
Orange-striped room[edit]
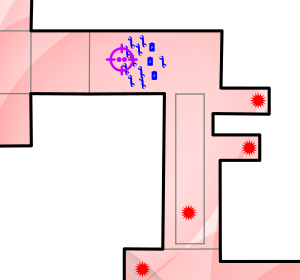
The orange-striped room has, of course, an orange-and-black striped floor. There is a rectangular depression in the center and a big stash of items in the northwest, by the fence between it and the energy chute. There will be up to two spiked viruses camping on its east side, but you can let them come to you. Once inside the room, watch the uneven floor, and go gather items according to your needs. Remember that the double eraser pickup includes 200 energy, so don't waste the smaller recharges if you can get by on just that big refill.
When you leave, be very careful of the large steps on either side of the hall, which need to be crossed slowly. Next, you'll cut south through the complex to visit the repair station.
Repair station[edit]
Head south down the side passage connecting the two ends of the complex. Spiked viruses will be waiting with items in each of the three alcoves on the right on medium and hard or just the last alcove on easy, so check them with strafing turns to avoid surprises. Further ahead, you should see a repair station, a protector, a breakpoint, and, if you use the scanner to see it, an invisible bug. A clamp guards that space on hard, so if you're playing on that difficulty level, ignore the side platforms, which should be empty by now, drive towards the clamp, and fell it from afar.
A word of warning: This next part at the south end of the map can only be attempted once since the lift that brings you back to the complex is one-way. Make sure that you accomplish everything the first time.
You will have to jump down a sequence of ledges to proceed, taking quite a bit of damage if you're impatient, though going slowly helps. Look before you leap so that you don't end up in the inescapable Matma. At the bottom, you'll find a lift. Ride it up, grab the protector, visit the repair station, take the breakpoint if you need it or squeeze past otherwise, and then activate your scanner to squash the bug. Next, take a slow dive off the east ledge by the bug into the Matma. Using your protector to avoid damage, head as far north as you can looking for a lift marked with a sixpack. Ride that back up to the complex, head back to the north half, and turn right to face the traces.
West traces[edit]
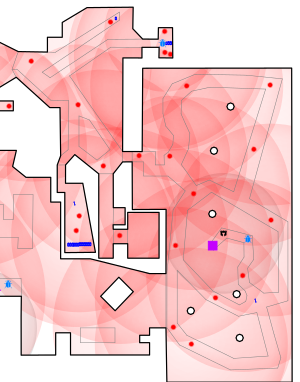
The traces carve out various pathways in the floors of two large open rooms. As you work your way through the west room, essentially everything in the small adjoining spaces and everything north of the third pillar in the east traces has good odds to notice you, so you can expect to deal with three spiked viruses on easy, six on medium, and a deluge of 15 on hard. After sniping anything out in the open, start your incursion by rushing the room at the east end of the second left trace, keeping ready for some enemies to be above eye level. Turn on your scanner at the T-intersection and squash the invisible bug. Grab energy if you need it, and then head back once more to the entrance.
There are three doors on the south end of the west traces. Lurk at their entryways to draw out any surviving opposition, prioritizing the left two doors since the rightmost one has a ledge that viruses will snag on. That particular doorway leads to a huge energy stockpile that you might not need now, but can remember for later. The middle one has an exit lift with a circuit board that needs a jumper to operate, neither of which you are ready for. So when the firefight is over, follow the leftmost to the second large room, the east traces.
East traces[edit]
The second traces room has a clamp and zero, two, or six more spiked viruses beyond those with a propensity to jump out the door. Some of them might be obscured by the red pillars. Find and hit the clamp first since it can attack you from range and then take out any active spiked viruses as they approach. Drop the rest at your leisure. If things get hairy, be aware that a virus might try to sneak out over the Matma to the southwest, so don't let that trick fool you.
Finally, use your HUD map to guide you to the center of the room where a trace deadends at a pair of steps. With your sublight scanner, see and squash a bug along the way and collect the invisible jumper. There's no need to climb the second step; just backtrack to the west traces, fill up on energy if you need it, and follow the middle of the three southern passages to find the exit lift.
Exit lift[edit]
To leave the level, drive up to the circuit board, and place the jumper from your inventory. Then step into the now-active lift to the right and ride it to the escape shaft.