Stage 7[edit]
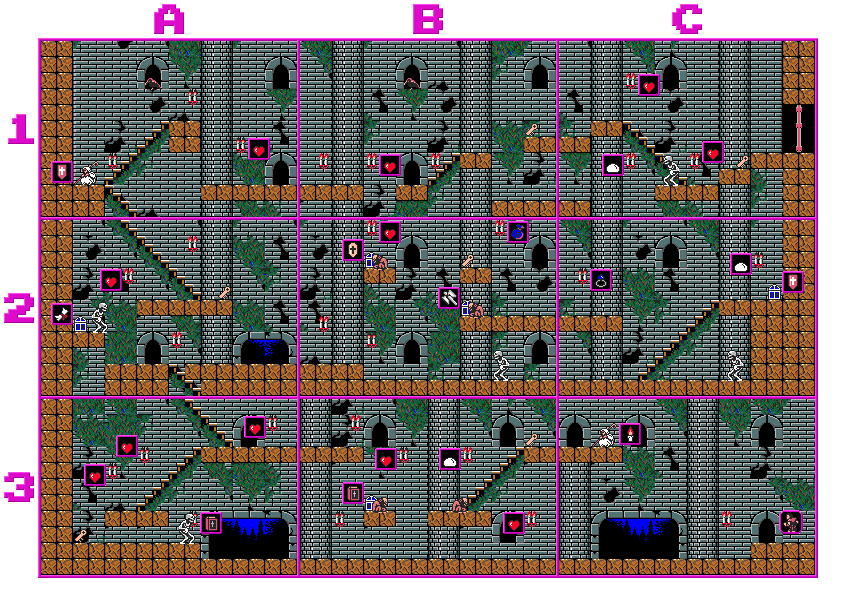
Stage 7 is a large and mostly open area with nine screens connected by stairs and floating platforms - the third leg of Vampire Killer takes place outside, in a high up area midway through Castlevania. This Stage also introduces Fleamen and bone-throwing White Skeletons to the game. Many items can be obtained in Stage 7, though a couple of them are either unnecessary or are outclassed by items you can find in Stages 8 and 9. This Stage also contains many Big Hearts - it's a good idea to stock up on Hearts for later while you can.
- Silver Key
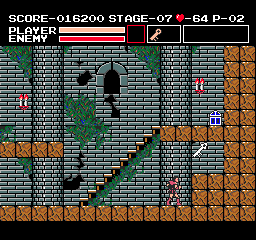
The Stage 7 Silver Key is found on screen C2, one block above ground level in the right-side wall. Be careful while fighting the White Skeleton guarding this item.
- A route through Stage 7, from the starting point of C3
- Left to B3. Upon entering B3, you'll notice the two Fleamen sitting on the raised platforms. After waiting for a couple of moments, they'll start hopping towards Simon to attack him. If you can't be bothered to fight them and don't mind missing out on the Big Heart in the rightmost candle on this screen, walk straight to the left upon entering this screen, and the Fleamen won't be able to catch up to Simon. Otherwise, stand under the right raised platform and whip to either side, attacking whichever Fleaman is closest, before heading off to the left.
- Left to A3. In A3, you'll fight the first of many White Skeletons in Vampire Killer. These boney boys take four hits to kill with the base Leather Whip, so be patient and strategic – they also won't approach you if you back them into a corner. Once you've eliminated the Skeleton, avoid collecting the Black Bible in the lower right candle, then collect all the Big Hearts from the other candles, snag the Gold Key, and head up the stairs.
- Up to A2. Upon entering A2, you'll be attacked by the White Skeleton guarding the raised platforms on this screen. Ignore him for now and head to the right.
- Right to B2. On B2, you'll have a couple of moments to prepare yourself before being attacked from three angles by two Fleamen and a White Skeleton. Whip the Fleamen first if you can – crouching may help. Also, make sure to walk at least a few tiles worth into the screen, as you're likely to take at least one hit here regardless of what you do, and getting knocked back to the previous screen is the last thing you ever want. Once you've defeated the Fleamen, force the White Skeleton into the right corner of the screen, destroy it, and head to the right.
- Right to C2. In C2, carefully approach the White Skeleton, timing your advance with his bone throws. Back him up against the wall, defeat him, and then grab the Stage 7 Silver Key from behind where he was standing. If you have a Gold Key in your inventory, you can use it to open the Chest on the raised platform above and obtain a Shield A, if you so wish. Once you're done, head back to the left.
- Left through B2 to A2. Head back into B2, and all three enemies will respawn. Thankfully, from your new position, they'll all be much easier to defeat. The White Skeleton will be directly in front of you; thus, you can take him out in just a few seconds. Wait under the raised platform for the Fleamen to jump down towards you before defeating them as well. Then go left to A2, destroy the White Skeleton there, and head up the stairs.
- Up to A1. Upon entering A1, the Crow perched up above will take notice of you. Bait him into swooping towards the left by standing against the left wall, then climb up the stairs and head over to the right.
- Right to B1. B1 contains another Crow – wait for it to swoop down within your range, then attack and destroy it before it swoops again to attack you. Once the Crow's been defeated, head rightward.
- Right to C1. You'll appear on the raised platform up on the left, and the White Skeleton down to the right will attempt to throw bones at you. Wait here until the Skeleton throws himself off his platform in an attempt to reach you – then you can head to the exit door.
Stage 8[edit]
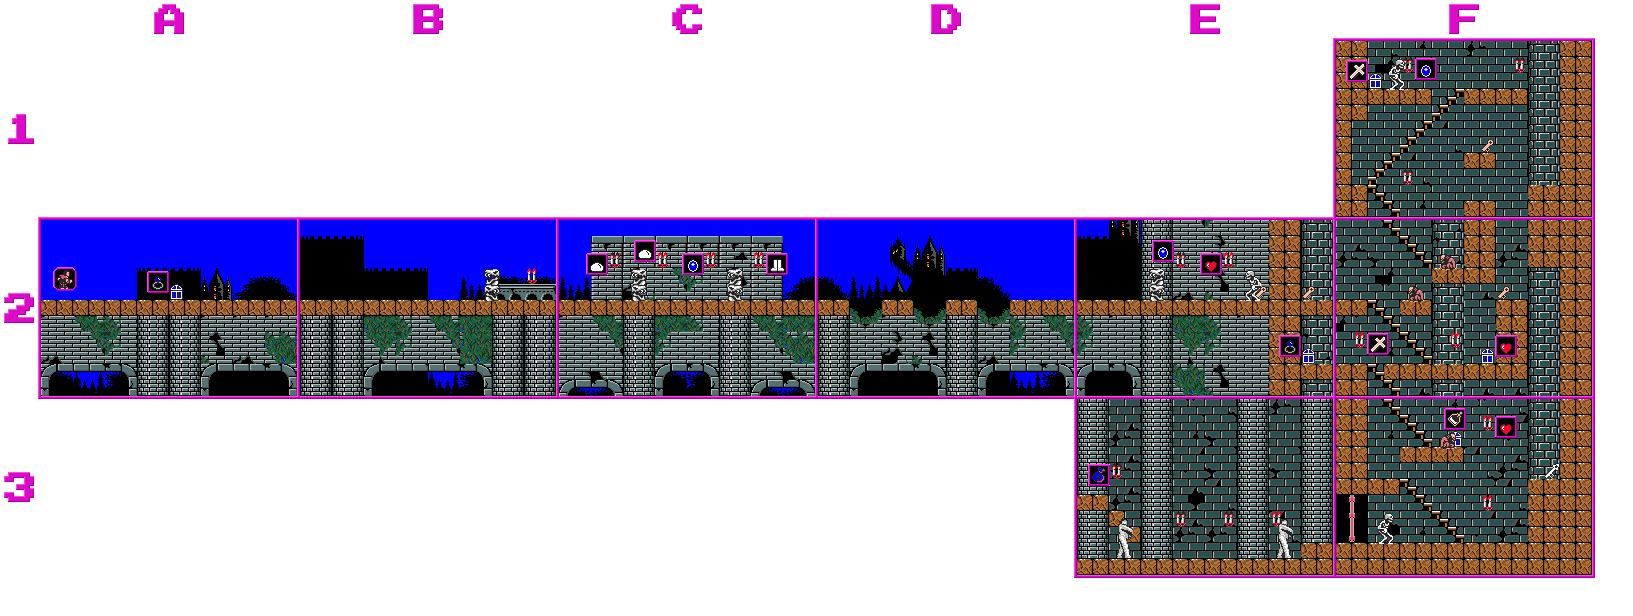
Stage 8 is relatively straightforward and contains some very beneficial items. It's also the first Stage in the game to implement vertical wraparound scrolling and “hide” the Silver Key in plain sight (hint: those two pieces of information are connected).
- Silver Key
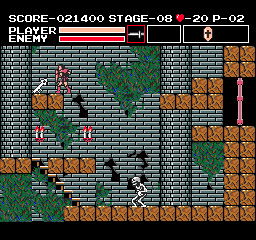
Indeed, Stage 8's Silver Key can be found on screen E1, in plain sight. It's impossible to reach the Key by platforming up to it; however, you'll find that this screen loops vertically, meaning that all you have to do is drop off the left side of the lower platform in E1, fall through E2, and you'll end up landing perfectly on the platform with the Silver Key.
- A route through Stage 8, from the starting point of A2
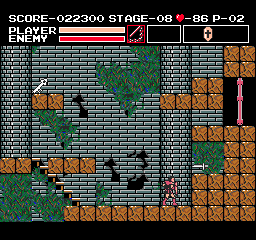
- Right to B2. You'll have to break your way through the blocks on screen A2, being mindful of the Slimes hiding inside some of these blocks. Once you're in B2, you can grab Speed Boots and a Morningstar Whip from two of the candles on the screen. Just be mindful of the Medusa Heads flying about as you cross through.
- Right to C2. Wait on the left side of the screen for the White Skeleton to jump down, then defeat it once it's within your range. The Merchant here will sell you a projectile-reflecting Shield B, which is very useful for parts of both this Stage and the next. Once you're ready, climb the stairs to the next screen.
- Up to C1. A Crow will try and interfere with your progress here – wait for it to swoop towards you before fully ascending the stairs to the platform, and then defeat it with your weapon and head to the right. You can also grab Wings here, which will increase your jump height by a bit, though they aren't at all necessary for the remainder of Stage 8 and the challenges of Stage 9 to come.
- Right to D1. This screen presents you with the first Bone Pillar since Stage 6, along with a Crow that'll attack you from below. If you bought the Shield B from the Merchant in C2, D1 becomes far more straightforward, as the Bone Pillar's fireballs are rendered useless. Otherwise, you'll have to execute some complicated dodges (or just damage boost) to reach the Bone Pillar and destroy it. Once you've dealt with both enemies, head onwards to the right.
- Right to E1. Quickly advance on and defeat the White Skeleton here, before retrieving the Throwing Knives from a Chest hidden in the second-lowest block in the right-side wall. Once you have the Knives, obtain the Silver Key by walking off the left side of the lower platform and falling through E2 and back around to the top of E1. While still on the Key's platform, crouch and throw a Knife at the block covering the Stage exit door to the right. Once the block breaks, jump down and head to the left.
- Left to D1, down to D2, and right to E2. Briefly return to screen D1 and fall into the rightmost hole – you'll end up on screen D2. There's no point in lingering on this screen, but if you wish to collect any of the items shown on the map, feel free to. Pick up the Gold Key (if you don't already have one) and head to the right across the top platform, into screen E2.
- Jump diagonally off the top of E2, wrapping around to E1. Jump over to the small top platform, and then jump diagonally off the right side. Like before, when you obtained the Silver Key, you'll wrap around to E1. This time, however, because of your jump trajectory, you'll land right in front of the Stage exit door.
Stage 9[edit]
Stage 9 is the most linear of all the Stages in the third leg of Vampire Killer and is made vastly easier by having the Shield B from Stage 8.
- Silver Key
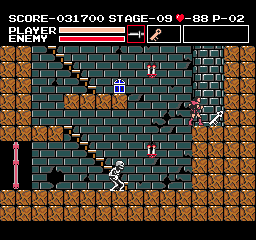
Stage 9's Silver Key is placed in plain sight on screen F3. You can get to the Key by climbing upward from F2 into F1, and then falling down the right sides of F1 and F2 to land on the Key's platform in F3.
- A route through Stage 9, from the starting point of A2
- Right to B2. Start heading to the right as soon as the Stage transition animation finishes. Medusa Heads spawn on the first three screens here, so it's best to keep moving forward as much as you can. Use your Gold Key from Stage 8 to open the Chest on A2 and obtain an Invulnerability Ring, which will allow you to one-shot the Bone Pillar on B2 if you keep holding right as soon as you pick up the item (the timing is rather tight to make it work). Keep heading to the right.
- Right to C2. This screen throws not only continually spawning Medusa Heads but also two Bone Pillars in your face. Your best bet, assuming you still have the Throwing Knives (and even better, the Shield B too), is to get as close to the Bone Pillars as you can, duck, and spam knives directly into them. Once you eventually push your way through this screen of enemy spam, head to the right.
- Right through D2 to E2. In D2, you have to run and jump across small platforms over an abyss while Medusa Heads attempt to hit you into the pit. Once you're across, head into E2, and defeat the Bone Pillar in the same way you did in C2. Destroy the White Skeleton, break through the middle of the right wall, and head to the right.
- Right to F2. You'll have a moment before the two Fleamen jump towards you – use these seconds to take them out first. Then jump to the upper platform and head up the stairs.
- Up to F1. Keep climbing the stairs to the top of the room while doing your best to dodge bones thrown by the White Skeleton above. Once you reach the top platform, head over to the right and drop down into the hole on the right side.
- Down through F2 to F3. Fall down the shaft through screen F2 to F3. Upon landing in F3, you'll find yourself on a ledge right next to the Stage 9 Silver Key. Make sure to grab it before jumping down to the floor! Otherwise, you'll have to climb the stairs back to F2 and repeat steps 4 and 5. Once you have the Silver Key, jump down to the floor of the room, defeat the Fleaman and White Skeleton, and head through the exit door to the next Boss: The Mummies.
Boss 3: The Mummies[edit]
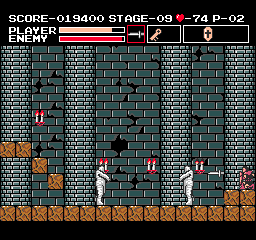
- See the Bosses page for more detailed info.
A pair of Mummies guard the way from Stage 9 to Stage 10. These two bandaged relics shuffle around their boss arena, periodically flashing red and shooting bandages in Simon's direction.
Due to poor boss room design, there's a straightforward, almost laughably easy way to defeat the Mummies. Upon entering the room, crouch in the far-right corner of the screen and attack to the left with your primary weapon – you'll want to have either Throwing Knives or a Battle Cross to make this work (the latter of which can be purchased from a Merchant in the wall directly across from the Stage 9 exit door on screen F3). Because the edge of the boss room is raised on the right side, the Mummies won't be able to melee hit you here, and you're free to attack them. Their bandages can still hit you, though – that is, unless you bought the Shield B in Stage 8, in which case those bandages will be vaporized on contact.
