m (+ 2 Stage 4 solutions for SMS) |
|||
| Line 153: | Line 153: | ||
=== NES Difficulty Level 2 === | === NES Difficulty Level 2 === | ||
From the stage start, beat up the gang of thugs that engage you in combat outside. From there, follow the steps outlined below: | From the stage start, beat up the gang of thugs that engage you in combat outside. From there, follow the steps outlined below: | ||
# Right door: You will need to fight three of the bosses from Stage | # Right door: You will need to fight three of the bosses from Stage 2, two at a time. | ||
# Right door: You must fight three of the bosses from Stage 3, but only one at a time. | # Right door: You must fight three of the bosses from Stage 3, but only one at a time. | ||
# Right door: Now you must fight four bosses from Stage 3, two at a time. Read the section on room M above to find out about strategies that you can use to survive this room. | # Right door: Now you must fight four bosses from Stage 3, two at a time. Read the section on room M above to find out about strategies that you can use to survive this room. | ||
Revision as of 02:46, 8 October 2012
In 1987, Nekketsu Kouha Kunio-kun was the first video game that Technos Japan ported to a home console. The system they ported the game to, the Famicom, could display no more than three enemy characters at one time. However, in converting it for play on the Famicom, they compensated for the technical limitations of the hardware by expanding the play experience, spreading the first three stages over several scenes, and making the quest to reach the final boss a veritable maze of rooms to explore. In 1988, Taito took Nekketsu Kouha Kunio-kun for the Famicom, and gave it the same cosmetic alteration in to Renegade for the NES as they had done for the arcade version. Much later, in 1993, Natsume converted the game for play on the Sega Master System late in the console's lifetime, published by Sega in Europe. As a result, it is a little known conversion of the game. It is heavily based upon, but not entirely identical to, the Famicom/NES version of the game, featuring different graphics and making use of the SMS's enhanced pallet. As such, much of the descriptions of the NES version are applicable to the SMS version as well.
It is important to note that during every scene change, you will automatically regain all of your lost health, and the 2 minute timer will reset.
-

Japanese Famicom title screen
-
American NES title screen
-
European SMS title screen


-

Japanese Famicom between round quote
-

American NES between round quote
-
European SMS between round quote


Items
Throughout these conversions of the game, it is possible to earn power up items. These items will only appear under certain conditions, and must be collected in order to activate them.
| Item | Description | Appearance Conditions |
|---|---|---|
| Hamburger | All of your missing health will be restored (Onigiri or rice ball in Kunio-kun). | Perform a dashing jump kick into the wall when the last two digits of the timer correspond to your level of difficulty; Level 1 - 17, Level 2 - 43, Level 3 - 59. |
| P | Power-up. You will flash for a limited time, and all of your attacks will send enemies sailing into the air. | Perform a jump kick when the last two digits of the timer correspond to your level of difficulty; Level 1 - 32, Level 2 - 25, Level 3 - 11. |
| Heart | Collecting a heart will grant you an extra life (appears as "1UP" on the SMS version). | To make the heart appear, you must sit on your third opponent and punch them when the last digit of the timer is an even number. |
| S | Turbo Boost. Press |
Only appears on the second stage during the motorcycle sequence if enough time passes by. |
Stage 1
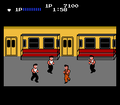
The first stage still takes place on a subway platform (or a train platform in the Famicom version), but now it takes place over three scenes. The boss no longer waits for you on the platform that you start on. Instead, he is a stop away, and you'll need to ride the train, and defend yourself along the way, to reach him.
- A: You start out on a platform that is fairly identical to the arcade version. As such, there is a drop on the right side of the platform which you can use to your advantage to immediately knock or throw enemies over the side. It can also contribute to your own death if you're not careful. You must defeat eight enemies before the doors on the train will open up. At any given moment, you will be fighting against two brawlers, and one stick wielder.
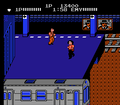
- B: Once inside the train, the fight will immediately continue. The train has no special features, so you must completely defeat each enemy. The same make up of fighters will approach you until you have defeated six of them. Then the train will come to a stop and the doors on the back side will open.
- C: You will face off with the boss on the smaller platform. Do not attempt to throw or knock the boss off the edge of the platform, you simply will not be able to do it until the boss is much weaker. Attempting to do so could backfire on you, and cause you to fall down instead. Likewise, you will not be able to sit on the boss and pummel him unless he is down to only one bar of health. Rely on jump kicks and dashing punches until he is defeated.
-
Stage 1 part A
-
Stage 1 part B
-
Stage 1 part C


Stage 2
The second stage takes place on the biker's pier, just like in the arcade. However, the order of events has been altered, and you must fight the gang on foot before you face any of the motorcycle riders. After you knock off the last rider, you will have an opportunity to grab his bike and go on a freeway ride to the boss. But don't expect to get there without a fight.
- A: As mentioned above, you will have to fight the gang members on foot first before dealing with any motorcycle riders. Use the left side of pier the same way you used the right side of the platform to make quick work of the gang members, but use caution.
- B: After taking out a number of gang members, the gang resorts to trying to mow you down with their bikes. Unlike the arcade version, you only ever have to deal with one at a time, making the ordeal substantially easier. In addition to that, jump kicks are far more reliable than they are in the arcade, although you must still time them carefully in order to succeed.
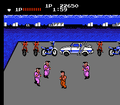
- C: After knocking out the last rider, you grab his bike and start riding down a highway to reach the boss. Along the way, several bikers will appear and try to kick you while you're riding. In addition to running out of energy, you must also beware of falling off the bottom side of the road. Press
 to kick your opponent. You will automatically kick on the appropriate side of the bike. It is much easier to kick and defeat your opponents if you are moving left or right as you do so. Holding still will make it harder and expose you to more injury. You may encounter an "S" icon along the way. If you collect it, you will be able to ram into enemy bikes and knock them out by pressing
  .
. - D: After the long bike ride, you will finally make it to the parking lot where the boss of the stage is waiting to fight you. This fight will not be substantially different from the previous boss fight, only you do not have to worry about falling off a ledge. Jump kicks and dashing punches are the key to victory.
-
Stage 2 part A
-
Stage 2 part B
-
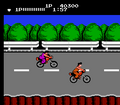
Stage 2 part C
-
Stage 2 part D


Stage 3
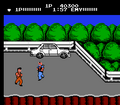
The third stage is an interesting stage in these home conversions. It offers a branching path, but stage can be completed and passed if you take either path. The only question you need to ask yourself is if you would prefer to face a second angry mob of women, or one very large and very angry stage boss.
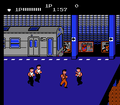
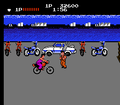
- A: Just as in the arcade, the third stage takes place in a seedy alleyway outside a bar and night club, occupied by an all female gang. With no edge to rely upon, you'll have to defeat these women the normal way in order to advance further into the stage. When the last female gang member is defeated, you'll have two entrances to choose from. The door that opens up leads to part B, while the stairs to the right lead to part C.
- B: Inside the bar, you'll find even more disgruntled women. And they won't take kindly to you crashing their hang out. The screen will not scroll, so you're limited to the space available in the bar. Still, no more than three women will ever confront you at one time, so space should not be much of an issue. If you knock out all of the women in this bar, you will advance to the next stage without confronting the boss.
- C: If you choose to take the stairs, you will only have to face off with one woman. But this is no ordinary woman. She is gigantic and can take a lot of punishment. Most of your traditional boss fighting methods will not work as effectively against her. The safest way to fight her is to run a good distance away from her, and let her chase after you. Stop and turn around, And jump kick her in the jaw when she's close enough. It takes three consecutive jump kicks to make her fall down. Then you can repeat the strategy from the opposite side of the room. If she gets close to you, she will pick you up, pummel you, and throw you, so don't get too close. Dashing punches will also work, but only if she is not in the middle of attacking you already; she will usually knock you down if she is.
-

Stage 3 part A
-
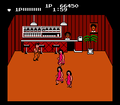
Stage 3 part B
-

Stage 3 part C


Stage 4
The only two things that the fourth stage has in common with it's older arcade brother, is that it takes place in more than one scene (several in fact), and it features a boss that fires a gun. Beyond that, Stage 4 on the NES and SMS is a veritable labyrinth of rooms and battles which you must successfully navigate without getting lost and sent back to the start of the stage. On higher levels of difficulty, you can even be sent back to the start of the third stage. What follows is a full break down of every room of the fourth stage of the first level of difficult on the NES port. The correct choice will be italicized. Each level has it's own solution, and the SMS solutions are entirely different from the NES version.
NES difficulty level 1
 Start: This is where the stage begins. Before you can venture anywhere into the interior of the buildings, you must fight off a gang of thugs who hang out in the alley outside. The good news is, this is the largest number of enemies that you will have to fight in any on area. The bad news is, you're the farthest you can possibly be from the boss. After you have defeated all of them, the left and the right doors will open.
|
 A: If this was your first choice, it was not your best, but you will have a chance to correct it by taking the right door. You'll have to take on three pipe wielders from the biker gang, two at a time.
|
 B: Consider this room a dead end. There are no doors to take when you complete this battle against a room full of angry ladies. Ironically, you will be shown the stage complete quote for completing it, but you will just find yourself back at the Start of the stage when the game continues. You'll have no choice but to survive and start over. Don't retrace your steps to this room. |
 C: This is the first step in the right direction. You'll have to fight three stick wielders from the subway gang in the first stage, two at a time. Jump kick them until they fall on the floor and sit on them to pummel their lights out. Or grab their collar when they are stunned and pummel them with your knee before you toss them over your shoulder to finish them.
|
 D: You may feel a bit unlucky as you enter this room. You will be confronted by not one, but two copies of the boss from the first stage. This won't be an easy fight. Try to continuously jump kick one of them until they are completely knocked out before going after the second. Dash punches can sometimes take both of them out, but if you stop too soon, you may get picked up and throttled.
|
 E: Don't breathe a sigh of relief just because there's only one woman in here. Not only is it the difficult boss from the third stage, but after you defeat the first one, a second boss woman will appear and fight you. Keep your health up for the second battle, or you won't make it. An odd twist of fate makes the right door an infinite loop back into this room.
|
 F: Don't look now, but there are bikers inside the building. You will have to jump kick in order to knock two of them off their bikes before the three doors at the top will open. Then you will have a tough choice.
|
 G: Apparently, the owner of the building has no problem with (or no control over) the biker gang riding motorcycles in the building. This room has more available exits than any other room in the building. Knock three bikers off to open the doors. From the left to right, you have:
|
 H: More of the stage 1 boss. And after you finish the one of two that you see initially, a third will come to join the fight. Keep your strength up as best as you can.
|
 I: More bike riders inside the building. Now you have to knock out three of them in order to continue. Only two doors this time, and whether you realize it or not, you're very close to the final boss of the game. Choose wisely.
|
 J: A room full of angry women with handbags, you will only be forced to fight two of them at a time. From here, no choice is great. In fact, you're better off taking the left door and starting over than choosing the right door and ending up in room E.
|
 K: This is it! You made it to the room of the fourth Stage boss, mob leader Sabu. He doesn't plan on fighting fair: he's packing a gun, and he won't hesitate to use it on you. One hit and you're dead, no matter how much life you had. The good news is, you'll start over in the room with him. You'll have to stay safe and jump kick him up close in order to avoid making him reach for his gun and shoot at you. Just as in the arcade, he can only shoot left or right, so you're safe if you're above or below him. But not for long if you stand still. Keep moving and surprise him. Defeat him and you'll beat the game. Congratulations! |
 L: Naturally, the boss from the second stage will finally make their appearance late into the building. In fact, there are two of them. Fighting these guys won't be much different than fighting the boss from Stage 1. Keep moving, and try your best to concentrate on one before you attack the other.
|
 M: You won't be happy to find out what's behind door M. It's two of the boss ladies from stage 3. If you thought fighting two of the bosses from stage 1 or 2 was difficult, this one may put an end to you. You'll need to do your best to keep one on the same horizontal level as you, and one on a different horizontal level. This will keep the second one from attacking you. Dash from one side of the room to the other, causing the women to follow you. When they catch up to you, prepare to jump kick them three times to knock one of the down. Then run to the other side of the room and start the process over. If you can help it, try to focus on one woman until she is defeated before switching to the other.
|
 N: Your eyes aren't playing tricks on you; you are up against three copies of the boss from stage 2. Unless you keep your back to a wall or stand in a corner, you're going to get sandwiched. The best way to avoid that is to try and dash punch back and forth across the room. There's no guarantee that you will stay safe doing this, but it's better than standing still and getting beat up. You may be lost at this point, but if you take the correct door, you can actually place yourself one door away from the boss.
|
 O: If you've made it this far, congratulations. You're a long way off from the correct path, but it's impressive none the less. This room has two stage 2 bosses waiting for you with a third in the wings just waiting to show up. Use the same strategy that you used in the previous room to survive the attack. You can go deeper in this stage… but you won't want to.
|
 P: You've made it to the farthest room in the building. You haven't found the boss at all, but what you have found is probably the most difficult screen in the entire first level of difficulty. Not only must you fight both of these stage 3 bosses, but there is a third one waiting in the wings. Even if you survive this and open the doors, they will all send you back to some earlier portion of the building. Definitely not worth the trip, unless you really want the practice.
|
NES Difficulty Level 2
From the stage start, beat up the gang of thugs that engage you in combat outside. From there, follow the steps outlined below:
- Right door: You will need to fight three of the bosses from Stage 2, two at a time.
- Right door: You must fight three of the bosses from Stage 3, but only one at a time.
- Right door: Now you must fight four bosses from Stage 3, two at a time. Read the section on room M above to find out about strategies that you can use to survive this room.
- Left door: You must fight three of the bosses from Stage 2, all at once.
- Left door: Surprisingly simple, you must fight four weapon toting thugs, two at a time.
- Right door: You will encounter the gang boss Sabu here. The first one is a fake. You must fight him two times to win.
NES Difficulty Level 3
From the stage start, beat up the gang of thugs that engage you in combat outside. From there, follow the steps outlined below:
- Right door: You must fight four weapon toting thugs, two at a time.
- Left door: you must fight three bosses from Stage 3, two at a time. Read the section on room M above to find out about strategies that you can use to survive this room.
- Right door: You must knock six motorcycle riders off of their bikes.
- 2nd door from the left: You must fight six of the bosses from Stage 2, three at a time.
- Left door: You must defeat nine women who appear three at a time.
- Right door: You must fight three of the bosses from Stage 1, all at once.
- Right door: You must knock seven motorcycle riders off of their bikes.
- Left door: You must fight six of the bosses from Stage 1, three at a time.
- Middle door: You will encounter the gang boss Sabu here. The first two are fakes. You must fight him three times to win.
SMS Difficulty Level 1
From the stage start, beat up the gang of thugs that engage you in combat outside. From there, follow the steps outlined below:
- Left door: You must fight two weapon toting thugs.
- Right door: You must knock three motorcycle riders off of their bikes.
- Right door: You must fight two of the bosses from Stage 1.
- Left door: You must fight two of the bosses from Stage 2.
- Left door: You will encounter the gang boss Sabu here.
SMS Difficulty Level 2
SMS Difficulty Level 3
From the stage start, beat up the gang of thugs that engage you in combat outside. From there, follow the steps outlined below:
- Left door: You must fight three street brawlers.
- Left door: You must fight two of the bosses from Stage 3.
- Right door: You must fight two of the bosses from Stage 3.
- Left door: You must fight two weapon toting thugs.
- Middle door: You must fight three of the bosses from Stage 1.
- Right door: You must fight two of the bosses from Stage 2.
- Right door: You will encounter the gang boss Sabu here.