| Star Voyager | |
|---|---|
| Developer(s) | ASCII Entertainment |
| Publisher(s) | Acclaim |
| Year released | 1986 |
| System(s) | NES |
| Japanese title | コスモジェネシス (Cosmo Genesis) |
|---|---|
| Genre(s) | Shooter |
| Modes | Single player |
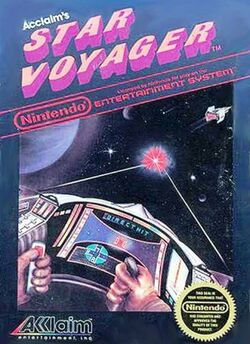
Star Voyager is an outer space shooter for the NES. It was originally developed in Japan by ASCII Entertainment, and released as Cosmo Genesis at the very end of 1986. Acclaim picked up the rights to release the game in the United States and changed the title.
The gameplay is heavily based on Atari's original Star Raiders concept. Another Famicom game built on this concept is Namco's Star Luster, which many players regard as the better quality game out of the two. Star Voyager is a first-person shooter from inside the cockpit of a spaceship. The player navigates through different quadrants contained in a galactic map. Different sections of the ship can sustain damage, but this damage can be repaired by visiting a space station.
The game is considered extremely difficult and frustrating by some, requiring a great deal of practice and strategy to overcome the sheer firepower that the enemy is capable of throwing at you. Star Voyager is one of those games where using a Game Genie to cheat can't always help you beat the game.
-
Japanese box
Story[edit]
The Place: Spiral Galaxy IX
The Problem: A flotilla of Molok Wardrivers are holding your temporary home, CosmoStation Noah, captive.
You and your people never wanted any trouble. You had boarded CosmoStation Noah in an attempt to flee a Galaxy whose sun was quickly dying.
Your hope was to find a new home. In a Galaxy whose sun was young and strong.
But suddenly - as you entered Spiral Galaxy IX - all hope began to dwindle. For you were confronted with one of the most ruthless astral terrorist groups in the universe: the Molok Wardrivers.
The Molok Wardrivers are renowned for their total disrespect for anything but rampant destruction. And they need no provocation to be driven into action.
Fortunately, the planners of CosmoStation Noah had thought to include the RH 119 in their inventory of equipment.
The RH 119 is one of the most supra-tech space vehicles ever designed. And it's equipped with Laser Cannons, Barrier Shields, a Life Support System and Adam, a fully-integrated bio-computer.
The thing is, there were only a handful of CosmoStation Noah inhabitants trained to work with Adam. And one of them was you.
After a series of stringent tests - for reflexes, endurance, intelligence and physical and psychological strength - you were chosen from all the rest.
And now it is your job to leave the CosmoStation and go meet the enemy. All hope rides in your hands.
Screens[edit]
Main screen[edit]

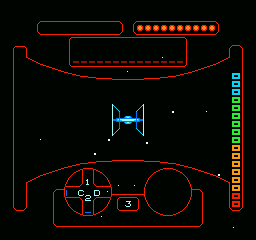
It's from the main screen that you'll monitor your energy and life support systems. It's also where you'll do all your flying. And fighting.
- Speed Meter: The Speed Meter can be seen along the left side of the screen. It indicates how quickly your ship is flying through space. You will begin to warp when then meter reaches the red zone.
- Warp Distance: The Warp Distance is the number in the center of the bottom of the screen, which indicates how many quadrants over your warp destination is, and how many dots you need in your Warp Meter to successfully arrive at that destination.
- Warp Meter: The Warp Meter can be seen along the left half of the top of the screen. In order to warp from one quadrant of space to another, you must carefully follow a procedure. First, accelerate your ship by holding the B button until the speed meter is one or two units from the top. The Warp Meter will begin to rise and fill with dots. Once you have the same number of dots as indicated by the Warp Distance display, hold the B button down again to initiate the warp. You must keep the B button held down and carefully guide your ship through the war by correcting any deviations in direction (as shown by the Gyro Compass) to prevent yourself from getting lost, or flying into a black hole.
- Fuel Crystal Reserve: Each dot shown in the Fuel crystal reserve on the top right of the HUD represents the number of remaining fuel crystals that you have left. Each time a fuel crystal is depleted, a dot is removed from the Fuel crystal tank, and your ship is re-energized. You will receive the warning Fuel crystal level is low when there are 3 crystals or lower remaining. If there are no dots left when the ship runs out of energy, your game will be over.
- Energy Scanner: The energy scanner is shown along the right side of the screen. It shows the current amount of energy remaining in the current fuel crystal. Whenever you engage your thrusters, or get hit with your barrier shield enabled, you lose energy.
- Message: Shown directly beneath the Warp Meter and the Fuel Crystal Reserve. Shows useful information which is provided to you by Adam, the bio-computer. It may indicate the approach of a ship or planet.
- Reticule: Shown directly in the center of your view of space, this is where your lasers are aimed, and where you must keep objects in view in order to successfully land on planets, or dock with space stations.
- Gyro Compass: Shown to the left of the Warp Distance, the compass indicates what your current heading is. You must keep your eye on this during the Warp sequence in order to ensure that you are traveling straight and not veering off course. Keep the numbers and letters steady during a warp.
- Radar: The radar shows you the relative proximity of enemy craft around you. Your radar is a two dimensional projection of three dimensional space, so enemies may appear to get closer or father simply by reorienting your ship.
Sub screen[edit]

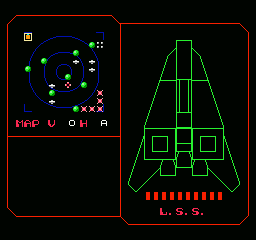
Use of the subscreen is vital to your efforts to battle the Molok Wardrivers, and defend the planets and bases. You can also determine the extent of damage you have taken in battle.
- Star Map: You can see what type of object occupies each current sector of space.
- Current location - This is indicated by a white square outline.
- Warp destination - This is indicated by a solid orange square.
- CosmoStation Noah - This is indicated by a blue cross or, in some versions, a small blue dot. The CosmoStation can repair every type of damage you have taken, including damage to your Defense Barrier, Laser Cannon, or more importantly, your Life Support System.
- Space Station - These are indicated by silver crosses that are longer across. They can completely refuel your ship, but they can only repair damage to your Radar or Engines.
- Planet - These are indicated by the green orbs. On two planets, you will find inhabitants that can supply you with upgrades to your engines and to your lasers, both of which are extremely helpful in your battles against the Molok.
- Enemies - These are indicated by the pink Xs. Once you arrive in these quadrants, you will find yourself in the middle of a dog fight between yourself and the Moloks. You must locate and destroy the Mothership in the quadrant or it will continue to spawn more war crafts to defend itself.
- Asteroid Belt - This is indicated by four gray dots arranged in a square. Avoid winding up in this sector or your ship will take a tremendous amount of damage.
- Black Hole - This is indicated by a pink cross with a black dot in the middle. If you end up in this sector, escape is difficult, but not impossible. To escape, imagine a rectangle just barely enclosing the swirling stars. Aim at one of the four corners of that rectangle and then warp to another sector (an adjacent sector is easiest). Other attempts to escape will fail (as will just sitting still), and the game will be over.
- Damage Report: The damage report is shown beneath the Star Map, and indicates precisely what is damaged on your ship.
- Laser Cannons - If your lasers are damaged you will not be able to shoot at your enemies at all.
- Defense Barrier - Be sure to turn on your defense barrier when you are in the middle of battle. If this is damaged, you will not be able to engage it and you will take the full brunt of your enemies blasts, since they reduce the fuel loss and lower the chance of getting ship components damaged.
- Engine - If the engine is damaged, acceleration and deceleration will be severely impaired, and you will also consume more energy while accelerating. On the top of this, building warp jumps will be slower.
- Life Support System - If this takes damage, it will slowly lose energy until it is depleted, and your game will be over.
Ship Upgrades[edit]
On 2 random planets, there are 2 upgrades to find that will aid you during the game:
- Super Lasers: Given by an engineer, these blue lasers will make your lasers twice as powerful.
- Hyperdrive Engine: Shown as 4 orbs at the corner of the HUD after being obtained. Given by a pilot, this new engine has:
- Much faster acceleration and deceleration.
- Much faster warp jump charge.
- Less fuel consumption while actively accelerating.
Gameplay[edit]
The player's primary goal is to eliminate all enemy fleets before they can surround the stationary CosmoStation Noah. The player may also visit up to eight different planets in search of engine and weapon upgrades for their ship. Players may also seek repairs at up to five space stations in addition to CosmoStation Noah. The player may also visit an asteroid field, and a black hole from which escape is impossible. The game is won if the player defeats the enemy armada. However, the game is lost if the enemy fleet reaches the CosmoStation Noah, the player enters the black hole, the player's ship runs out of fuel crystals, or if life support fails.
Gameplay occurs on a 10x10 grid that is randomized at the start of each game with the exceptions of the player and CosmoStation Noah will always begin in the top left, and the five initial Molok Wardriver fleets will begin in the bottom right. To progress through the grid, the player must select their destination coordinates either through the HUD or the select menu grid, and hold down the B button to charge enough power to travel as many sectors as required to reach their destination, as identified by the number on the bottom-center of the HUD. The number of leaps charged is indicated by icons in the upper-left gauge.
As gameplay progresses, additional fleets may join the Molok Wardriver armada. Any planets or space stations they encounter during their trek to the CosmoStation Noah can be attacked. Plan attacks near space stations for easy repairs, but be warned: enemy armadas left only partially destroyed will regenerate when the player returns. In order to destroy the enemy fleets, the player must warp to their coordinates and destroy the fleet's spacecraft and mothership, which will endlessly deploy enemy spacecraft as long as it remains operational. The player must raise their shields in the select menu in order to minimize damage taken to the ship.
The player's fuel crystals will deplete normally over time, and faster during warping or sustaining damage. Therefore it is necessary to visit space stations to refuel to prolong gameplay. They can also repair damaged systems which include radar, engines, weapons, and life support. Depending on the amount of damage taken, the engines may become inoperable, one or both laser cannons can malfunction, and radar can become difficult to use.
Controls[edit]
 : Use the direction pad to steer your ship in the desired direction. Also use it to move to the quadrant of the galactic map that you would like to warp to.
 : Press A to fire your ship's laser cannons. Additionally, press the A button while on the subscreen to toggle the activation of your Defense Barrier shield.
 : Press and hold the B button to accelerate your ship. Tap the B button to immediately cut your ship's engines. Press and hold B until the warp drive is completely lit to launch into hyperspace.
 : Press Start to begin a new game, or to pause and unpause the action mid-game.
 : Press Select to toggle back and forth from the main screen to the subscreen.
Star Bomb[edit]
In addition to the upgraded engines and lasers, there is another item that you can collect, called the Star Bomb.
Its location is not indicated on the map.If you fly into the sector where the Star Bomb is hidden, you will receive as message from Adam saying "Faint Message Received."
You must search within the sector until you find a thin vertical line. Dock with the line just like you would with a base. It will increase in size and appear as a black monolith, and you will get the one and only Star Bomb in the game.
To activate the bomb, you must have a second controller plugged into your console.
Press one of the buttons on the second controller to fire the bomb.
It is best used against an enemy mothership and not against any of the smaller fighter craft.
Finding the bomb can be time consuming, and may allow your enemies to attack a base or planet while you are busy searching. It is not recommended that you actively seek it out, but rather happen upon it by chance in the course of your game.
Special Note: Method for finding the StarBomb.
The play area contains stationary and moving objects.
The StarBomb is a stationary object, furthermore it is never occupied by a planet or the enemy.
While playing the game you can track which sectors are never occupied by the enemy or planets to help limit your search.
