Crag Hack, newly arrived in Erathia and looking for adventure, meets a young wizard named Sandro, who hires him to find the four pieces of the Armor of the Damned so he can destroy the cursed thing. Great rewards are offered for this service.
Bashing Skulls
- Win condition: seize the Skull Helmet from Barshon the Barbarian.
- Loss condition: Crag Hack is defeated in combat.
- Level cap for Crag Hack: 10
- Medium sized map.
- Two enemies, Red and Tan.
- Hard difficulty (in Shadow of Death is modifiable)
- Starting bonus: 40 Goblins or 20 Wolf Raiders or 15 Orcs; choose 15 Orcs
We begin with Crag Hack at level 2 (has Expert Offense, Attack 5, Defense 0, Power 1, Knowledge 1) in southeastern corner of map and without a town. Put Crag Hack troops in tight formation (Orcs in middle).
First week
Pick that Campfire near start position (600 gold + 6 gems), then proceed to north-west on road (we must capture a town as quickly as possible). We meet a Red enemy, Gurnis the Barbarian with 5 Orcs and 25 Hobgoblins; when clicked first, a message pops: "I, Gurnis the Barbarian, demand that you shall go no further into these lands. Turn back now or die!"; on second click battle begins. Tactic employed: wait all, enemy Hobgoblins move forward outside full damage zone, shoot them with Orcs (half damage), block our Orcs with rest of our troops, in second turn Hobgoblins are killed by Orcs (who make now full damage) and our Goblins and Wolf Raiders who waited to minimize losses; after Hobgoblins are down, shoot with orcs and defend with the rest two turns (when that 5 enemy Orcs are dead); losses - not more then 15 Goblins.
We pass by Stables (visit), then a little more to west find Dragonspire (Stronghold), guarded by lots of Goblins (about 30, of which one third are Hobgoblins; only Fort). Tactics: wait with all except Orcs who shoot enemy Hobgoblins, in second turn they arrive near our Orcs, block them and attack our Goblins (retaliation from them should kill all remaining Hobgoblins); after that kill all; losses - 1-2 Goblins and 1 Wolf Raider. Conquer Dragonspire at end of second day (garrison of 10-11 Goblins and 5-6 wolf Raiders); losses: all our remaining Goblins. This town has City Hall (cannot build Capitol and Tavern), Goblin Barracks and Orc Tower. Recruit everything available; flag Sawmill (follow road to NW) and Ore Pit (follow road to NE). Visit Windmill (SW of Dragonspire). Near Ore pit is Wagon; visit it.
At week's end:
- Crag Hack level 3 - 20 Orcs, pack of Goblins, Ammo Cart.
- Dragonspire: Goblin Barracks, Wolf Pen, Orc Tower, Blacksmith, Castle, Cliff Nest, Marketplace.
Second week
Buy all troops and go west of Dragonspire; we find Gold Mine, Orc Tower (recruit!); in SW of map there is Den of Thieves.
At end of week:
- Crag Hack level 4 - about 40 Orcs, lots of Goblins, 9 Rocs, pack of Wolf Raiders
- Dragonspire: same as first week + Mess Hall + Resource Silo + Mage Guild
- No sign of enemy yet (excluding Gurnis).
Third week
Now we go east of Dragonspire; there are one Alchemist Lab and one Witch Hut.
End of week:
- Dragonspire - level 1-5 creature generators, Hall of Valhalla, Resource Silo, Castle,
- Ballista Yard, Mage Guild level 2
- Crag Hack level 5 - about 40 Orcs, 9 Rocs, lots of Goblins, pack/lots of Wolf Raiders
Fourth week
Recruit everything. Then flag Crystal Mine NE of Ore Pit; afterwards go north, then west until a Gem Pond (flag it), then south, pass by Hut of the Magi (see image) which show us our destination - town of Rovener in NE corner of map; Tan has it. North of Hut of the Magi there is rocklands with 2 Goblin Barracks (about center of map). Now we see a Red enemy with a powerful army for this time upgraded packs of Stronghold and Castle creatures of level 3-5.
Before attacking him/her (if runs, track him/her!), Crag Hack (level 7) should have about 100 Goblins, 70 Orcs, 70 Wolf Raiders, 20 Rocs (maybe some Orc Chieftains joined for greater glory). Crag Hack must win this battle, although with serious losses (be careful not to lose many Rocs and Orcs; will be needed soon). Build Cyclops Cave in Dragonspire at end of week. Visit Dark Blue Keymaster Tent (located at western side of map, in center, on a Clover Field; see image).
From there we see to NE a mountain pass leading, presumably, to Red territory. Crag Hack (level 8) returns to Dragonspire. Meantime we upgraded all buildings and made Mage Guild level 3 (Crag Hack should have by now Wisdom). Maybe another Red hero appears wandering north of us.
Sixth week
Recruit all; Crag Hack should have: 12 Cyclops Kings, more than 100 Orc Chieftains, lots of Wolf Raiders, lots of Hobgoblins, 25+ Ogre Magi (only lots of level 1-2 because we sacrificed them previously on purpose in that battle with Red hero). March to north passing by Sawmill, get through that mountain pass, then straight north until Strongglen (Stronghold; Red); conquer it on fourth day of week (it is completely build, except Capitol and Mage Guild; has upgraded level 1-5 and Cyclops building; has Tavern also).
Probably 2 Red heroes ran from Crag Hack being about east of Hut of the Magi. From Strongglen march eastward on road until Drago Breach (Stronghold; Red) and conquer it; Crag Hack remains here with several Cyclops Kings, about 100 Orcs Chieftains, 20-25 Thunderbirds, 25-30 Ogre Magi.
Build Capitol in Strongglen; recruit here a secondary hero to flag mines and explore around. Crag Hack should attain level 10 with conquering of drago Beach and should remain there at end of this week.
Seventh week
From Drago Breach begins a road which makes a turn northward and reaches to our aim (NE zone with Tan city, Rovener).
Crag Hack recruits all from Drago Breach and goes to SW (there is a Hill Fort south of road connecting Strongglen with Drago Breach; also in area we find an Arena; upgrade Cyclops). Toward south-east of Drago Breach there is Timintal (Castle) with unupgraded level 1-4 creature generators and City Hall; we can build here only Mage Guild. South of Timintal there is a mountain pass to our starting zone. Meanwhile Red conquered Dragonspire, but could not recruit anything (we bought everything available before attack).
Eighth week
Recruit everything from Drago Breach, go with Crag Hack towards Timintal, pass by it, through that mountain pass, then to southwest until we reach Dragonspire in day 5 to reconquer it. If on way to Dragonspire there is an enemy with strong enough army, beat him/her. An enemy hero could slip by Crag Hack and retake Timintal; it does not matter; guard Strongglen and Drago Beach at all costs. After capture, Dragonspire should have building for Ancient Behemoths (we let computer build it for us).
There is another Hill Fort just south of Timintal, west of mountain pass nearby.
Weeks 9-12
Crag Hack goes from Dragonspire to Strongglen, takes army, reconquers Drago Beach (because surely it was overrun by the last relatively powerful Red hero), kills any Red hero he gets to, recaptures Timintal. Be careful not to lose again Dragonspire. Red is vanquished around week 11.
From Drago Breach there is a road to NE to Red Tent (see image), blocked by Dark blue Border Guard (if Red enemy did not visit corresponding tent, it will be still in place); Red Border Guard is underground; past it lurches a throng of Trolls; Subterranean Gate to underground section of map (small nevertheless) lays around center of map (see image).
After vanquishing red, beat that Trolls with Crag Hack (because Quuest Guard guarding pass to NE region asks it), then gather all available army on Crag Hack, enter NE region and conquer Rovener in week 12, beating Barshon in the process.
At beginning of battle:
- Crag Hack should have several Ancient Behemoths, about 80 Thunderbirds, about 50 Cyclops Kings, swarm of Hobgoblins, 140-150 Wolf Raiders, about 240 Orc Chieftains, about 110 Ogre Magi;
- Barshon Should have about 40 Cyclops Kings, about 80 Thunderbirds, about 180 Orc Chieftains, about 130 Ogre Magi, about 180 Wolf Raiders, 450-500 Hobgoblins.
With our superior status we win (serious losses though), capturing Skull Helmet (our scenario objective), and some other artifacts.
Black Sheep
- Bonus at start: Greater Gnoll's Flail OR 5000 Gold OR Upgraded Orc Tower (choose either Upgraded Orc Tower - helps with some shooters at start - , or 5000 Gold - for easier building and recruiting at beginning)
- Level cap: 15
- Win condition: capture an artifact, Blackshard of Dead Knight, from Marzeth
- Difficulty: hard
- Loss condition: Crag Hack is defeated in combat
- Enemies: Red
- Starting town: Hartgrim (no creature generator, cannot build Town Hall and Tavern)
First week
Near start place (northeastern corner of map) we see a horde of Halflings guarding Centaur's Axe and lots of Boars guarding Shield of the Dwarven Lords (we take them at end of week, after building some creature generators).
Points of interest: Ore Pit just NW of Hartgrim; Sawmill W of Hartgrim (on road); Gold Mine (north of Sawmill); Windmill (near Hartgrim); between Sawmill and Gold Mine there is a pass to west guarded by pack of Ogre Magi.
End of week:
- Crag Hack (level 10) - 3 Rocs, about 20 Goblins, about 10 Wolf Raiders, 7 Orc Chieftains (if we chose Upgraded Orc Tower as bonus)
- Hartgrim - level 1,2,5,7 (+3, if chosen as start bonus), Castle
Second week
Crag Hack go on road from Hartgrim to south; at SE of town there is Crystal Mine; flag it; immediately at south we found a Tavern; beat guarding monsters and recruit a hero of Stronghold alignment and take his/her troops for Crag Hack. We pass by Dwarven Treasury, free Gold Mine; south of Gold Mine there is a Star Axis (+1 spell power) and Water wheel; West of Gold Mine there is Mystical Garden. The road is blocked (about middle of map) by Light blue Border Gate (on isthm between our zone and southeastern zone of map). Next we visit with the secondary hero mines and the rest; with Crag Hack only beats guarding monsters and visits stat enhancers.
End of week:
- Crag Hack (level 11, artifacts): about 10 Wolf Raiders, 3 Rocs, some Orc Chieftains (those guarding Crystal Mine could join for greater glory).
- both heroes should be someplace in south of starting zone (near Light blue Border Gate).
- Hartgrim: level 1,2,3,4,5,7 creature generators; Castle; Mage Guild level 1, Marketplace (we were forced to trade resources), Blacksmith
Third week
Upgrade Rocs and Ogres.
Fourth and fifth weeks
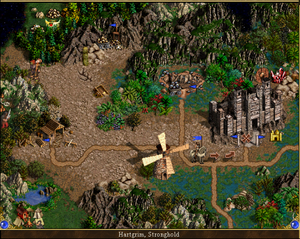
Crag Hack (with all creatures recruited; 7 Behemoths, 15+ Thunderbirds, 15 Ogre Magi) beats Ogre Magi blocking pass to west; just north there are several Red Dragons guarding Dragon Scale Armor (+4 Attack and +4 Defense); get artifact. See image on the left for details
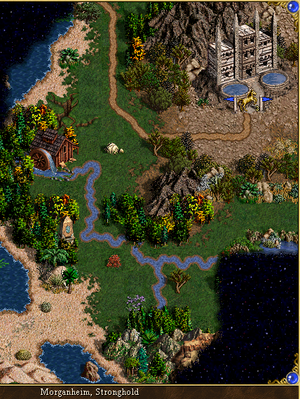
Go west, conquer Morganheim (neutral Stronghold; level 1-3 creature generators + City Hall; NW zone of map); almost sure a Red hero wandered here through a one-way monolith NE of Morganheim, eliminating Light blue Border Guard blocking access to southwestern zone of map. See image on the right for location of Light blue Border Guard.
Enter enemy zone, pass by Mercenary Camp (visit), crush an ambush of 60 Swordsmen and 1 Crusader, pass by First Sword (Red; Castle type; blocked by Green Border Gate). Green Tent is in NW od this zone (there is a road from First Sword going there). Crag Hack conquers First Sword in fifth week; until then, a Red hero with significant forces probably attacks and conquers Hartgrim and maybe Morganheim too; buy all available troops before his/her attack. After conquering First Sword, Crag Hack (level 14) should have 6 Behemoths, 10-15 Thunderbirds, 15 Ogre Magi, some Orc Chieftains. Also in fifth week strike east from First Sword (upgraded level 1-6 creature generators; level 7 disabled), get past Garrison (on isthm between SW and SE zones of map) until Second Sword (Castle type; upgraded level 1-5 creature generators; level 6-7 disabled). Recruit an secondary hero in First Sword for: getting aditionally troops from 1 Archer's Tower an 2 Guardhouses; flagging Gold Mine; visiting Windmill, waterwheel, Sawmill, Ore Pit (if possible).
Weeks 6-8
Crag Hack visit Red Tent (SW of zone with Second Sword), then to NE until Third Sword (Red Border Gate blocking it; upgraded level 1-5 creature generators, unupgraded level 6) and conquers it. Objective: amassing of army on Crag Hack; do not attack an enemy hero with powerful troops; attack those with moderately or few troops (war of attrition). Next Crag Hack makes a circle on map to regain the two Strongholds: pass by Light blue Border Gate (Tent in NE of Third and Second Sword zone); probably the best enemy hero departed through a two-way monolith (south of Second Sword) into SW of map (where we see swamp => surely around there could be found Marzeth ...)
At end of second month:
- we have all five towns on the map.
Ninth week
That hero with a strong army appears from SW zone through monolith; he/she will advance against Second Sword if we maneuvered well with Crag Hack and secondary heroes. With luck Crag Hack (200+ Marksmen, 20+ Champions, 15 Ogre Magi, about 70 Crusaders, about 400 Halberdiers, 100+ Royal Griffins, 40+ Zealots) attacks and crushes him/her outside Second Sword (before losing all army he/she will retreat). After this battle we have no dangerous enemy hero left.
Tenth and eleventh week
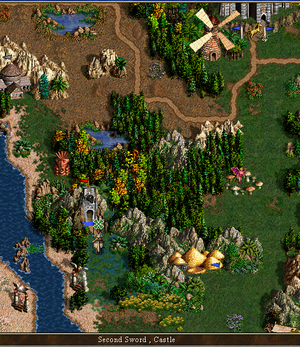
Crag Hack visits all remaining stat enhancers; build Mage Guilds at maximum level useful, then replenish his army, goes to two-way monolith (see image) and through it, turns south then west (rest of SW zone is not interesting), enters swamp zone (ambush of 100 Lizardmen and 40 Lizard Warriors) until arrives at Subterranean Gate (near it ther is a sign saying "Admittance to excavation prohibeted upon pain of death. Signed Marzeth"), goes underground where is Marzeth (attack 10, defense 7, power 7, knowledge 6) with 70 Dread Knigths, 70 Crusaders, lots of Vampires and some Wigths and Skeletons. Crag Hack will crush him easily (he tends to use blind; Cure it), capturing Blackshard of Dead Knight and some other artifacts in the process around end of eleventh week.
A Cage in the Hand
We start:
- northwest corner;
- no city;
- Crag Hack is level 15 (Attack-Defense = 15-16, Pow-Kno=3-4)
- one enemy, Red
- level cap = 20
- start bonus: between 40 Wolf Raiders, 30 Orc Chieftains, 5 Ogres; choose 30 Orc Chieftains for easier start.
See image of starting zone.
Day 1
Go south, pick 1500 gold, visit Windmill; just south of Windmill is crossroads; there is a road to south and another to east until Dragonspire (Stronghold) blocked to west by Light blue Border Guard and to east by Dark blue Border Guard; just west of crossroads is Subterranean Gate. Go south, visit Learning Stone (+ 1000 experience points).
Day 2
Visit sign at another crossroads which says " Light Blue - Setting Sun Dark Blue - Rising Sun " See images for locations.
We turn westward.
Ransack campfire. We get to another sign:
"
Gold mine - North
Tent - South
"
so we go south.
We find Light blue Keymaster's Tent, visit it and pick gold laying around.
Day 3
Visit Fountain of Youth, then go straight to town; on our course we see movement from the Red enemy.
Day 4
Pass by Light blue Border Guard, attack the city guarded by 2 Ogres and 8 Goblins (wait and shoot with Orc Chieftains); it has no Citadel and no Tavern, but Town Hall, Fort, Goblin Barracks, Orc Tower.
Days 5-6-7
Flag Gold Mine, Sawmill and Ore Pit; the last two are near road going east round mountains to Dark blue Keymaster's Tent; there are 2 Cliff Nest around.
At first week end: Crag Hack - level 15 Dragonspire - Townhall, Citadel, unupgraded level 1-5 creature generators
Weeks 2 and 3
If a stack of wandering monsters wants to join, accept. In third week is possible that a Red hero to beat one of the two fourth level stacks guarding passes to Red zone. From sign saying " ... Rising Sun ..." go south and conquer Blight (Necropolis), Then go underworld, beat a pack of level 2 monsters (if the arttifact thay are guarding is desirable) and lots of level 4 monsters in order to visit Black Keymaster's Tent (very important: computer must not visit also this Tent). Around Blight there is a Star Axis (+1 Power) and a School of Magic.
At week's end: Crag Hack - level 16 (Attack=17,Defense=11,Power=4,Knowledge=4); 50-60 Ogres, 15-20 Rocs, horde of Orc Chieftains, lots of Wolf Raiders, lots of Orcs Dragonspire - unupgraded level 1-6 creature generators, Castle, City Hall, Mess Hall; should try to get Earth, Air Magic and Wisdom. Blight - level 1-6 creature generators, Resource Silo, no Citadel, Tavern, City Hall, cannot build level 7 structure. Recruit a secondary hero in Blight to flag mines around.
Fourth week
From Dragonspire zone strike eastward with Crag Hack, pass by place with 4th level monsters, turn southeast along a School of War (visit it), Magic Well, Dwarven Treasury; from Treasury go northeast until reach Agony (Necropolis) and conquer it with some losses (no level 7 possible), then go north and then northwest on the road until Whitestone (Castle); conquer it. This town is seriously limited is what can be build here (it has City Hall, Resource Silo, no Fort). Around this week end we beat the last Red hero wandering in the north half of map.
At week's end: Crag Hack - level 18 (Attack=18, Defense=13, Power=4, Knowledge=4); has few Cyclopses, horde of Ogres, several Rocs, 20-25 Orcs, horde of Orc Chieftains; should be somewhere south of Whitestone.
Fifth week
In northeast region of map: visit White Tent (needed if we want to go to southwestern region of map because the pass is blocked by White Border Gate; not necessary for finishing the scenario, but nevertheless useful; here we can find a Dragon Utopia, two buidings fro Mummies, two Building for red Dragons guarded by a pack of Red Dragons), a Mercenary Camp (+1 Attack), flag a Gem Pond. Go to center of map where we can find Arena (guarded by pack of Cavaliers) and Marletto Tower.
At week's end: Crag Hack - level 19 (Attack=21, Defense=16,Power=4,Knowledge=4); 3 Behemoths, 5-6 Cyclopses, 80-90 Ogres, weaker troops.
Sixth week
Build Mage Guilds level 4-5 in Agony, Blight and Whitestone and send Crag Hack there to learn spells; hopefully we get Town Portal or Resurrection or both. After learning as much spells as possible, having visited all stat enhancers and reaching level 20, amass army on Crag Hack, go to Agony, then south until a Garrison, beat guarding troops, turn east, then south until Crag Hack arrives in southeast corner of map about end of week where is a patch of Cursed Ground blocked by Black Border Gate (there are many more in this swampy southeast area; see image ). Attack the Liches; a message appears: "As the Liches attack you notice one of them wearing armor appearing to be made of human ribs."; this message gives us the clue that here is Rib Cage. Beat them easily and capture Rib Cage, thus finishing the scenario.
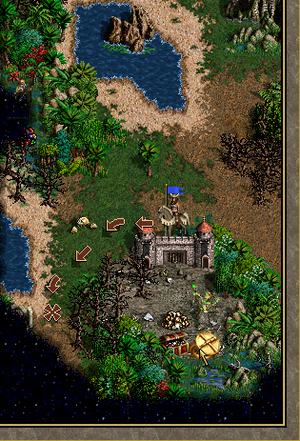
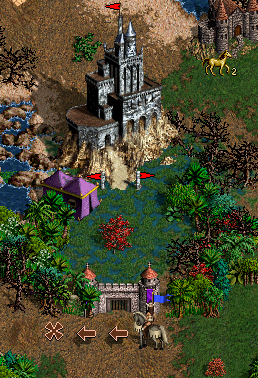
Note 1: If computer player have visited the underground Black Tent, it surely would enter these Cursed Ground patches before us and got Rib Cage itself; afterwards it is very difficult, even impossible, to complete the scenario (must defeat the enemy hero that has Rib Cage and not letting him/her flee from battlefield).
Note 2: Red enemy has a town in southeast region, but it is behind Purple Border Gate (see image) and the corresponding Tent is located also behind the same Purple Border Gate so we cannot even reach it (almost sure Dimension Door and Fly spells are disabled in this campaign).
