Red Canyon doesn't have any notable features, but the stages within continue to escalate in difficulty. There are quite a few wide bottomless pits, tricky auto-scrolling sections as well as strong winds, which really require you to apply the skills you've hones from past levels. There are 5 stages on this island, and the number isn't going any lower for future levels. More challenges await as you unveil the final remaining islands, can you successfully conquer them all?
Stage 1[edit]
Section 1[edit]

The stage starts out with another standard horizontal scrolling section, with some bottomless pits as well as the return of temporary platforms, this time looking like cracked blocks. There are some nice items to get at the end, but they require quick and precise jumps to get if you're partnered with Rick or Kine.
Section 2 - Mid-Boss: Master Green[edit]

The fight with the electrifying jellyfish is still the same as before, but now you can't duck, as doing so will cause you to fall through the ground into the spikes. This fight is entirely optional, and you only need to go here if you want an Animal Friend.
Section 3[edit]

This is a huge section, but much of it is spent winding around the cave. There are quite a few Gordos scattered in the cave, so you must make your way to the top carefully. At the end of the cave is a drop through some temporary platforms where you can actually take some damage if the block doesn't dissolve when the Gordos within the small space close in on you. Past that is a vast but straightforward section to the door.
(1) If you bother to investigate the top of the section you will be rewarded with a nice 1-Up. However, watch out if you intend to get there or reach the door while flying with Coo. There are tons of Propeller Bombs hovering around the skies, so you can easily lose your friend if you're not careful.
Section 4[edit]

The last section of the stage is another horizontal scrolling stage, but space is much more restricted due to the ceiling of the cave and the presence of Gordos. As you progress through the section you will also encounter Shotzos on top of Star Blocks as well as other enemies falling from the ceiling. Fight off the enemies in this straightforward section to reach the exit.
Stage 2[edit]
Section 1[edit]

This shorter-than-average stage starts off with another horizontal scrolling section. Spikeys are the only enemies that grant you copy abilities here. There aren't many big threats here. The bottomless pit is bridged by thin platforms, and any Small Stars are easy to reach. Just get to the door to initiate a boss battle.
Section 2 - Mid-Boss: Waiu[edit]

Waiu is a new mini-boss that you've not seen before. As a ninja, it is incredibly quick, being able to move through the air at astonishing speed. He can also perform melee attacks as well as toss out projectiles that travel along the ground, then shoot up when you get close. Finally, it can toss multiple blades across the room. Without a copy ability, you must inhale these blades and spit them back at it to damage it. Inhaling Waiu grants you the Cutter ability.
Section 3[edit]

This section is an auto-scrolling one, and it is quite difficult to keep up. There are a lot more walls that you can get crushed by, and the game sometimes forces you to choose between different paths. For the first branch, you must either choose to swim through a winding path or attempt to clear the Star Block passage up top. For the second branch, you would obviously want to go up to get the Maxim Tomato. Don't be too greedy for any items you see. Only go after them if you are confident you can obtain them in time.
Stage 3[edit]
Section 1[edit]

This section starts off with three doors, each containing a rare enemy and an Animal Friend. Enter door A to rescue Kine, door B to team up with Coo, or door C to find Rick. You can only enter one door, and you will be sent straight to section 5 after the short fight. It is recommended for you to get Kine for this particular level, as he is required to reach this stage's secret area.
Section 2 - Mid-Boss: Masher[edit]

The Masher guards the bag holding Kine the Sunfish. It attacks with a big mace and chain, and its heavy armor prevents Kirby from inhaling it. However, an air puff or the use of a copy ability should let you easily defeat him. The room's layout does make it a bit difficult to attack him safely, due to his height advantage while standing on the ledge.
Section 3 - Mid-Boss: Butch[edit]

Butch is the protector of the bag containing Coo the Owl. It can toss its axe like a boomerang, even making it explode if he wants to. Like Masher, he cannot be inhaled, but can still be defeated with copy abilities or an air puff.
Section 4 - Mid-Boss: Blade[edit]

Blade is the one you have to fight if you wish to get Rick the Hamster. Like the other two knights, it cannot be inhaled but can still be defeated through similar methods. Blade's lack of a ranged attack may make it safer to fight than the other two, but it can parry certain projectiles thrown at it, and the room you fight him in is narrower than others.
Section 5[edit]

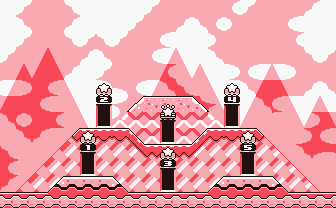
A lake and tall pillars jutting out from a big abyss makes up the landscape for this section. It is a standard horizontal scrolling section, but the bottomless pits and narrow platforms means that your jumps must be more precise, especially if you are partnered with Rick or Kine.
(1) Be careful while crossing this bridge. Not only is there a Propeller Bomb in your way, you also have to deal with Sir Slippies leaping out of the water as well as Kabu that ambush you from above.
Section 6[edit]

This wide lake is filled with dangerous currents and nooks and crannies filled with plenty of secrets. The treasures within this area can only be reached with Kine's assistance. Regardless of who you're partnered with or whether you choose to go alone, beware the strong currents that force you into the spikes, as you swim toward the door to the next section.
Section 7[edit]

Once again, this dark room hides a secret door that can be revealed when Spark Kirby is partnered with Kine. The left door is naturally the better option to take, but its location is a mystery without illuminating the room.
Section 8[edit]

This secret area either lets you get 3 Small Stars or 3 1-Ups, depending on whether you took the obvious route or the hidden door. Regardless of which way you chose, the door at the top will take you back to section 6, where you must continue your swim to the door at the end.
Section 9[edit]

The last section of the stage is a climb up a rocky mountain. The enemies here are infrequent and mildly threatening, with the exception of a Propeller Bomb halfway up the section. The last few platforms is patrolled by Gordos, so be careful as you jump to the exit door.
Stage 4[edit]
Section 1[edit]

Precarious stone spires is the main feature of this section, and you must use them to progress forward in the stage if you are with Rick or Kine. Most of the spire platforms are located above bottomless pits, so be very careful not to fall off. There are also a couple of Propeller Bombs to catch you off guard, one directly beside the Small Star and one on the platform before the door.
Section 2 - Mid-Boss: Captain Stitch[edit]

Captain Stitch looks like a Gordo, but it is much more aggressive than its smaller lookalikes. Captain Stitch is completely invulnerable while it has spikes covering its body, so you can only harm it when it sheds the spikes. While its defense certainly is strong, it has a very simple attack pattern. It will either charge at you or launch its spikes at you. Both attacks will cause it to lose its spiky armor. If you lack a copy ability, you must inhale the spikes that it shoots at you, but only after the spikes have hit the wall and dropped to the ground, then spit them back at it. Captain Stitch grants you the Needle ability if you inhale it after its defeat.
Section 3[edit]

A moderately strong gust blows throughout this section. While you can still move normally on the ground, you will have difficulty going to the left midair. There are very few enemies here, and the obstacles can be easily responded to. To get to the door without Coo, you have to jump to it from the previous platform, as you can't jump or fly directly to the door with the wind.
Section 4[edit]

More strong forces will influence where you move in this section. The underwater pipes will push you to the right like before, but the pipes above ground can also blow you up high. Although this will make it awkward to traverse the middle of the section, it is required for you to reach the top pathway. The final corridor is much more dangerous, with Scarfies right in your path, as well as two consecutive Gordos guarding the exit.
Stage 5[edit]
Section 1[edit]

This stage contains the Rainbow Drop of Red Canyon, but to get it, you must first get Rick from another stage. You can return to stage 3 of Red Canyon, then go through the right door and defeat Blade to get Rick, then exit the stage. You must keep Rick until you reach the Rainbow Drop room, which is no easy task.
This section is a large underground cavern, with a deep lake leading to two doors. There are many Sparkies here, which grant you the Spark ability necessary to get the Rainbow Drop. Again, be sure to hold on to the ability until you reach the Rainbow Drop room.
Section 2[edit]

This dark room contains a Maxim Tomato, which should help prepare you for the challenging section 3. If you brought Kine and the Spark ability, you can light up the room to find a painting of an orca. Enter this painting to find a small island with several Small Stars, but be careful as there are Propeller Bombs on this island also.
Section 3[edit]

While you have dealt with horizontal auto-scroll sections before, this part of the stage auto-scrolls vertically, which means you have to jump fast as well as run. While the section's layout is simple enough that you can try and float up immediately, the later parts of the section will start to wind around more, so you really have to be quick to keep up. Don't spend too much time dealing with enemies and use single, accurate jumps instead of hovering about. The door to the Rainbow Drop room is at the very top, but the screen will continue to scroll upwards, so you better enter it before you get crushed.
Section 4 - Rainbow Drop[edit]

The blocks in this room can only be destroyed with the Spark ability, but you won't be able to get through with Kirby alone. Instead, you need to have Rick with you to use the electric whip attack, which will let you easily hit the black blocks safely. Once you've dropped down to either side and destroyed the blocks, you must abandon Rick to make it across the gap. After you do, the Rainbow Drop is right above.
Section 5[edit]

The final section of the stage has you falling down a rather crude and surprisingly suggestive arrangement of blocks. There are a couple of enemies that grant a variety of copy abilities, so be sure to stop on one of the clouds or blocks if you need an ability for the upcoming boss fight.
Boss: Mr. Shine and Mr. Bright[edit]
You will have to fight a duo of celestial bosses, Mr. Shine and Mr. Bright. They will mostly engage you one at a time, with the other assisting and tagging in after a while. Each boss has their own life bar, and touching them is harmful, even if they're just hanging in the sky.

The fight with Mr. Shine is probably the easier of the two. He will either launch fireballs at you, which can be easily dodged by jumping, or try to charges at you, which you can also evade by hopping over him. However, Mr. Bright can cause a meteor shower to occur, sending stars flying at you at odd angles. These stars can be inhaled and used to damage either boss.

The fight against Mr. Bright is slightly tougher. He can also fire a projectile at you, this time a crescent blade, as well as charge straight at you. What makes the battle harder is Mr. Shine's assist attack, as he will hover above you and send a blazing torrent toward the ground. This fiery cascade produces stars both during and after the attack, which you can inhale and spit at either boss.
Mr. Shine and Mr. Bright also have a powerful combination attack. Whenever they align themselves, Mr. Shine will charge up a strong attack while casting an eclipse with Mr. Bright. You must hurry to the shadow caused by the eclipse, as the ensuing attack will hit everywhere on the screen except the black shadow. Once you've defeated one of the two bosses, you will fight the remaining boss for the rest of the battle, but the defeated boss can still use his assist attack. A few more hits and you will defeat both misters!
With the sun and the moon sent back into the sky, the sixth island appears. Be ready to travel atop the clouds in Cloudy Park!
Bonus Chance[edit]
Mr. Shine and Mr. Bright will cooperate once again in this bonus chance. Mr. Bright will attack you actively, rolling along the ground and bouncing about. Meanwhile, Mr. Shine will move across the screen from side to side, dropping both Small Stars and harmful rain. You must avoid both bosses and their attacks while collect the Small Stars. Touching either boss or getting hit by Mr. Shine's fire rain will end the minigame.