(Revised to match same maps from Eggerland series)
Line 2:
Line 2:
== Floor 1-1 ==
== Floor 1-1 ==
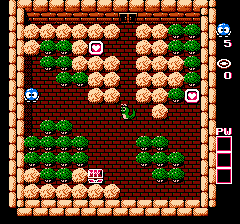
[[File:AdventuresOfLolo1-1.png|thumb|right|Map of floor 1-1.]]
[[File:AdventuresOfLolo1-1.png|right]]
Collect the heart on the right, shoot the Snakey off the map, and get the heart and chest.
{| {{prettytable|notwide=1}}
! Strategy
| ★
! Agility
| ★
|}
;Solution:
# Collect the Heart Frame on the right for two egg shots.
# Shoot the Snakey and push it aside, or shoot it twice to remove it from the screen.
# Head up and collect the last Heart Frame, and then collect the key.
{{-}}
{{-}}
== Floor 1-2 ==
== Floor 1-2 ==
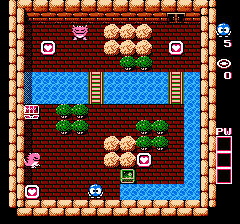
[[File:AdventuresOfLolo1-2.png|thumb|right|Map of floor 1-2.]]
[[File:AdventuresOfLolo1-2.png|right]]
Collect all four hearts; once you do so, the Gols will awaken.
{| {{prettytable|notwide=1}}
! Strategy
If you need to go in front of one of the gols, you will need to either shoot them first, or block them with the framer. However, you can run past Gols if you are at least 3.5 tiles away (e.g. when going for the chest.)
| ★★
! Agility
| ★
|}
;Solution:
# Starting with the Heart Frame in the lower left corner of the room, work your way around the room in a clockwise direction, collecting each of the Heart Frames.
# You should end with the Heart Frame in the lower right corner. Once you collect this, the Gols will wake up.
# Push the Emerald Frame to the left until it is one space away from the left wall. Then push it up in front of the Gol along that wall. Then collect the key.
{{-}}
{{-}}
== Floor 1-3 ==
== Floor 1-3 ==
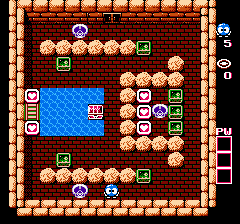
[[File:AdventuresOfLolo1-3.png|thumb|right|Map of floor 1-3.]]
[[File:AdventuresOfLolo1-3.png|right]]
Get the heart, and shoot the Snakey twice. The Leeper will eventually run around, make sure you are in the lower-left corner of the 3x3 space.
{| {{prettytable|notwide=1}}
! Strategy
| ★★
! Agility
| ★
|}
;Solution:
# Collect the nearest Heart Frame for two egg shots. Then walk up to the Snakey and shoot it twice to remove it from the screen.
# Collect the next heart below you, and walk out to the left, and up so that you are standing to the right of either tree (it doesn't matter which one.)
# Wait for the Leeper to make it all the way around and touch you to fall asleep.
# Collect the remaining Heart Frames around the edge of the room, and collect the key.
{{-}}
{{-}}
== Floor 1-4 ==
== Floor 1-4 ==
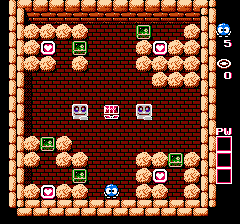
[[File:AdventuresOfLolo1-4.png|thumb|right|Map of floor 1-4.]]
[[File:AdventuresOfLolo1-4.png|right]]
Push the two framers at the top and bottom and block the two Skulls' path. Get the hearts on the left.
{| {{prettytable|notwide=1}}
! Strategy
On the right, push the top and lower framer to the left, and move the middle framer. Shoot the skull off the map and get the three hearts and pearl.
| ★★
! Agility
You may notice the door at the top move slightly. This shouldn't cause problems.
| ★
|}
;Solution:
# Push the Emerald Frames above the bottom skull, and below the top skull, so that you trap the skulls into the rows below the rocks, so that they can't escape when they wake up.
# Collect the two Heart Frames along the left wall if you haven't do so already. You'll get two egg shots
# Walk to the right, and push the two Emerald Frames above and below the trapped skull to the left. Push the middle frame up or down, and then shoot the Skull twice to remove it.
# Collect the three Heart Frames behind the removed Skull, and then collect the key before that Skull has a chance to return.
{{-}}
{{-}}
== Floor 1-5 ==
== Floor 1-5 ==
[[File:AdventuresOfLolo1-5.png|thumb|right|Map of floor 1-5.]]
[[File:AdventuresOfLolo1-5.png|right]]
This is your introduction to Rockys. They can't directly kill you, but will charge and push you. You can use the chest in the center to avoid them if necessary.
{| {{prettytable|notwide=1}}
! Strategy
Get the lower-left heart first, and get the three remaining hearts. Make sure a Rocky isn't following you, as he can easily trap you in the corners, requiring you to restart the level.
| ★
{{-}}
! Agility
| ★★
|}
;Solution:
# Walk over to the Emerald Frame to the left of the lower left Heart Frame, and push it all the way in to the left. Collect the lower left Heart Frame.
# Watch out for the two Rockys as you walk up and collect the upper left Heart Frame. Don't allow yourself to get pinned in.
# Walk along the top wall to the right and push the Emerald Frame along the wall to the right in order to collect the upper right Heart Frame.
# Come down to the lower right corner and push the Emerald Frame all the way down to collect the lower right Heart Frame.
# Collect the key.
{{Footer Nav|game=Adventures of Lolo|prevpage=Walkthrough|nextpage=Floor 2}}
{{Footer Nav|game=Adventures of Lolo|prevpage=Walkthrough|nextpage=Floor 2}}
Starting with the Heart Frame in the lower left corner of the room, work your way around the room in a clockwise direction, collecting each of the Heart Frames.
You should end with the Heart Frame in the lower right corner. Once you collect this, the Gols will wake up.
Push the Emerald Frame to the left until it is one space away from the left wall. Then push it up in front of the Gol along that wall. Then collect the key.
Push the Emerald Frames above the bottom skull, and below the top skull, so that you trap the skulls into the rows below the rocks, so that they can't escape when they wake up.
Collect the two Heart Frames along the left wall if you haven't do so already. You'll get two egg shots
Walk to the right, and push the two Emerald Frames above and below the trapped skull to the left. Push the middle frame up or down, and then shoot the Skull twice to remove it.
Collect the three Heart Frames behind the removed Skull, and then collect the key before that Skull has a chance to return.