After the title screen is displayed, you are offered three choices. The number corresponding to a specific option needs to be pressed to select that option (1, 2, or 3):
Make character: Here is where you will create your main character and where you should begin. After saving your character you will be asked to come up with a password for your save file.
Play game: Begins your journey through the Psychic City. After selecting this option, you will be asked if you would like to load a save game. Choose either (Y)es or (N)o. Afterwards, choose the number corresponding to the save file you would like to load (1, 2, or 3). Lastly, you will be asked to input your password.
Demo: Show the game's opening cinematic.
Creating a character
The Process
Press "1" while on the starting screen to start making the main character.
You will then be offered three options:
Name enemy characters (if this option is skipped the game will use default names instead)
Create character
Save data
Select the second option.
Decide what the main character will be called. Both romaji and katakana input is possible. After inserting the name, the menu depicted on the right will appear.
Ten points need to allocated to five different abilities. At least one point needs to be assigned to each ability.
Make sure to save your character by selecting "Save data".
Character creation screen
Attributes
It's recommend that you allocate three points to "Shield" and "Psychokinesis" and one point each to the remaining attributes.
Shield: Defense.
Psychokinesis: Damage enemies during battle. Outside of battle it can be used to break certain objects.
Telepathy: Only used during battle. When facing hostile enemies, it can be used to render them immmobile. When facing NPCs it can be used to gain information or gain ID Cards.
Look: Use it to check if something is in a designated direction.
Jump: Used to escape from enemies, move to registered spaces, and to move beyond walls and obstacles.
Controls
Note: Make sure Caps Lock is enabled when issuing commands.
Key
Command
↑
North
↓
South
←
West
→
East
P
Psychokinesis
T
Telepathy
P
Teleport
L
Look
I
Inventory
Screen layout
Map screen
Player status: The names and current status of all of your present party members are displayed in the top left corner. In addition to how many points the characters have in each stat, it also shows their current HP (PW) and experience (EXP) values.
Command window: The commands which the characters can perform are displayed directly below the "Player status" screen. (see "Controls").
Bird's-eye-view map: In the right part of the screen you will be able to see your current location and the world around you. The interior of buildings are not visible until after they're entered.
Input window: The results of the various action the characters can perform as well as dialogue are displayed along the very bottom of the screen.
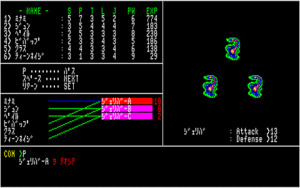
Battle screen
Player status: The names and current status of all of your present party members are displayed in the top left corner. In addition to how many points the characters have in each stat, it also shows their current HP (PW) and experience (EXP) values.
Command window: The commands which the characters can perform are displayed directly below the "Player status" screen.
Enemy select window: Located below the "Command window". By moving up or down you can select which enemy your characters should target. After you made your selection, a green line will appear that connects an attacking party member with the enemy character that you decided to target. If an enemy characters targets one of your characters, the line will turn red. If a Telepathy attack on an enemy character has been succesful, that enemy's name will turn pink.
Enemy screen: The foes you will be facing in battle are displayed on the right part of the screen.
Input window: Located along the very bottom of the screen. Shows whether or not a character has been hit and how much damage has been dealt or received. Dialogue will be displayed here when encountering NPCs.
Inventory
Return to game: Closes the inventory screen.
Data save: Save game.
Data load: Load game.
Possession PRINT: Displays items (ID cards, Radcliffe, and Medicine).
Narration TIME: Sets message speed during battle. (0 = very fast, 999 = very slow)
Take medicine: Use medicine to fully heal your characters.
Long JUMP registration: Set JUMP point for a character.
Energy conversion: If one of your characters has a energy conversion ability, using this command will allow that character to heal another member of the party at the cost of 10 EXP. However, as you will most likely have more medicine than you will ever use, using this option isn't necessary.