This is the final floor, accessible with password DVYB.
Floor 10-1
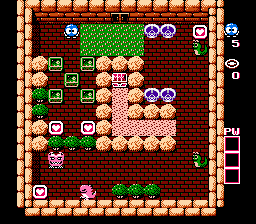
- Collect the upper-right heart, and use one of it's shot to align the snake with the skull.
- Move the middle framer down, and get one framer on the same row as the Don Medusa.
- Shoot the snakey, and push it all the way down, then push the framer to pin the Don Medusa.
- Move a second framer under the Don Medusa.
- Move a third framer to the left of the Don.
- Collect the two hearts at the framer, and move the fourth one in line with the skulls.
- Get the last framer, and exit.
Floor 10-2
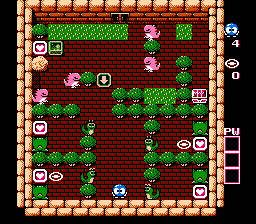
This level requires some guess work, but once you know which hearts give two shots, you can complete it.
First, get the hearts in the top left corner. You then need to open the two cells with shots (marked on the map), move two of the Dons on the top, then get the other two hearts. To open one of the cells, shoot the snake, and do a properly timed push. When you open the first cell, make sure you get the bottom-left Don blocked completely.
When moving the dons, Push the upper left one to the top, and lower right one to the grass as well.
Floor 10-3
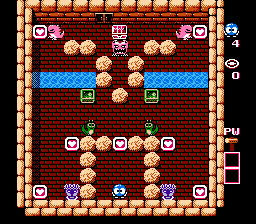
- Get the first heart.
- Shoot a snake, push it all the way to the left, and into the water. Run across the water to get the heart, and return once the egg aligns with the emerald framer. Push said framer above the medusa, and get the heart.
- Repeat for the other side.
- After the first snake respawns, shoot it and push it between the heart and the medusa. Collect the heart.
- Repeat for the other side, but when done, shoot it off the map before the egg breaks.
- Break the middle rock below the medusa, and quickly take cover behind the snake.
- Shoot the snake, and trap it in the lower room,
Work your way to the top. There is exactly enough crates to block the medusas, and they are placed at half tiles. The framer positions are shown.
Floor 10-4
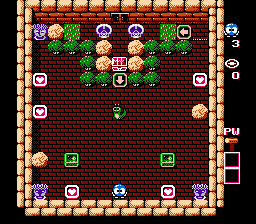
- Shoot and move the snake to the top-left corner. Get the two hearts, and shoot the egg off the map.
- When it reappears, shoot and move the snake to the top-right corner and get the heart. Shoot the egg off the map, and run downward past the rock.
- Move a framer up and left of the rock.
- Shoot and move the snake, and move it to the right of the lower-left medusa. Get the heart.
- Smash the rock, and take cover behind the framer. When the Don Medusa passes by, push the framer right, and down.
- Move the other framer to a half-tile covering both medusas. Get the heart.
- When approaching the chest, shoot the skull, and push it. Get the pearl and exit the level.
Move the emerald framers from the top-left and surround the medusa in the middle. Once enclosed, take the right-most heart and circle around taking each heart, then take the pearl and exit.
Floor 10-5
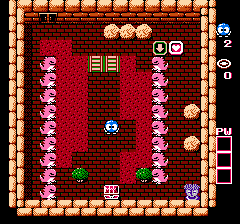
This is the final puzzle level. If you want the password for the level, you need to suicide to end the game.
- Get the heart.
- Shoot the top-left Don from above.
- Shoot the top-right Don from above, push it right one time, and all the way down.
- Run down the center of the bridge, on the half-tile. At the bottom, make a turn to the right.