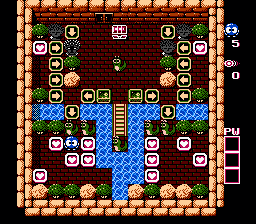
First, notice that the Heart to the left of Lolo is guarded by the Medusa at the top. Therefore, collect the other four ones, thus getting six magic shots.
Shoot the left Snakey and push it north, then shoot the Snakey to the right of Lolo, push the egg in the water and ride it.
When the egg stops south of the Snakey on the pier, shoot it and be quick before the egg breaks: push the egg all the way north, push one Emerald sideways, walk to the side of the egg and push it to the opposite side; push the other Emerald sideways, and push the egg north so that it is half a tile from the north wall. This way, it blocks the eyesight of two Medusas on the same side.
Let us go to the south-east quarter. Push the east Emerald all the way east, then turn south against the Snakey. Quick now, before the egg breaks: shoot Snakey and push the egg two tiles south, walk around it and push it north. Shoot once the next Snakey, push it north in the water, step on it and push the other egg the opposite way (it will move as soon as the first one sinks). From the second floating egg, push the Emerald all the way north and collect the nearby Heart. Quickly walk back into the south-east quarter, collect all Hearts (with two magic shots) and position Lolo against the arrow, before the rightmost Snakey reappears. When the other Snakey reappears, shoot it, push it into the water and get back to the north portion of the room.
Repeat on the west side what you just did (see the previous point).
Back in the north part, use the last magic shot on the Snakey in the center, and position it symmetrically to its "brother". Grab the jewel and exit the room.
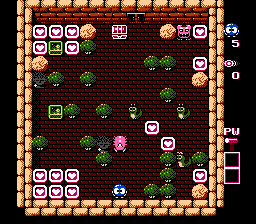
At start, only two Hearts are accessible, between the three Snakeys. They grant Lolo four magic shots and the Hammer power.
Shoot the north-west Snakey once, then push it to the north-west, where the sight lines of the two Medusas cross. Walk to the north-west corner and collect the five Hearts, for six more magic shots. Push the Emerald east, one tile southwards, then to east (and a bit south) until it is straight south of Don Medusa.
Shoot once the Snakey south of the Emerald, then push it west and south, until it is straight south of the Medusa next to Gol.
Shoot twice the Snakey in the south east corner, take the Heart and wait for the monster to reappear. When it does, push it north and east, until it is above the Medusa next to Gol. Push the west Emerald down one tile, walk around the tree and push the same framer against the west wall. Walk around Medusa and Gol and grab the six Hearts in the south-west corner; one of them has two magic shots.
Back in the south-east area, shoot away one of the Snakeys next to Medusa and Gol, and wait in the south-east corner until it reappears. Shoot it once and push the egg between the three trees in the north-east. Get south of the rock that blocks Don Medusa, break it with the Hammer and rush east. Go back to the south-east area. Shoot twice the other Snakey near Medusa, and wait in the south-east corner until it reappears. Shoot it once and push the egg between the jewel box and Don Medusa.
Push the east Emerald all the way north between Don Medusa and the Heart. Collect the last two Hearts.
Beware of Gol's fireball, collect the jewel from the box and leave the room.
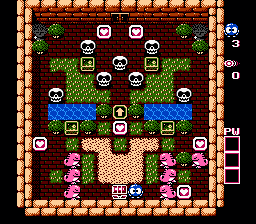
Take the Heart in the center for two magic shots, and continue north.
In order to take the two Hearts near the door, you should move the two Skulls straight south of them. Shoot the west one once, push the egg west and north between Medusa and the Heart; repeat for the second Skull. Grab the two Hearts for two magic shots only (from the west one).
Push the two Emeralds against the opposite walls, south of the Medusas.
Focus on the south-east corner: grab the eastmost Heart, shoot Gol once and push the egg, so that you can get the nearby Heart.
Before collecting the last Heart, create an easy passage to the jewel box. Shoot the middle Gol in the west column, and push the egg east, across the sand. Collect the last Heart and rush to the grass and between the Gols: only one Skull could reach Lolo.
Protected by the grass patches, walk on the sand just north of the jewel box. Firmly step south, grab the jewel, then leave the room.
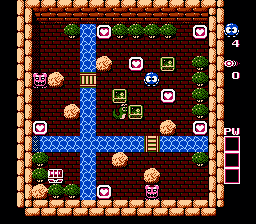
Collect the two Hearts near Lolo's starting position. Both of them have two Magic Shots.
Pay attention to Don Medusa, and collect the three Hearts in the quarter, starting from the one in the north-east corner.
Push the southmost Emerald south and east, then across the bridge. Shoot the nearby Snakey once and, paying attention to Don Medusa, push the egg in the water, cross it, and push the Emerald one tile to the right. Lolo is now protected by the rock.
Let us trap one Don Medusa! Push the Emerald to the right, against the tree. Wait for Snakey to reappear. Shoot Snakey, push the egg right, then down in the water, cross and push the Emerald down, so to trap Don Medusa in the corner. Collect the Heart.
Repeat the last two points for the western Don Medusa.
Shoot Snakey once, push the egg straight west (or south) into the water and ride it to cross the stream. Collect the jewel and exit.