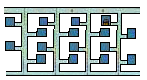
Four out of six of the dungeons in Round 9 are quite large, and require a great deal of stamina to survive and locate the exit. You're a long way off from rescuing Celia once more, so the Crown and Sceptre should be distant thoughts. Instead, focus on preserving, and perhaps extending your life. Path c-d-e offers two mushrooms for you to collect. However, if you're already at or close to 255 vitality points, path c-d-f gives you plenty of potions to keep your vitality full. Path a-b offers a quick alternative to the dragon, but with few items to collect along the way.
Dragon's health: 100 Dragon's weak point: Left arm
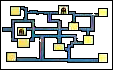
a
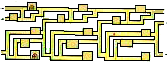
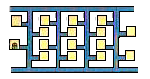
Item: Location a offers possibly the largest dungeon in the whole game to explore. Therefore, knowing where you are and where to locate one of the two exits along the left side is important. There are two potions here along with a vial of poison, but there's also a Crown to be found if you think you can hold on to it all the way until Round 12.
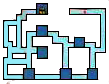
b
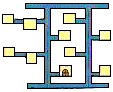
Item: The last location along the very quick upper path is a comparatively smaller dungeon, and as such, has fewer items to discover. But you should have no problem making your way through this simple dungeon and you will be on your way to fight the dragon in very little time.
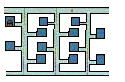
c
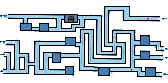
Item: Compared to the location a, the dungeon in location c is a breeze; you can't possibly get lost. Keep an eye out for the vial of Poison and do not jump to collect your prize for defeating the room guardian until you have made certain that it won't harm you.
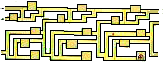
d
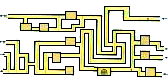
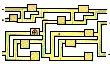
Item: While location d has a complicated dungeon, there are also quite a few rewards worth collecting from here, including the life extending mushroom. There are a large number of rooms to explore here, and the room guardians will be at their strongest, so once you have collected all that you need, don't be greedy; get out of there.
e
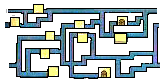
Item: Location e offers the second mushroom which can be found in this round. Once again, the dungeon is quite complex, and it pays to be aware of your current location in relation to the two exits which can be found. Don't dawdle, collect the mushroom, and leave with as much vitality as possible.
f
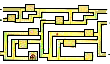
Item: If there's one benefit to visiting location f, it's the fact that you will practically be tripping on potions. As long as you fight carefully, there's little reason why you won't leave with a full vitality bar, which will be useful when you arrive in the dragon's lair.
Round 10
Once again, you have arrived at a round with a single location. There is absolute no decisions to be made about what path to take, you have only one choice. Be prepared for quite an exploration. While there are a number of items in this dungeon, there isn't a large quantity of potions to discover, so monitor your health carefully.
Dragon's health: 110 Dragon's weak point: Left wing
a
Item: With a large variety of items present, you may be tempted to treasure hunt a little bit, but this is a dangerous dungeon to linger in for too long. You would be far better off identifying only that which you need, and locating the dungeon exit as quickly as possible. You can find everything you need to rescue Celia in here, but you will have other opportunities to collect a Crown and Sceptre later on, so don't make that the focus of your visit.
Round 11
Dragon's health: 120 Dragon's weak point: Left foot