(expanded the walkthrough, added some floor details, placed a few FOE strategies in collapsible lists, still need to finish it) |
(Added a few links, added an animated explanation, expanded the walkthrough) |
||
| Line 1: | Line 1: | ||
{{Header Nav|game=Etrian Odyssey III: The Drowned City}} | {{Header Nav|game=Etrian Odyssey III: The Drowned City}} | ||
| Line 7: | Line 6: | ||
==B1F ~ A Glorious Journey's Start== | ==B1F ~ A Glorious Journey's Start== | ||
[[File:Etrian_Odyssey_III_The_Drowned_City_b01F.png|thumb|Floor 1]] | [[File:Etrian_Odyssey_III_The_Drowned_City_b01F.png|thumb|Floor 1]] | ||
'''Available Missions:''' Prelude to the Forest<br/> | '''Available Missions:''' [[Etrian_Odyssey_III:_The_Drowned_City/Missions#Prelude_to_the_Forest|Prelude to the Forest]]<br/> | ||
'''Available Quests:''' Butterfly Bistro's new menu; The fisherman's rest<br/> | '''Available Quests:''' [[Etrian_Odyssey_III:_The_Drowned_City/Quests#Butterfly_Bistro.27s_new_menu|Butterfly Bistro's new menu]]; [[Etrian_Odyssey_III:_The_Drowned_City/Quests#The_fisherman.27s_rest|The fisherman's rest]]; [[Etrian_Odyssey_III:_The_Drowned_City/Quests#Tanniyn_Hunting|Tanniyn Hunting]]<br/> | ||
''' | '''Gathering Spots''' | ||
''Chop -'' Soft Bark, Supple Branch, Palm Trunk (Rare)<br/> | |||
'''New Items:''' Kopis, Tetsukiyari, Makiri, Intellect Book, Scale Jerkin, Hairband, Strap Shoes, Life Belt, Tent, Ariadne Thread<br/> | '''New Items:''' Kopis, Tetsukiyari, Makiri, Intellect Book, Scale Jerkin, Hairband, Strap Shoes, Life Belt, Tent, Ariadne Thread<br/> | ||
'''New Enemies:''' Fanged Fish, Deadly Durian, Forest Frog, Great Lynx<br/> | '''New Enemies:''' Fanged Fish, Deadly Durian, Forest Frog, Great Lynx<br/> | ||
| Line 35: | Line 35: | ||
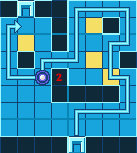
==B2F ~ Marshlands of Misfortune== | ==B2F ~ Marshlands of Misfortune== | ||
[[File:Etrian_Odyssey_III_The_Drowned_City_b02F.png|thumb|Floor 2]] | [[File:Etrian_Odyssey_III_The_Drowned_City_b02F.png|thumb|Floor 2]] | ||
'''Available Quests:''' Ho! The gigapede!; Request from the Firm<br/> | '''Available Quests:''' [[Etrian_Odyssey_III:_The_Drowned_City/Quests#Ho.21_The_gigapede.21|Ho! The gigapede!]]; [[Etrian_Odyssey_III:_The_Drowned_City/Quests#Request_from_the_Firm|Request from the Firm]]<br/> | ||
'''Gathering Spots | '''Gathering Spots''' | ||
'''New Items:''' <br/> | ''Take -'' Small Flower, Anra Fruit, Hibiscus (Rare)<br/> | ||
'''New Items:''' Panzerstecher, Culverin, ''Lance,'' Ooyumi, Spiked Club, Main Gauche, Feather Armor, Round Shield, Tale Gloves, Light Muffs, Poison Charm, Nectar, Theriaca B, Shock Oil, Freeze Oil, Blaze Oil<br/> | |||
'''New Enemies:''' Claw Shrimp, Great Platypus, Titan Arum, Largebill (Day), Gigapede (Night)<br/> | '''New Enemies:''' Claw Shrimp, Great Platypus, Titan Arum, Largebill (Day), Gigapede (Night)<br/> | ||
'''New FOEs:''' Greedy Lizard | '''New FOEs:''' Greedy Lizard | ||
{{-}} | |||
On this floor, we should make it a point to gather 1 Gigapede Leg from a Gigapede (appears at night), and 1 Small Flower from a "take" spot in order to complete "Ho! The gigapede!" and "Request from the Firm" upon our return. If you decided earlier to have a separate exploring/gathering team, keep in mind that some quests (like the one now) require gathered materials from the Labyrinth. | |||
Shortly after reaching B2F, you'll be introduced to your first FOE (first threatening one if you've encountered the Pasaran on the previous floor). As of right now, you'll have a very hard time defeating it if you even can so just go ahead and avoid it. To avoid the Greedy Lizard (as with most non-aggressive FOEs), watch the path it takes and FOLLOW behind it until you can continue south. To do this, just pace back and forth directly above its route until it starts moving in the direction you want to go and walk behind it. It's very important to not run toward a FOE moving at you unless you know you can move around it or you plan on fighting it. | Shortly after reaching B2F, you'll be introduced to your first FOE (first threatening one if you've encountered the Pasaran on the previous floor). In addition to the FOEs, we will be introduced to a few new things to keep in mind throughout the Labyrinth. The first will be campsites, the second is special tiles. As discussed earlier, campsites are used to recover HP/TP and also status ailments provided there's a Farmer in the party with Camp Mastery. Get to know where they are in each floor and always bring a tent or two to avoid returning to town constantly. The special tiles come in a wide variety, the first one introduced are "sticky tiles". Sticky tiles cause your party to move 1 step per 2 movements, what this means is that you take 1/2 step per movement on sticky tiles but are forced to move the entire tile length. Though this does not seem like a big deal initially, keep in mind that FOEs are unaffected by these tiles and can easily catch up if you move across multiple sticky tiles. As a side note, a Farmer with Rain or Shine can negate a few special tiles (sticky and damage tiles). Later tiles range from damage tiles to spinning tiles, but we'll cover those later. | ||
As of right now, you'll have a very hard time defeating it if you even can so just go ahead and avoid it. To avoid the Greedy Lizard (as with most non-aggressive FOEs), watch the path it takes and FOLLOW behind it until you can continue south. To do this, just pace back and forth directly above its route until it starts moving in the direction you want to go and walk behind it. If that is not clear enough, watch this [[Media:EO3_passing_passive_FOEs.gif|'''example''']] and look at the movements. It's very important to not run toward a FOE moving at you unless you know you can move around it or you plan on fighting it. Keep in mind that if you get into fight with a FOE and decide to retreat, you HAVE to have an empty tile directly behind you to step backwards to, so try to avoid putting your back to the wall. After getting past the first FOE, we can go ahead and use the same trick to get to the eastern path and grab a Coupon from the chest and use the same trick to get back to the southern pass. As you make your way to D-3, be sure to open up the shortcut to avoid having to dance past the FOE. Further into the floor we'll encounter a second Greedy Lizard, go ahead and use the same trick to get past it to the eastern pass and, if you desire, to the chest it was guarding for a "Stun Blade" (until you get used to this simple trick, don't be afraid to use an Ariadne Thread if you get stuck). | |||
{{collapsible list | {{collapsible list | ||
| Line 57: | Line 62: | ||
[[File:Etrian_Odyssey_III_The_Drowned_City_b03F.png|thumb|Floor 3]] | [[File:Etrian_Odyssey_III_The_Drowned_City_b03F.png|thumb|Floor 3]] | ||
'''Available Quests:''' <br/> | '''Available Quests:''' <br/> | ||
'''Gathering Spots | '''Gathering Spots''' | ||
'''New Items:''' <br/> | ''Mine -'' Phonolite, Topaz, Chalcophyllite (Rare)<br/> | ||
'''New Items:''' Scramasax, Small Sword, Javelin, Light Mace, ''Tauret Hammer,'' Hakenbuechse, Flame Lance, Chemise, Spiked Leather, Caetra, Kettle Hat, Plague Mantle<br/> | |||
'''New Enemies:''' Venomshroom, Spotted Frog, Scylla Crab<br/> | '''New Enemies:''' Venomshroom, Spotted Frog, Scylla Crab<br/> | ||
'''New FOEs:''' Raging Tyrant | '''New FOEs:''' Raging Tyrant | ||
{{-}} | |||
On this floor, we will be introduced to the first aggressive FOE of the game. Some aggressive FOEs, like passive ones, can be avoided using careful planning and observation. Aggressive FOEs differ in that they do not follow a set route, but they will chase your party to a set point on a floor (usually within a room, but a few FOEs can go "around" doors if there's no wall). The trick regarding dancing around a route won't work, so instead, move toward the eastern side of the room and walk south until you can go into a door. From here, you can exit back into the previous room and move west going from door to door until you can continue. If you're tempted to, in the room with the second Raging Tyrant, it is possible to both grab the chest with the Defense Script and make it into the room behind it, but you may need to warp out; in order to accomplish this, you should have Rain or Shine to negate the sticky tiles. Regardless of what you do, proceed to the next room and be sure to open up the shortcut. The next room has another Raging Tyrant in it that you should avoid. Keep to the eastern side of the room initially and use the terrain to your advantage (in case you don't know, Raging Tyrants are hippos and they CAN cross rivers). If you need help, follow [[Media:EO3_passing_the_Raging_Tyrant.png|'''this''']] route. | |||
{{sect-stub|expanded walkthrough needed}} | |||
{{-}} | |||
{{collapsible list | {{collapsible list | ||
|title=FOEs | |title=FOEs | ||
| Line 77: | Line 88: | ||
'''Available Missions:''' Proof of Will<br/> | '''Available Missions:''' Proof of Will<br/> | ||
'''Available Quests:''' <br/> | '''Available Quests:''' <br/> | ||
'''Gathering Spots | '''Gathering Spots''' | ||
'''New Items:''' <br/> | ''Chop -'' Soft Bark, Supple Branch, Palm Trunk (Rare) | ||
''Take -'' Small Flower, Anra Fruit, Hibiscus (Rare) | |||
''Mine -'' Phonolite, Topaz, Chalcophyllite (Rare)<br/> | |||
'''New Items:''' Pike, Eared Dagger, ''Antennae Dagger,'' Repeater Bow, Ahtlatl, ''Reshef's Bow,'' Crushing Club, ''Yagrush,'' Knowledge Book, Fortune Book, Guard Vest, Leaf Blazer, ''Barbute,'' Purple Leggings, Aim Goggles<br/> | |||
'''New Enemies:''' Starry Slug, Devilfish, Great Anaconda<br/> | '''New Enemies:''' Starry Slug, Devilfish, Great Anaconda<br/> | ||
'''New FOEs:''' Furyhorn, Bog Lurker, Narmer (Boss) | '''New FOEs:''' Furyhorn, Bog Lurker, Narmer (Boss) | ||
As you | As you have seen by now, sticky tiles cause you to walk slower and this room is covered in them. In order to fight Narmer, have it run into either the NW, SW, or SE corner as far as it can go and go "around" it through the hidden side rooms to be able to come out from behind and ambush it. If you need, expand the FOE section just below for more information on fighting it both with a party and solo. After Narmer drops to around 50% HP, it'll flee from battle and spawn the Bog Lurkers in the room. This gives you the chance to return to the campsite and recover before fighting it again. Ambush it like before and continue to fight it with the same strategy. Any Bog Lurkers left alive after Narmer dies will vanish, but they will respawn much like normal FOEs. Feel free to proceed to the 2nd Stratum, do not use an Ariadne Thread to return as you can warp back with the Geomagnetic Field. | ||
{{sect-stub|expanded walkthrough needed}} | |||
{{-}} | |||
{{collapsible list | {{collapsible list | ||
| Line 111: | Line 128: | ||
|As far as a solo run is concerned with Narmer, I would strongly recommend a Prince(ss) with at least 2nd Stratum gear, Shock Arms, Regal Radiance, Royal Lineage, Nobility Proof, Protect Order. Optional skills would be Negotiation, Guard/Attack Order, and Reinforce. The same tactic applies with Shock Arms and Regal Radiance, be sure to keep up Protect Order as well and use Negotiation for a quick (but potentially risk) heal, also equipping and using the Indomitable limit is pretty helpful here. You should not have too much trouble if you're at a decent level and are familiar with the fight/class, but you could also wait until you have subclasses unlocked for an easier fight. Just be sure to pick a class with good synergy (pretty hard to go wrong with a supportive class, but a damage dealing class will make the fight go faster). One thing to keep in mind is that Narmer will not run on any encounter after the storyline battle. | |As far as a solo run is concerned with Narmer, I would strongly recommend a Prince(ss) with at least 2nd Stratum gear, Shock Arms, Regal Radiance, Royal Lineage, Nobility Proof, Protect Order. Optional skills would be Negotiation, Guard/Attack Order, and Reinforce. The same tactic applies with Shock Arms and Regal Radiance, be sure to keep up Protect Order as well and use Negotiation for a quick (but potentially risk) heal, also equipping and using the Indomitable limit is pretty helpful here. You should not have too much trouble if you're at a decent level and are familiar with the fight/class, but you could also wait until you have subclasses unlocked for an easier fight. Just be sure to pick a class with good synergy (pretty hard to go wrong with a supportive class, but a damage dealing class will make the fight go faster). One thing to keep in mind is that Narmer will not run on any encounter after the storyline battle. | ||
}} | }} | ||
{{-}} | |||
{{Footer Nav|game=Etrian Odyssey III: The Drowned City|prevpage=|nextpage=2nd Stratum: Undersea Grotto}} | {{Footer Nav|game=Etrian Odyssey III: The Drowned City|prevpage=|nextpage=2nd Stratum: Undersea Grotto}} | ||
Revision as of 17:46, 20 August 2013
Preamble
Start off by naming your guild and creating your party (registering guild members). If this is your first time playing any Etrian Odyssey, it's recommended to take 1 Hoplite, 1 Monk, 1 Zodiac, and 2 more of what you want (Gladiators provide good melee dps, Prince[ss] is good for support, Farmers are good for exploring but not fighting, Arbalist/Buccanneers are good for ranged physical dps); play around with different classes as its free to recruit more members and get a feel for ones that compliment your play style. Make sure to go into the main menu and select "Custom," from there, select Limit and pick 1 skill per person(s) (Damage dealing limits are dependant on STR or INT so pick 2 good physical DPS for Cross Slash, Indomitable is good for either the Hoplite or the Monk). Also, be sure to set up your skill points (I'd recommend spending 1 point in TP Up for the Monk and Zodiac). A note for first timers, Most damage skills have a prerequisite for their respective skills (i.e Sword skills require Sword Mastery) so for Zodiacs, spend 1 point in an elemental master and its respective star. Also, its recommended to try out different combinations in anticipation of selecting subclasses with the best synergy. After visiting the Via Sensus and accepting your first mission, "Prelude to the Forest," feel free to head to Napier's Firm and upgrade some of your equipment (for those who are patient, you can recruit new guild members, take and sell their gear then dismiss them from your guild). After preparing, head to the Labyrinth through the Forest Entrance.
B1F ~ A Glorious Journey's Start

Available Missions: Prelude to the Forest
Available Quests: Butterfly Bistro's new menu; The fisherman's rest; Tanniyn Hunting
Gathering Spots
Chop - Soft Bark, Supple Branch, Palm Trunk (Rare)
New Items: Kopis, Tetsukiyari, Makiri, Intellect Book, Scale Jerkin, Hairband, Strap Shoes, Life Belt, Tent, Ariadne Thread
New Enemies: Fanged Fish, Deadly Durian, Forest Frog, Great Lynx
New FOEs: Pasaran (1st Stratum)
Your first mission is pretty straightfoward, just head in and listen to the guard to discover you need to map out the first floor. As the game says, making a good map is essential in this series and as such, getting acquainted with its features is always the first mission. While you're exploring, make sure to check the walls for secret paths or events, distribute points as you level, and keep an eye on your HP/TP; if it takes half your TP to get where you are now, it'll probably take half to walk back out. You'll probably figure out that some events you may encounter are dependant on stats, these usually are based on the character with the highest stat or the one chosen (such as with Luck and freeing the caught animal); others depend on the time of the day (i.e. Night time). Once you're done making your map of the area you can explore, return to the guard and present your map, then, return to the Via Senatus. After reporting, head to the Butterfly Bistro and grab your first two quests (you might be able to report "Butterfly Bistro's new menu" immediately provided you've gathered the necessary materials), sell and stock up at Napier's (grab an Ariadne Thread or two), rest and save at Aman's and head back into the Labyrinth. Alternatively, you can explore the Sea to earn more money before venturing back into the Labyrinth. If you choose to set sail, you can find a separate walkthrough and some maps under the "Sea" part of the walkthrough. Be aware, some quests available are directly related to the sea and are triggered by certain events at sea (such as with getting Ned's Harpoon and "Tanniyn hunting"). If you accepted "Tanniyn hunting," just set sail and find a large 2x2 fish icon and repeatedly harpoon it with Ned's Harpoon equipped until you bring it down to complete the quest.
Note: Tents are fairly useful throughout the Labyrinth (with the removal of geomagnetic poles) and can be enhanced with a Farmer's "Camp Mastery" skill. Note: It's recommended that your level is at least 3x (roughly) the floor to not struggle as much (i.e. 3 x B20F = Lv. 60)
After returning to the Labyrinth, you're first objective should be to head toward A-2 during the day time in order to complete "The fisherman's rest". When you continue past where you were originally barred from exploring by the guard, he will give you a few hammers to forge with at Napier's. Hammers are useful items that are unlimited in use, but will cost you a small fee in addition to the materials required to "unlock" the weapon for sale in the first place, as such, you will need to obtain more materials should you add too many augmentations. Core stat boosts (i.e. STR or LUC) will remain as a constant effect when you are equipped with the item; generally speaking, status ailment enchants or secondary stat boosts (i.e. Seals or ATK) will only apply to regular attacks made with the weapon. You may have already noticed, but there are some rooms and treasures that are locked and are marked with a symbol (the moon symbol on a door). These objects can be opened later on in the game, so be sure to note them well in order to return to them later. After reporting your quests and getting a good feel for the Labyrinth, level up to around 6 and descend the stairs to the next floor.
Note: Don't be afraid to swap out characters or even create a secondary gathering/exploring party, it sometimes helps to have access to different skills in the Labyrinth. Also, be sure to make good use of Farmers and the gathering points (Harvestry, Double Crop, and even Keen Nose help make the gathering process much faster).
B2F ~ Marshlands of Misfortune

Available Quests: Ho! The gigapede!; Request from the Firm
Gathering Spots
Take - Small Flower, Anra Fruit, Hibiscus (Rare)
New Items: Panzerstecher, Culverin, Lance, Ooyumi, Spiked Club, Main Gauche, Feather Armor, Round Shield, Tale Gloves, Light Muffs, Poison Charm, Nectar, Theriaca B, Shock Oil, Freeze Oil, Blaze Oil
New Enemies: Claw Shrimp, Great Platypus, Titan Arum, Largebill (Day), Gigapede (Night)
New FOEs: Greedy Lizard
On this floor, we should make it a point to gather 1 Gigapede Leg from a Gigapede (appears at night), and 1 Small Flower from a "take" spot in order to complete "Ho! The gigapede!" and "Request from the Firm" upon our return. If you decided earlier to have a separate exploring/gathering team, keep in mind that some quests (like the one now) require gathered materials from the Labyrinth.
Shortly after reaching B2F, you'll be introduced to your first FOE (first threatening one if you've encountered the Pasaran on the previous floor). In addition to the FOEs, we will be introduced to a few new things to keep in mind throughout the Labyrinth. The first will be campsites, the second is special tiles. As discussed earlier, campsites are used to recover HP/TP and also status ailments provided there's a Farmer in the party with Camp Mastery. Get to know where they are in each floor and always bring a tent or two to avoid returning to town constantly. The special tiles come in a wide variety, the first one introduced are "sticky tiles". Sticky tiles cause your party to move 1 step per 2 movements, what this means is that you take 1/2 step per movement on sticky tiles but are forced to move the entire tile length. Though this does not seem like a big deal initially, keep in mind that FOEs are unaffected by these tiles and can easily catch up if you move across multiple sticky tiles. As a side note, a Farmer with Rain or Shine can negate a few special tiles (sticky and damage tiles). Later tiles range from damage tiles to spinning tiles, but we'll cover those later.
As of right now, you'll have a very hard time defeating it if you even can so just go ahead and avoid it. To avoid the Greedy Lizard (as with most non-aggressive FOEs), watch the path it takes and FOLLOW behind it until you can continue south. To do this, just pace back and forth directly above its route until it starts moving in the direction you want to go and walk behind it. If that is not clear enough, watch this example and look at the movements. It's very important to not run toward a FOE moving at you unless you know you can move around it or you plan on fighting it. Keep in mind that if you get into fight with a FOE and decide to retreat, you HAVE to have an empty tile directly behind you to step backwards to, so try to avoid putting your back to the wall. After getting past the first FOE, we can go ahead and use the same trick to get to the eastern path and grab a Coupon from the chest and use the same trick to get back to the southern pass. As you make your way to D-3, be sure to open up the shortcut to avoid having to dance past the FOE. Further into the floor we'll encounter a second Greedy Lizard, go ahead and use the same trick to get past it to the eastern pass and, if you desire, to the chest it was guarding for a "Stun Blade" (until you get used to this simple trick, don't be afraid to use an Ariadne Thread if you get stuck).
B3F ~ The Surging River Shores

Available Quests:
Gathering Spots
Mine - Phonolite, Topaz, Chalcophyllite (Rare)
New Items: Scramasax, Small Sword, Javelin, Light Mace, Tauret Hammer, Hakenbuechse, Flame Lance, Chemise, Spiked Leather, Caetra, Kettle Hat, Plague Mantle
New Enemies: Venomshroom, Spotted Frog, Scylla Crab
New FOEs: Raging Tyrant
On this floor, we will be introduced to the first aggressive FOE of the game. Some aggressive FOEs, like passive ones, can be avoided using careful planning and observation. Aggressive FOEs differ in that they do not follow a set route, but they will chase your party to a set point on a floor (usually within a room, but a few FOEs can go "around" doors if there's no wall). The trick regarding dancing around a route won't work, so instead, move toward the eastern side of the room and walk south until you can go into a door. From here, you can exit back into the previous room and move west going from door to door until you can continue. If you're tempted to, in the room with the second Raging Tyrant, it is possible to both grab the chest with the Defense Script and make it into the room behind it, but you may need to warp out; in order to accomplish this, you should have Rain or Shine to negate the sticky tiles. Regardless of what you do, proceed to the next room and be sure to open up the shortcut. The next room has another Raging Tyrant in it that you should avoid. Keep to the eastern side of the room initially and use the terrain to your advantage (in case you don't know, Raging Tyrants are hippos and they CAN cross rivers). If you need help, follow this route.
B4F ~ Bladed Ordeal in the Muck

Available Missions: Proof of Will
Available Quests:
Gathering Spots
Chop - Soft Bark, Supple Branch, Palm Trunk (Rare)
Take - Small Flower, Anra Fruit, Hibiscus (Rare)
Mine - Phonolite, Topaz, Chalcophyllite (Rare)
New Items: Pike, Eared Dagger, Antennae Dagger, Repeater Bow, Ahtlatl, Reshef's Bow, Crushing Club, Yagrush, Knowledge Book, Fortune Book, Guard Vest, Leaf Blazer, Barbute, Purple Leggings, Aim Goggles
New Enemies: Starry Slug, Devilfish, Great Anaconda
New FOEs: Furyhorn, Bog Lurker, Narmer (Boss)
As you have seen by now, sticky tiles cause you to walk slower and this room is covered in them. In order to fight Narmer, have it run into either the NW, SW, or SE corner as far as it can go and go "around" it through the hidden side rooms to be able to come out from behind and ambush it. If you need, expand the FOE section just below for more information on fighting it both with a party and solo. After Narmer drops to around 50% HP, it'll flee from battle and spawn the Bog Lurkers in the room. This gives you the chance to return to the campsite and recover before fighting it again. Ambush it like before and continue to fight it with the same strategy. Any Bog Lurkers left alive after Narmer dies will vanish, but they will respawn much like normal FOEs. Feel free to proceed to the 2nd Stratum, do not use an Ariadne Thread to return as you can warp back with the Geomagnetic Field.
Bog LurkerWeakness: BashSkills: Life Absorb, DefendConditional Drops: NoneBehavior: PassiveRecommended Party: Should be the same as the Narmer oneThere's no real strategy to this one, if you have any defense reducing skills or Ad Nihilo, be sure to remove it of its buff. Try not to waste too much HP/TP bringing this FOE down. The real purpose of this FOE seems to be to make getting into another fight with Narmer harder.
NarmerWeakness: VoltSkills: Earthquake, Fin Smack, Mud Throw, Submerge, Whip Ripper, RunConditional Drops: Trembling Fin (1 person party)Recommended Party: Monk, Zodiac, Prince(ss), HopliteThis is the first boss of the game so be sure to come well prepared and bring a tent. It's up to you whether or not to use Provoke as Whip Ripper can kill an unlucky Hoplite, but if you do, be sure to keep your Hoplite topped off (Selflessness can work wonders here). Make sure that your Monk has Refresh, your Zodiac has Volt Star, and your Prince(ss) has both Shock Arms AND Regal Radiance. The only real trick here is when Narmer uses Submerge and it's why a Prince(ss) is strongly recommended. Be sure to spend some points in Royal Lineage/Nobility Proof (or both) and keep Shock Arms up on them at all times so when Narmer does use Submerge, you can have everyone recover/defend and have the Prince(ss) use Regal Radiance on themself to damage Narmer, remove the duplicates and prevent Earthquake from being used.
As far as a solo run is concerned with Narmer, I would strongly recommend a Prince(ss) with at least 2nd Stratum gear, Shock Arms, Regal Radiance, Royal Lineage, Nobility Proof, Protect Order. Optional skills would be Negotiation, Guard/Attack Order, and Reinforce. The same tactic applies with Shock Arms and Regal Radiance, be sure to keep up Protect Order as well and use Negotiation for a quick (but potentially risk) heal, also equipping and using the Indomitable limit is pretty helpful here. You should not have too much trouble if you're at a decent level and are familiar with the fight/class, but you could also wait until you have subclasses unlocked for an easier fight. Just be sure to pick a class with good synergy (pretty hard to go wrong with a supportive class, but a damage dealing class will make the fight go faster). One thing to keep in mind is that Narmer will not run on any encounter after the storyline battle.