Buildings 1, 2, and 4[edit]

Building 4 to Building 1[edit]
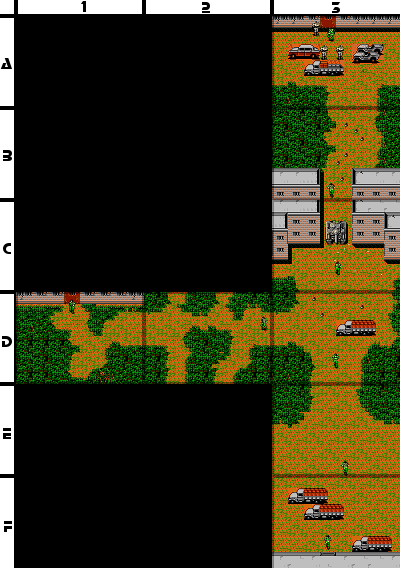
D1: You will arrive here after you first exit Building 4. There is no alternative other than to head east to D2.
D2: This is one of two forest-maze areas. If you use the east exit, you will simply arrive at D3. However, in order to make it from this screen back to the entrance of Building 4, you must navigate the forest in a precise order. If you wish to know the solution, read the spoiler below.
To reach the entrance to Building 4, you must take the left exit two times, followed by the upper left exit once, followed by the left exit once more.
D3: The truck here provides Snake with an endless supply of rations. Exit and enter the truck until you reach your maximum supply. The north portion of this screen has a few land mines which you will not be able to detect without a land mine detector. Beyond this screen to the north is a tank that you will not be able to defeat until your rank has three stars. For now, head south to E3.
E3: There is little of interest on this screen. Traveling to the east or west merely wraps you around to the opposite side of the same screen. Continue south to F3.
F3: There are three trucks here in addition to the back door to building 1. The top truck contains more plastic explosives for you to collect. Hopping into the back of the middle truck will actually transport you to back to the checkpoint at the bottom of the initial jungle path, so avoid it. The bottom truck, however, provides you with access card 4, which is exactly what you need to open the back door to building 1 and get back inside.
Once inside the building, avoid detection from the four guards that are present around the crates, and head east to reach the elevator. Use the elevator to access the second floor.
Building 1 to Building 2[edit]
F3: Before you make your way to building 2, it is highly advisable that you make sure you have at 15 land mines. You can collect land mines from the room to the left of the back entrance of building 1 by opening the door with card 4, and exploring the right truck. Stocking up on remote control missiles is also a good idea since the game does not provide you with another chance to collect them. Assuming you know the contents of each truck (see the entry for F3 above,) head north to E3.
E3: Continue north to D3.
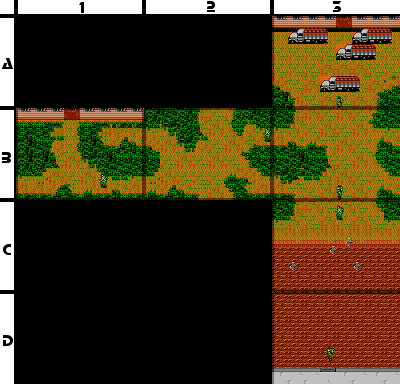
D3: Take this opportunity to enter the truck and max out on rations. Restore any damage that you have taken, and then activate the land mine detector. You will see a few mines scattered along the ground leading north. Walk around them and proceed to C3.
C3: You will run into a serious threat that you will be forced to deal with in order to proceed. Blocking your progress to the north is a tank. In order to proceed to building 2, you'll have to destroy it.
With the threat of the tank removed, you are free to proceed north to B1.
B1: You'll want to have your mine detector activated when you traverse this screen. Avoid the mines and continue north to A1.
A1: You will finally arrive at the entrance to building 2. When you get there, the guards out front will have set up a roadblock. They will not open the door under any circumstances unless they verify the identity of someone who approaches the building. Big Boss will call you up and tell you to wear an enemy uniform. He will also tell you that from now on, you need to contact him on frequency 120.13. In fact, all of the previous contact frequencies will change. If you managed to collect the enemy uniform already, put it on and step in front of the soldiers. They will not recognize you for who you are, believe that you are one of them, and permit you to enter the building, where you will arrive on the first floor.
If you do not have the enemy uniform, it would be a good idea to give Resistance Leader Schneider a call on frequency 120.79. He will tell you that the enemy uniform can be found in building 4, and we will also tell you to contact him on frequency 120.16 from now on. While you're at it, if you give Diane a call on frequency 120.33, she will tell you to contact her on frequency 120.91 from now on as well.
Buildings 2, 3, and 5[edit]

D3: After having escaped through the back door of building 2 with card 7, Snake will find himself at the foot of a desert. Building 3 may be 20km to the north, but without a device to help keep him going in the right direction, he will wander aimlessly through the desert. In order to have any hope of reaching building 3, you will need to find the compass and activate it as you traverse the desert. Assuming you have a compass, activate it now, and head north. The desert will be teaming with scorpions that lunge toward anything they suspect is a meal, and instantly sting anything they touch. Getting stung by a scorpion means a slow painful death unless you possess an antidote to the poison. Even with the compass, you will need to pass through this scorpion infested desert for at least two screens. Do your best to avoid them, and don't hesitate to use antidote if you get stung by one. You can use a trick to make getting by them a little easier; run along the left and right edges of the screen. When a scorpion lunges toward you, simply cross over to the opposite side of the screen. Your progress through the desert will not be lost as long as you are using the compass. Keep moving north until you reach C3.
C3: This screen also has scorpions, but it also signifies the end of the desert. Continue to avoid getting stung and make your way through the trees at the top to reach B3.
B3: There are six paths from this screen, but really only two places to go. To the north is the entrance to building 3, but you'll have to navigate another forest maze if you'd like to visit building 5 to the west. To reach building 3, go north one screen to A3. To make your way to building 5, go west to B2.
Building 3[edit]
A3: As soon as you arrive, you'll receive a call from Big Boss, and he will instruct you to hop in the right truck. He doesn't specify which one, but no matter what truck you pick, the truck will drive away. The lower right truck will transport you to the truck that contains rations south of building 2 (just south of where you fought the tank). The upper right truck will transport you back to the front of building 1. Clearly, there must be some mistake. Of the two remaining trucks, the bottom truck contains two boxes of ammo and the left truck contains a single soldier. Seeing as how Big Boss's instructions get you no farther, you may as well approach the door to building 3 and open it with card 7.
Building 5[edit]
B2: Like the entrance to building 4, building 5 is hidden behind a dense forest. You'll have to figure out what the exact path is that leads you out to the building. It's actually very similar to the south forest maze. Read the spoiler below to learn the route to B1.
To reach the entrance to Building 5, you must take the either the lower or upper left exits two times, followed by the top exit once, followed by the lower left exit once.
B1: Now that you've made it to the entrance, walk up to the door and use card 6 to gain entry into building 5