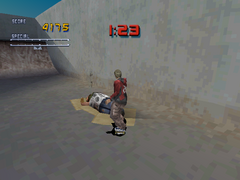
It's back to Southern California again to hit the beach. This level is based on The Pit in Venice, California, a very famous skating spot that lasted until 2000. There are many rooftops and ledges to get a great view of the graffiti and quarterpipes placed everywhere to get some high air. Be careful not to fall into the sand.
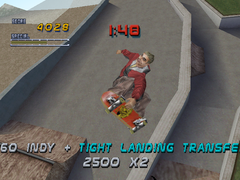
To the left of your skater is a large bowl that's perfect for vert tricks. If your air, hangtime, and spin starts are high, you should be able to pull off 720 grabs by now. A boneless for extra height could help if you fall short of a 720. For a street line, your skater can start by grinding the wall behind him and keep grinding. Jump with quick flip tricks to add to your multiplier. When you see the quarterpipe at the end, jump to the left and land in a manual, then go up the quarterpipe and finish with a grab move. If you're confident, you can try transferring to another quarterpipe for the Tight Landing Transfer to get extra points. You can get back to the wall and grind the other way until you reach the wooden bowl and air off that for another huge combo.
Another good place for vert skaters is the two halfpipes with the triangular rooftop between them. You can air from one to the other at the pointy end to add the "VB! Skinny Transfer" to your multiplier and if your stats and angle are good enough, the "Fatty Transfer" at the wide side as well. Otherwise, you can go back and forth and use every trick in your arsenal. For street skaters, the table area has some benches for grinding. Try grinding the two benches against the wall for the "Ledge 2 Ledge" gap, then manual toward the next set of benches and grind those for more transfer points, then manual again. You can end the combo by heading for the wooden quarterpipe with a nice grab or the Seaside Rail to the left of that with a special grind.
The letters are not only scattered pretty far, but they all are hidden on the rooftops. To get them in one go, be sure not to fall off.
S: From the start, take a right past the hump and grind the chain-link fence. Keep it up until you see the rooftop with the S in front of you.
K: Take a left and keep going straight until you see the K hovering above "Muska's Gap".
A: Take another left and ride along the left edge until you see a ledge. Grind the ledge and ollie off the very end. You should be able to land on the next rooftop or grind the edge of it if you're just shy of making it. Once you're there, grind the curved vent with the A on top.
T: After grinding the curved vent, you should be facing a small ramp. Ollie off it to get the higher rooftop in front of you. Keep skating ahead and you'll find the letter T above a curved ramp. Use the ramp to air upward and grab the letter.
E:: Finally, after coming down from the ramp, turn left and drop down to the rooftop with the long quarterpipe around the edge. In the middle of that quarterpipe is the letter E high above.
Unlike the other collectible goals, your skater has to ollie the bum in a specific order. Once you find him, just jump over him. Afterward, the bum will move to a different area. The only hint on where he'll spawn next is indicated by the cardboard on the ground.
The bum's second spot.Go forward from the start, down the steps and past all the tables. Go around the graffiti wall to find Ollie sleeping behind it.
After getting him the first time, go back out the way you came and turn to the right toward the Seaside Rail. You'll find the bum sleeping at the bottom.
Go back up the slope and take a right to reach the starting position, then a left go ride along the fence until you see the bum snoozing near a wall. You could also get there faster by launching off the wooden quarterpipe in the seaside area and land in the sand to instantly go back to start.
Turn to your left and turn again when you reach the Bluetorch banner. The bum should be sleeping on the grass.
Finally, turn around and take a couple of rights where you'll find the bum resting at start. Again, you can use the sand to go there quicker.
Some independent artists have left their spray cans behind after finishing their handiwork. Collect all five like you would with the SKATE letters.
A spray can.From the start, head right and go straight to the end of the map. You'll find a wooden quarterpipe and the first spray can.
After coming down from the QP, turn right and go past the Bluetorch banner to find two QPs with the spray between them. Transfer from one to the other.
Head back to your starting position by going past the banner again and taking a right. Go to the bowl area to obtain the third spray can.
Next, get out of the bowl area. Turn left and as soon as you enter the table area, turn right to find a long wooden bench and the fourth spray can.
Finally, go past the tables and take a left to the Seaside area. The final spray can is above the quarterpipe at the very end.
From the start, take a left into the circling quarterpipe. Get some speed and ramp out over the wall while being close to the building and you should land on the sidewalk. Carefully follow it to get to the secret area. You should find a short wall with the word ledge spray painted on it. Perform a tailslide (Right on d-pad + Y/Triangle) on this ledge to get the goal.
There are four gaps that go from one quarterpipe to the other with the VB label. Hitting all four can be tough since they're spread out far and the first two are very wide. Good air and hangtime stats can help with this one.
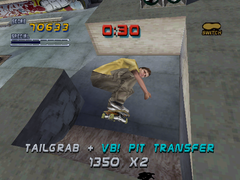
VB! Pit TransferVB! Huge Transfer!!!: Being the hardest of the four VB gaps, it's best to get this one out of the way first. From the start, take a right and grind the wall for some extra speed. When you get to the wooden quarterpipe, angle yourself to the left as best as you can and transfer over the middle quarterpipe and land in the left quarterpipe.
VB! Pit Transfer: After landing, turn to the right and you should see more quarterpipes ahead. Get some speed with the ones in front of you and as you come back down, go for the quarterpipe against the wall and transfer over the roof to land in the other quarterpipe.
VB! Skinny Transfer: Take a left and go into the table area, then take a right past the graffiti wall and go around until you see more wooden quarterpipes. There is a triangular roof seperating them from another set of quarterpipes. Air off the QP that's right by the tip of the triangular roof and land in the other QP.
VB! Ledge Transfer: The final gap is near Venice Ledge. Air out of the QP and land in the table area. Then, take a right past the Seaside Rail to find a lone quarterpipe against a wall. Use it to air out into the Venice Ledge area. You should find two more QPs, one higher than the other. Transfer from the higher one to the lower one.
The secret tape is in the table area, way up above on a large wire. The expected way is to go straight into the table area and find the quarterpipe against the wall that leads up to the curved window. Launch up to the roof and then use the ramp to launch to an even higher roof. At one corner of the higher roof is another ramp that points to the wire with the special tape. Get some speed, then ollie off the ramp to get some high air and grind the wire for the tape.
However, there's a far easier way to do it. Go straight to the table area and take note at one of the tables being directly under the secret tape. Use that table's base to ollie up high. If done right, your skater should barely touch the tape with the top of his head. It will take a few tries because the base the table is on is very short, but it's a better time-saver.
$50: Right behind your skater at the start is the first $50 on the gate.
$50: At the start, turn right and skate along the wall until you see the next $50 on another gate.
$50: Near the Bluetorch banner and a lone funbox is the final $50 on yet another gate.
$100: The Bluetorch banner has a $100 resting on top. Get to the rooftop and grind the banner.
$100: The second $100 is near the VB Pit Transfer gap. You can boneless for it when you're on the rooftop or you can use the quarterpipes to air up to it.
$100: In front of the previous $100 is another that's resting on a curved air vent.
$100: At the triangular roof, the next $100 is floating above the base, also known as the Fatty Transfer. You don't have to get the gap to reach the money, just air toward it with a quarterpipe.
$100: The Seaside Rail has a $100 on top. Just grind the rail to get it.
$100: The final one is hidden in the secret area. You can get there by either airing out of the bowl and over the wall or airing out of the lone quarterpipe.
A $250 on a sculpture.$250: From the start, grind the fence to the right and get up on the roof. Turn around and you should find a ramp that's pointing to a tall, cylindrical structure with the first $250 on top. Ollie off the ramp at the right time to get some serious air and grab the money.
$250: The second $250 is to the left of the quarterpipe used for the Skinny Transfer gap. Launch to the left from the quarterpipe to grab the money.
$250: The final one is at the roof with the long quarterpipe along the edge. There's a structure with wires that has the $250 above it. Get some speed with the QP and then grind one of the wires to ascend to the middle wire and get the cash.
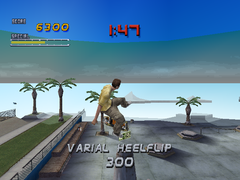
VB! Skinny Transfer (100 points): Beyond the table area, there is a triangular rooftop sandwiched between four quarterpipes. Use the quarterpipe close to the pointy end and transfer to the other.
Up!, Up!!, And Away!!! (100, 250, 500 points): At the start, go to the table area and turn right to go across the tables to the two ledges against the wall. Turn to the right to find a thin quarterpipe. Like the gap in Marseille, you have to air up the QP as high as you can. Use the ledges to gain some speed and perform a boneless for extra height.
Table Pop (200 points): Ollie over any of the tables in the table area.
Shorty Planter Pop (200 points): Ollie over the short side of any of the planters in the starting area.
Cake Transfer (250 points): All the way to the right from the starting point are three quarterpipes with two planters between them. Go to the middle quarterpipe and air to the left or right quarterpipes.
West Side Transfer (250 points): Past the Bluetorch Banner, there's some quarterpipes laid out. Go from the one in the middle of the path to the one against the wall.
Wee Lil' Roof Gap (250 points): At the wooden bowl, air out or wallride to reach the roof with the very long quarterpipe and the wires. Facing across the roof at a corner is another roof. Ollie from the roof, over the bowl, and to the other roof. This gap requires the shortest distance.
Canyon Jump (250 points): When you're on the rooftop with the long quarterpipe, face the other rooftop with the curved window on top. Ollie from one to the other, passing over the Seaside Handrail.
Ledge 9 Set (250 points): At the secret area, there's a set of stairs right by the Venice Ledge. Clear over them for this gap.
Tight Landing TransferMuska's Gap (500 points): On the rooftop near the "VB! Pit Transfer", you'll find a piece of the roof jutting out to the left, pointing toward the J-shaped air vent. Jump from that piece of the roof and clear the small gap.
Tight Landing Transfer (500 points): At the three quarterpipes at the right, air from the leftmost or rightmost quarterpipe and land in the middle quarterpipe.
Big Double 5 Set (500 points): At the starting position, go to your left and you should see two sets of stairs you have to air over. You can use a wallride for extra hangtime if you need it.
VB! Pit Transfer (500 points): Past the banner, you should see some quarterpipes up ahead. The two you need for this gap are across the "West Side Transfer" gap and have a section of the roof between them. Air from one to the other.
Nice Mid Size Roof Gap (500 points): This is the same as "Wee Lil' Roof Gap" except the distance required is farther than last time. Try to do a boneless from one roof to the other if you need extra distance.
Planter Pop (500 points): Ollie over the long side of any of the planters in the starting area.
Roof 2 Ramp (500 points): Get on the roof that's closest to the wire that holds the secret tape. You can get up there by using the "Vent 2 Roof Gap" or using the wooden bowl to air up to a lower roof adjacent to the roof you have to get to. You should see a small quarterpipe at the right edge of the roof. Air off that to the wooden quarterpipe back on the ground.
VB! Ledge Transfer (500 points): In the secret area, there are two wooden quarterpipes. Air from one, go over the Venice Ledge, and land in the other.
Lil' Vent Gap (500 points): On the roof near one of the QPs that make up the Pit Transfer is a small vent that can be used as a kicker. Jump off the vent, air over the QP, and land on the rooftop.
Ramp 2 Roof (750 points): This is the same as the "Ramp to Roof" gap, but in reverse. You have to air from the wooden quarterpipe on the ground to the small quarterpipe on the roof closest to the wire. You'll need a lot of speed and air for this one.
Uphill Canyon Jump (750 points): On the roof with the curved window is a small vent that you can use as a ramp. Jump off the vent while slanting to the right and land on the lower roof.
Vent 2 Roof Gap (750 points): On the roof with the curved window is a small vent that you can use as a ramp. Jump off the vent straight ahead to land on the higher roof.
VB! Huge Transfer!!! (1000 points): At the three quarterpipes at the right, air from the top quarterpipe at the right, over the middle one, and down the lowest one.
Massive 20 Set! (1000 points): At the Seaside Handrail, there is a large set of stairs. Ollie over the entire set.
Siiiiick Roof Gap!!! (1000 points): This is the same as "Wee Lil' Roof Gap" except the distance required is farther than that and "Nice Mid Size Roof Gap". To get this, use the quarterpipe on the rooftop to get some speed and then angle yourself toward the low pyramid. Ollie off it at just the right moment and you should be able to cover the large distance.
Huge Roof 2 Ramp (1000 points): At the rooftop with the candy cane vent, there is a curved, stone quarterpipe. Launch from that QP to the wooden QP at the right.
Fatty Transfer (1000 points): Beyond the table area, there is a triangular rooftop sandwiched between four quarterpipes. Use the quarterpipe close to the wide end and transfer to the other.
Big Vent Gap (1000 points): On the roof with the curved ceiling window, you'll find a small kicker that points toward the triangular rooftop. Use the kicker to jump toward it. If you think you won't make it, you can grind the edge of the rooftop to make it count.
Huge Ramp 2 Roof (1500 points): This is the same gap as "Huge Roof 2 Ramp", except your skater must launch from the wooden QP to the one on the roof. Speed and a high air stat can help a lot with this gap.
Seaside Handrail (200 points): From the start, go down to the table area and take a left to find a long rail that leads downward with a set of stairs to the left. Grind the entire rail.
The Venice Ledge (250 points): In the secret area, there is a ledge with "The Ledge" painted on it by a set of stairs. Grind the entire ledge.
Bench Trippin' (500 points): In the table area, there are three stone benches. Grind from one bench to the other. It doesn't have to be all three at once.
Ledge 2 Ledge (500 points): In the table area, there are two benches similar to the ones in "Bench Trippin'", except they're against a wall littered with graffiti. Grind them back to back.
10 Point Landing (500 points): Climb up to the roof that's closest to the wire in the table area. Turn your skater toward the Seaside Handrail below, then jump off the roof and grind that rail.
The High Wire (1000 points): In the table area, there is a wire high above and you need to grind it to get this gap. Go to the wooden bowl, air up to the roof with the long quarterpipe, then jump to the higher roof. You should see a kicker at the edge that points toward the wire. With enough speed, launch off the kicker and land on the wire with a grind. Alternatively, you can use the tables below the wire to jump up toward with a well timed ollie, but this will require a high ollie stat.
'Round The Horn!!! (2500 points): At the wooden bowl, you need to grind the entire rim. You will lose speed when you reach the end, so start the grind with a lot of speed. It helps to have a full special bar for this one.
He Could Go...He Could Go..., All The Way..., Touchdown! (250, 500, 1000 points): At the table area, you should see a set of tables with wooden planks placed on top of it. Starting from one end, jump up and manual the planks. The first gap is one-third of the way, the second gap is two-thirds, and the final gap is all the way.
Candy Cane Manual (750 points): On the rooftop past the banner and "VB! Pit Transfer" is a J-shaped air vent. Jump on the vent and manual the entire thing.