- On the sixth and seventh floors of the castle, there are "warp zones" (
 ) on the right side of the rooms, which will send Pino and Acha to the left side of the rooms if they walk onto them; however, if they do it on Floor 6, they will be trapped in the bottom-left...
 - Some of the boxes contain boxing gloves (
 ) that will temporarily stun Pino and Acha if they hit them, and others contain time bombs (
 ) that will instantly kill them if they can't get out of their blast radiuses before they explode... You should also watch out for the Magic Hands (
 ), that appear on the sides of the boxes upon some floors - touching them when fully clothed equals a hit.
 - However, some boxes will glow when you fire at them to open them, and diamonds (
 ) will emerge from them to the north, east, south, and west before disappearing almost immediately four times; if either Pino or Acha is standing at any side of the box when a diamond emerges from it, they will collect it for 100 extra points, and the maximum amounts of points they can get from it 1600.
 - The colours of the ribbons on the boxes (
 ,
,  ,
,  ), are also randomly-generated - which means that their colours in the images you see below may vary from what you see on the monitor of an actual cabinet, when you are playing. The placement of Weapon Icons, "7" and "Star" Cards, Shirts and Bonus Foods inside the boxes is randomly-generated as well; however, the placements of Boxing Gloves and Time Bombs inside them is not, and you will always find them in the same boxes, upon each floor. Also, if you shoot at a box to open it and it has a "7" or "Star" Card inside it, you should not shoot the box again to make it disappear until you are ready to collect the card; because if you do, it will disappear after a few seconds. This can be bad if you are about to proceed to the 7th, 15th, 23rd, 31st or 39th floors, as you will need the Tornado Attack or Star Shot to kill Mahou when he shows for 5000.
 - The eighth, sixteenth, twenty-fourth, thirty-second and fortieth floors of the castle are "bonus floors" (which explains their absence on this page), where Pino and Acha have to collect apples (
 ) for extra points as they fall from the trees in the background - and as mentioned on that Gameplay page, pushing the joystick up or down on these floors has no effect, and pressing the Firing Button will cause them to jump... Each apple they collect is worth 100 points; and because there are three trees on the five bonus floors, which yield nine apples each, the maximum amount of bonus points you can get from one of them is 2700. The apples will fall off the trees in the order of centre, right and left - so you should remember this if you wish to maximize point-earning potential.
 - For an extra challenge, you can also try killing all the enemies upon any non-bonus floor before collecting enough Hearts to open the double door; once both players have gone through that double door, the player who killed most of the enemies will get a 500-point bonus, and 10 points for every second of time remaining. It is advisable to go through the double door as soon as you have opened it, though - as the walls of that floor will begin to close in around you if you wait. If one of the walls comes down on top of either of the players, it will kill them instantly - as if they had incurred an explosion from a Time Bomb that had been uncovered...
-
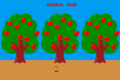
Floors 8, 16, 24, 32 & 40.
-

The opening cutscene 1.
-

The first cutscene from 9.
-

The second cutscene 17.
-
The ending cutscene 44.


Floor 1[edit]
Opening Cutscene: "PINO AND ACHA ARE GOING TO MAJYO'S CASTLE TO SAVE FRIEND." The amount of enemies on the 1st to 7th floors is 20.

- This floor contains forty-six boxes, four jars, twenty-two blocks (four of which are enemy-spawning), ten Heitai, ten Cars, three Pellet Icons, six Wheel Icons, one "7" or "Star" Card, and three randomly-generated Bonus Foods (this means that one play a Bonus Food could be a 50-point Candy - but on another it could be a 300-point Bamkuhen).
- All four jars on this floor can be seen into (which means you only have to fire at them once to open them), and they all contain Hearts given that there are four of them on every floor. The best weapons to proceed to the second floor with are two Wheels, given that they can kill both Heitai and Cars when fired upon them. Pellets only kill the former.
Floor 2[edit]

- This floor contains: forty-nine boxes, seven jars, thirty-eight blocks (four of which are enemy-spawning), ten Heitai, five Cars, five Tanks, two Pellet Icons, three Wheel Icons, four Bomb Icons, one "7" or "Star" Card, three randomly-generated Bonus Foods and two Boxing Gloves. The last of these always appear in the same boxes on every play.
- Four of the jars on this floor cannot be seen into, which means you will have to shoot them twice to open them. The best weapons to proceed up to the third floor with are a Bomb and Wheel, given that they can kill Tanks and Cars...
Floor 3[edit]

- This floor contains thirty-three boxes, seven jars, thirty-four blocks (four of which are enemyspawning), eight Heitai, eight Domdoms, four Cars, two Pellet Icons, three Wheel Icons, two Pin Icons, one "7" or "Star" Card, either one or two Shirts (which depends on whether Acha is present or not), three randomlygenerated Bonus Foods, two Boxing Gloves and two Time Bombs. Again, the last two will always appear in the same boxes every play, so remember it.
- Five of the jars on this floor cannot be seen into - which again means you'll have to fire at them twice to open them. The best weapons to proceed to the fourth floor with are a Pin and Wheel, as they can kill the Domdoms and Cars.
Floor 4[edit]

- This floor contains thirty boxes, eighteen jars, seventy-two blocks (four of which are enemy-spawning), four Heitai, four Cars, eight Domdoms, four Trumps, two Pellet Icons, four Wheel Icons, four Pin Icons, four Flame Icons, one "7" or "Star" Card, one or two Shirts (which again depends on whether Acha is present or not) and three randomly-generated Bonus Foods. This floor also has more jars and blocks than any of the previous three (as you can see)...
- All eighteen jars upon this floor cannot be seen into, which once again means you will have to shoot them twice to open them. The best weapons to proceed to the fifth floor with are two Flames, given that they can kill the Trumps.
Floor 5[edit]

- This floor contains seventy-one boxes, seven jars, four blocks (and all four of these are a enemy-spawning), twelve Tanks, four Trumps, four Domdoms, three Pellet Icons, six Bomb Icons, three Pin Icons, three Flame Icons, one "7" or "Star" Card and three randomly-generated Bonus Foods. The Magic Hands are also present for a first time here, and touching them while you're fully clothed counts as hit. However, touching them while not fully clothed does not.
- Five of the jars on this floor cannot be seen into - which yet again means you will have to shoot them twice to open them. The best weapons to proceed up to the sixth floor with are: two Pins, given that they can kill the Domdoms...
Floor 6[edit]

- This floor contains total of forty-three boxes, eight jars, thirty-four blocks (four of which are enemyspawning), eight Domdom, twelve Heitai, one Pellet Icon, three Pin Icons, one Flame Icon, one "7" or "Star" Card, one or two Shirts (which, once again, depends on whether Acha is present or not) three randomly-generated Bonus Foods, and four Boxing Gloves. There is also a "Warp Zone" at the bottom-right corner of this floor - but using it will result in a trap.
- Five of the jars on this floor cannot be seen into - which for a fifth time means you will have to shoot them twice to open them. The best weapons to proceed to the seventh floor with are either: two Flames, the Tornado Attack, or the Star Shot - given that Mahou is about to make his first appearance. That second one will kill him immediately.
Floor 7[edit]

- This floor contains total thirty-three boxes, four jars, twenty-nine blocks (four of which are enemyspawning), Mahou, three Heitai, eight Trumps, eight Cars, four Wheel Icons, four Flame Icons, three randomly-generated Bonus Foods and four Boxing Gloves. There is also another "Warp Zone" at the right of this floor - but using it won't result in trap.
- All four jars on this floor can be seen into - which again means you will only have to shoot them once to open them. The best weapon to proceed to the eighth floor with isn't applicable, because it's the first "bonus floor" of the castle. You should remember that the twenty-seven apples will fall off the three trees in the order of centre, right, then left.
Floor 9[edit]
First Cutscene: "MAHOU CHANGES GOOD HEITAI TO EVIL HEITAI." The amount of enemies that appear on the 9th to 15th floors of the castle is 24.

- This floor contains thirty-eight boxes, eight jars, thirty-four blocks (four of which are enemy-spawning), eight Heitai, eight Robots, eight Domdoms, four Pellet Icons, two Wheel Icons, six Pin Icons, four Bolt Icons, one "7" (or "Star") Card, three randomly-generated Bonus Foods, and two Time Bombs. The lasts always appear in the same boxes.
- Four of the jars on this floor cannot be seen into, which means you will have to shoot them twice to open them. The best weapons to proceed to the tenth floor with are two Bolts given that they can kill Robots and also freeze others.
Floor 10[edit]

- This floor contains thirty-two boxes, four jars, fifty-eight blocks (four of which are enemy-spawning), twelve Osaru, twelve Trumps, three Pellet Icons, three Flame Icons, three Spring Icons, one "7" (or "Star") Card, three randomly-generated Bonus Foods, and one Diamond-Generating Box (the position of which will be the same on every play).
- All four jars on this floor can be seen into - which means you will only have to shoot them once to open them. The best weapons to proceed to the eleventh floor with are two Flames given that they can kill off Trumps. Remember.
Floor 11[edit]

- This floor contains twentyone boxes, eight jars, fortytwo blocks (four of which are enemyspawning), eight Domdom, eight Trumps, eight Heitai, two Pellet Icons, four Pin Icons, four Flame Icons, one "7" (or "Star") Card, either one or two Shirts (depends upon whether Acha is present or not), three randomly-generated Bonus Foods, one Diamond-Generating Box and one Time Bomb (the position of those last two will also be the same on every play). The Magic Hands will also be present for a second time on here, so you should watch out for their appearances if fully clothed.
- Six of the jars on this floor cannot be seen into, which again means you will have to shoot them twice to open them. The best weapons to proceed to the twelfth floor with are not applicable given that Pins and Flames are useless on.
Floor 12[edit]

- This floor contains twenty-nine boxes, eight jars, fifty-eight blocks (four of which are enemy-spawning), eight Osaru, eight Heitai, eight Robots, four Spring Icons, four Bolt Icons, one "7" (or "Star") Card, one Diamond-Generating Box and one Time Bomb (the position of those last two will also be the same, on every play). The Magic Hands are also present for a third time here, so you should again watch out for their appearances if your doll happens fully clothed.
- Seven of the jars on this floor cannot be seen into - which once again means you will have to shoot at them twice to open them. The best weapons to proceed to the thirteenth floor with are a Spring and a Bolt, given that they can kill Osaru and Robots (that latter can also temporarily freeze the other six enemy types, and can even freeze Mahou).
Floor 13[edit]

- This floor contain sixty-five boxes, eight jars, seventeen blocks (four of which are enemyspawning), four Cars, eight Heitai, eight Trumps, four Osaru, four Pellet Icons, four Wheel Icons, four Flame Icons, two Spring Icons, one "7" or "Star" Card, three randomly-generated Bonus Foods, and two Time Bombs (the last of which will always appears in the same boxes on every play). The Magic Hands are also present for a fourth time here, so you should once again watch out for their appearances, if your doll happens to be fully clothed (but if he/she isn't, you don't have to worry).
- All eight jars on this floor cannot be seen into, which yet again means you'll have to shoot them twice to open them. The best weapons to proceed to the fourteenth floor with are two Wheels, given that they can kill Cars. Remember.
Floor 14[edit]

- This floor contains fifty-eight boxes, sixteen jars, thirty-nine blocks (four of which are enemyspawning), eight Heitai, eight Cars and eight Domdom, with two Pellet Icons, four Wheel Icons, four Pin Icons, one "7" or "Star" Card, three randomly-generated Bonus Foods, two Diamond-Generating Boxes, four Boxing Gloves and two Time Bombs (and the positions of the last three will be the same on every play). The thirty-six boxes, four jars and thirty-two blocks in the centre of the floor, are arranged to look like a playing-card heart (like those yellow ones Pino and Acha collect).
- Fifteen of the jars on this floor cannot be seen into, which for a fifth time means you will have to shoot them twice to open them... The best weapons to proceed to the fifteenth floor with are either: two Pins, the Tornado Attack, or the Star Shot, given that Mahou about to make his second appearance. Remember that the second one kills instantly...
Floor 15[edit]

- This floor contains twenty-one boxes, eight jars, seventy-four blocks (four of which are enemy-spawning), Mahou, seven Domdoms, four Robots, two Osaru, two Tanks, four Trumps, four Heitai, two Pellet Icons, two Wheel Icons, two Bomb Icons, two Pin Icons, two Flame Icons, two Spring Icons, two Bolt Icons, one "7" or "Star" Card, one or two Shirts (which again, depends on whether Acha is present or not), three Bonus Foods, two Boxing Gloves and two Time Bombs. The last two will also always appear in the same boxes on every play, so you should remember.
- All eight of the jars on this floor cannot be seen into - which for a sixth time means you'll have to shoot them twice to open them. The best weapons to proceed to the sixteenth floor (which is the second "bonus floor" of the castle) with are a Pin and a Bolt given that they can kill Domdoms and Robots (the latter can also freeze the other types).
Floor 17[edit]
Second Cutscene: "MAJYO LOOKS PINO AND ACHA THROUGH THE CRYSTAL BALL." The amount of enemies upon the 17th to 23rd floors is 28...

- This floor contain thirty-one boxes, eighteen jars, thirty-four blocks (four of which are enemy-spawning), four Heitai, four Robots, twelve Domdoms, eight Osaru, two Pellet Icons, four Pin Icons, four Spring Icons, four Bolt Icons, one "7" or "Star" Card, three randomly-generated Bonus Foods, one Diamond-Generating Box, four Boxing Gloves and two Time Bombs. The last three will also always be in the same positions on every play - so you should remember.
- All eighteen of the jars on this floor cannot be seen into - which means you will have to shoot at them twice to open them. The best weapons to proceed to the eighteenth floor with are two Bolts given that they can kill off the Robots.
Floor 18[edit]

- This floor contain thirty boxes, eight jars, forty-two blocks (four of which are enemyspawning), ten Robots, ten Cars, eight Trumps, with three Wheel Icons, three Flame Icons, three Bolt Icons, one "7" (or "Star") Card, three randomly-generated Bonus Foods and three Boxing Gloves. The last ones will always appear in the same boxes upon every play and the Magic Hands are also present for a fifth time on here, so you should watch out for them if fully clothed.
- Five of the jars on this floor cannot be seen into - which again means you'll have to shoot them twice to open them. The best weapons to proceed to the nineteenth floor with are two Wheels, given that they can kill Heitai and Cars...
Floor 19[edit]

- This floor contains: thirty-three boxes, seven jars, fifty-eight blocks (four of which are enemy-spawning), four Cars, four Osaru, four Tanks, four Robots, four Trumps, four Heitai, four Domdoms (all seven types...), two Pellet Icons, two Wheel Icons, two Bomb Icons, two Pin Icons, two Spring Icons, two Bolt Icons, one "7" (or "Star") Card, three randomly-generated Bonus Foods and two Time Bombs. The last one will also always appear in the same boxes.
- Five of the jars on this floor cannot be seen into, which once again means you'll have to shoot them twice to open them. The best weapons to proceed to the twentieth floor with are: a Bolt and a Spring, given that they can kill the Robots and Osaru (and you will need to proceed to the twentieth floor with the latter, if you want to kill the Osaru).
Floor 20[edit]

- This floor contains thirty-nine boxes, fourteen jars, sixty-four blocks (four of which are enemyspawning), four Heitai, eight Robots, eight Osaru, four Cars, four Domdoms, two Pellet Icons, four Wheel Icons, two Pin Icons, four Flame Icons, two Bolt Icons, one "7" or "Star" Card, three randomly-generated Bonus Foods and five Boxing Gloves. The last one will also always appear in the same boxes on every play, and the only way to kill the Osaru properly upon this floor is to bring in a Spring from the previous floor (if you didn't, the only way to kill them is have them hit you).
- Thirteen of the jars on this floor can't be seen into, which yet again means you'll have to shoot them twice to open them. The best weapons to proceed to the twenty-first floor with are two Pins given that they can kill off Domdoms.
Floor 21[edit]

- This floor contains... sixty-four boxes, ten jars, forty blocks (four of which are enemy-spawning), eight Heitai, eight Tanks, twelve Domdoms, six Bomb Icons, four Pin Icons, one "7" or "Star" card, three randomly-generated Bonus Foods, and four Boxing Gloves. The last ones will always appear in the same boxes on every play, and the Magic Hands are also present for a sixth time here. All sixty-four boxes, all ten jars and all thirtyeight blocks in the centre of the floor are also arranged to look like an upside-down Galaxian flagship, but the fact isn't immediately obvious.
- All ten jars on this floor cannot be seen into, which for a fifth time means you will have to shoot them twice to open them. The best weapons to proceed to the twenty-second floor with are two Pins given that they can kill Domdoms.
Floor 22[edit]

- This floor contains fourteen boxes, eight jars, sixty-five blocks (four of which are enemyspawning), fourteen Robots, fourteen Trumps, with two Pellet Icons, four Flame Icons, four Bolt Icons, one "7" (or "Star"), Card, three randomly-generated Bonus Foods, two Diamond-Generating Boxes, and one Boxing Glove (and the positioning of those last two will always be the same on every play, so you should remember this now, especially with only fourteen boxes).
- Seven of the jars on this floor cannot be seen into - which for a sixth time means you will have to shoot them twice to open them. The best weapons to proceed to the twenty-third floor with are either: the Tornado Attack or the Star Shot, given that Mahou is about to make his third appearance. Remember that the former will also kill him instantly.
Floor 23[edit]

- This floor contains: thirty-nine boxes, five jars, forty-six blocks (four of which are enemy-spawning), Mahou, eleven Heitai, eight Robots, eight Cars and two Pellet Icons, two Wheel Icons, two Bomb Icons, two Spring Icons, two Bolt Icons, one "7" or "Star" Card, one or two Shirts (which depends on whether Acha is present or not), three randomly-generated Bonus Foods, one Diamond-Generating Box, three Boxing Gloves and two Time Bombs. Remember it.
- Two of the jars on this floor cannot be seen into, which for a seventh time means you will have to shoot them twice to open them. The best weapons to proceed to the twenty-fourth floor (which is the third "bonus floor" of the castle) with are two Pins (and you will need to proceed to the 25th floor with them if you want to kill the Domdoms upon it).
Floor 25[edit]
The twenty-fourth floor is the first bonus floor of the castle to not have a cutscene after it - and the amount of enemies upon the 25th to 31st floors is 32.

- This floor contains: thirty boxes, nine jars, forty-six blocks (four of which are enemy-spawning), eight Cars, eight Robots, eight Domdoms, eight Heitai, eight Pellet Icons, two Wheel Icons, two Bolt Icons, one "7" or "Star" Card, three Bonus Foods and two Boxing Gloves. The last one will always appear in the same boxes upon every play, and the only way to kill the Domdoms properly on this floor, is to bring in a Pin from the previous floor (if you did not... the only way to kill them is to have them hit you, which unfortunately takes your outer clothes or life with it).
- Eight of the jars on this floor can't be seen into - which means you'll have to shoot them twice to open them. The best weapons to proceed to the twenty-sixth floor with are a Bolt and Pin, as they can kill Robots and Domdoms.
Floor 26[edit]

- This floor contain twenty-eight boxes, ten jars, forty-two blocks (four of which are enemyspawning), eight Domdom, eight Osaru, eight Trumps, eight Heitai, two Pellet Icons, two Flame Icons, two Spring Icons, one "7" or "Star" Card, three randomly-generated Bonus Foods, two Diamond-Generating Boxes and two Time Bombs. The positioning of the last two will also always be the same on every play, and again the only way to kill the Domdom properly on this floor is to bring in a Pin from the previous floor (again if you didn't, the only way to kill them is to have them hit you).
- Eight of the jars on this floor cannot be seen into, which again means you'll have to shoot them twice to open them. The best weapons to proceed to the 27th floor with are a Spring and Flame, as they can kill off Osaru and Trumps.
Floor 27[edit]

- This floor contains sixty-five boxes, twenty-six jars, four blocks (all of which are enemy-spawning), eight Heitai, four Osaru, eight Trumps, four Tanks, eight Robots and two Pellet Icons, four Bomb Icons, two Flame Icons, two Spring Icons, four Bolt Icons, one "7" or "Star" Card, one or two Shirts (which depends on whether Acha is present or not), and three randomly-generated Bonus Foods. All enemies upon this floor can also be killed properly after two floors.
- Twenty-four of the jars on this floor cannot be seen into, which once again means you will have to shoot them twice to open them. The best weapons to proceed to the twenty-eighth floor with are a Flame and a Bomb given that they can kill Trumps and Tanks. There are only seventeen more floors left to clear now (fifteen normal and two bonus)...
Floor 28[edit]

- This floor contain twenty-eight boxes, ten jars, thirty-eight blocks (four of which are enemyspawning), eight Trumps, eight Heitai, eight Tanks, eight Domdoms, three Bomb Icons, three Pin Icons, three Flame Icons, one "7" (or "Star") Card and three randomly-generated Bonus Foods. The Magic Hands are also present for seventh time on this one.
- Eight of the jars on this floor cannot be seen into, which yet again means you will have to shoot them twice to open them. The best weapons to proceed to the twenty-ninth floor with are a Flame and a Pin given that they can kill the Trumps and Domdoms (and you will need both of these weapons to kill the Trumps and Domdoms on it properly)...
Floor 29[edit]

- This floor contains forty-four boxes, twenty-eight jars, four blocks (all of which are enemy-spawning), eight Trumps, eight Heitai, eight Domdoms, eight Cars, along with two Wheel Icons, two Spring Icons, one "7" or "Star" Card and three randomly-generated Bonus Foods. All forty-four boxes and all twenty-eight jars are also arranged to spell out the game's name, and once again the only way to kill the Trumps and Domdoms properly on this floor is to bring in a Flame and Pin from the previous floor (and once again, if you didn't, only way to kill them is to have them hit you).
- All twenty-eight jars on this floor cannot be seen into, which for a fifth time means you will have to shoot them twice to open them. The best weapons to proceed to the thirtieth floor with are a Spring and a Wheel for Osaru and Cars.
Floor 30[edit]

- This floor contain forty-one boxes, eight jars, forty-two blocks (and four of them are enemy-spawning), eight Osaru, eight Heitai, eight Robots, eight Cars, two Wheel Icons, two Pin Icons, two Spring Icons, two Bolt Icons, one "7" (or "Star") Card, three randomly-generated Bonus Foods, two Boxing Gloves and two Time Bombs. Those last two will also always appear in the same boxes every play, so you should remember their positioning in order to avoid them.
- Five of the jars on this floor cannot be seen into - which for a sixth time means you will have to shoot them twice to open them. The best weapons to proceed to the thirty-first floor with are either: a Pin and a Bolt, Tornado Attack or Star Shot given that Mahou's about to make his fourth appearance in the game (which will also be his second-last).
Floor 31[edit]

- This floor contain sixty-one boxes, twenty-three jars, forty-eight blocks (four of which are enemyspawning), Mahou, fifteen Domdoms, sixteen Robots, four Pellet Icons, two Bomb Icons, two Pin Icons, one "7" (or "Star"), Card, three randomly-generated Bonus Foods, two Boxing Gloves and two Time Bombs (and the last two will always appear in the same boxes on every play). The Magic Hands are also present for an eighth time here - and yet again, the only way to kill the Robots properly on this floor is to bring in a Bolt from the previous floor (and yet again, if you did not, the only way to kill them is to have them hit you at the expense of your doll's outer clothes or life, which is too bad).
- All twenty-three jars on this floor cannot be seen into - which for a seventh time means you will have to shoot them twice to open them. And the best weapons to proceed to the 32nd (fourth bonus) floor with are: a Pin, and a Bomb.
Floor 33[edit]
The thirty-second floor of the castle is the second bonus floor to not have a cutscene after it, and the amount of enemies on the 33rd to 39th floors is 36.

- This floor contains twenty-six boxes, eight jars, seventy blocks (four of which are enemy-spawning), twelve Heitai, eight Osaru, eight Domdoms, eight Cars, four Pellet Icons, four Wheel Icons, two Spring Icons, one "7" (or "Star"), Card, one or two Shirts (depends on whether Acha is present or not), three randomly-generated Bonus Foods and two Time Bombs (the last of which will always appear in the same boxes upon every play). The only way to kill the Domdoms properly on this floor, is to bring in a Pin from the previous floor (if you didn't, the only way to kill them is to have them hit you - which will unfortunately take your doll's outer clothes or life with it). This is the sixth floor for.
- All eight of the jars on this floor cannot be seen into, which means you will have to shoot them twice to open them. The best weapons to proceed to the thirty-fourth floor with are Wheel and Spring, as they can kill Cars and Osaru.
Floor 34[edit]

- This floor contains twenty-nine boxes, six jars, sixty-two blocks (four of which are enemy-spawning), five Cars, five Osaru, five Tanks, five Robots, five Trumps, five Heitai, six Domdom, two Pellet Icons, two Wheel Icons, two Bomb Icons, two Pin Icons, two Flame Icons, two Spring Icons, two Bolt Icons, and one "7" or "Star" Card, three randomly generated Bonus Foods and two Boxing Gloves (the last of which always appear in the same boxes on every play).
- Five of the jars on this floor cannot be seen into - which again means you'll have to shoot them twice to open them. The best weapons to proceed to the thirty-fifth floor with are a Pin and Bolt, as they can kill Domdoms and Robots.
Floor 35[edit]

- This floor contains... fifty boxes, nineteen jars, four blocks (all of which are enemy-spawning), twelve Heitai, twelve Tanks, twelve Domdoms, and two Pellet Icons, four Bomb Icons, four Pin Icons, one "7" or "Star" Card, one or two Shirts (which again depends on whether Acha is present or not) and three randomly-generated Bonus Foods. Also, all fifty boxes and all nineteen jars are arranged to spell out the two main characters' names ("PINO" and "ACHA").
- All nineteen jars on this floor cannot be seen into, which once again means you'll have to shoot them twice to open them. The best weapons to proceed to the 36th floor with are: a Bomb and Bolt, as they can kill Tanks and Robots.
Floor 36[edit]

- This floor contain thirty-two boxes, twenty-two jars, thirty-two blocks (and four of them are enemy-spawning), eight Heitai, eight Osaru, four Tanks, eight Cars, eight Robots, two Wheel Icons, two Bomb Icons, two Spring Icons, one "7" (or "Star"), Card three randomly-generated Bonus Foods, two Diamond-Generating Boxes and six Time Bombs (the positions of the last two will always be the same on every play)... First-time visitors for this floor may also think they are trapped unless the game has generated all four hearts in the four jars at the top of the floor, but the fourth, sixth and eighth blocks in the two columns on either side of them are actually boxes in disguise. Also, the only way to kill the Robots properly on this floor, is to bring in a Bolt from the previous floor (again, if you didn't, the only way to kill them is to have them hit you). Twenty-one of the jars on this floor can't be seen into - which yet again means you'll have to shoot them twice to open them. The best weapons to proceed to the 37th floor with are a Bomb and Spring for killing Tanks and Osaru.
Floor 37[edit]

- This floor contains thirty-two boxes, twelve jars, sixty-six blocks (four of which are enemy-spawning), six Heitai, six Osaru, six Tanks, six Robots, six Trumps, six Domdoms, two Pellets Icons, two Wheel Icons, two Bomb Icons, two Pin Icons, two Flame Icons, two Spring Icons, two Bolt Icons, and one "7" or "Star" Card, three randomlygenerated Bonus Foods, one Boxing Glove, and two Time Bombs (the last two of which will always appear in the same boxes on every play)... Ten of the jars on this floor cannot be seen into, which for a fifth time means you will have to shoot them twice to open them. The best weapons to proceed to the thirty-eighth floor with are a Flame and a Pin as they can kill Trumps and Domdoms - and there are only seven more floors left to clear now (six normal, and one bonus).
Floor 38[edit]

- This floor contains twenty-five boxes, eight jars, fifty-five blocks (four of which are enemy-spawning), eight Trumps, eight Domdoms, four Cars, eight Robots, eight Osaru, two Pellet Icons, two Wheel Icons, two Pin Icons, two Flame Icons, two Spring Icons, two Bolt Icons, one "7" or "Star" Card, one or two Shirts (which, once again, depends upon whether Acha is present or not), and three randomly-generated Bonus Foods. Six of the jars on this floor cannot be seen into - which for a sixth time means you will have to shoot these jars twice, to open them. The best weapons to proceed to the thirty-ninth floor with are either a Pin and a Flame, Tornado Attack, or Star Shot given that Mahou is about to make his fifth and final appearance of the game (he is worth maximum of 25000 points, if you've counted).
Floor 39[edit]

- This floor contains... forty-four boxes, four jars, forty blocks (four of which are enemy-spawning), Mahou for the last time, five Heitai, six Domdoms, six Trumps, six Cars, six Osaru, six Robots, two Pellet Icons, two Wheel Icons, two Bomb Icons, two Flame Icons, two Spring Icons, two Bolt Icons, and three randomly-generated Bonus Foods. That only way to kill the Domdoms properly on this floor is to bring in a Pin from the previous floor (as once again, if you didn't the only way to kill them is to have them hit you). All four jars upon this floor cannot be seen into, which for a seventh time means you'll have to shoot them twice, to open them. The best weapons to proceed up to the fortieth (which is the fifth and final bonus) floor with are a Bomb and a Pin given that they can kill off Tanks and Domdoms.
Floor 41[edit]
The fortieth floor of the castle is the third bonus floor to not have a cutscene after it - and the number of enemies that appear on 41st to 43rd floors is 40.

- This floor contain forty-seven boxes, twelve jars, forty-eight blocks (four of which are enemy-spawning), six Tanks, six Trumps, eight Cars, eight Robots, six Domdoms, six Osaru, and two Pellet Icons, two Wheel Icons, four Bomb Icons, two Flame Icons, two Spring Icons, two Bolt Icons, one "7" or "Star" Card and three Bonus Foods. The only way to kill the Domdoms properly on this floor is to bring in a Pin from the previous floor (if you didn't, the only way to kill them is to have them hit you). Eleven of the jars on this floor cannot be seen into which means you will have to shoot them twice to open them. The best weapon to proceed up to the forty-second floor with are not applicable.
Floor 42[edit]

- This floor contains: seventy-three boxes, four jars, twenty blocks (four of which are enemy-spawning), twelve Cars, sixteen Heitai, twelve Osaru, four Pellet Icons, two Wheel Icons, two Spring Icons, one "7" (or "Star"), Card, one or two Shirts (which depends whether Acha is present or not), three Bonus Foods and four Boxing Gloves (the last of which will appear in the same boxes on every play). All four jars upon this floor can be seen into, which means you will only have to shoot them once to open them. The best weapons to proceed to the forty-third floor with are again not applicable given that it is penultimate floor of the castle, and the last one to feature regular enemies of any kind.
Floor 43[edit]

- This floor contains thirty boxes, seven jars, forty-one blocks (four of which are enemy-spawning), ten Trumps, ten Heitai, ten Robots, ten Domdoms, two Pellet Icons, two Bomb Icons, one "7" or "Star" Card, and three final Bonus Foods. The only way to kill the Trumps, Robots and Domdoms properly on this floor is to bring in a Flame, Bolt or Pin from the previous floor (and again, if you did not, the only way to kill them is to have them hit you). Five of the jars on this floor cannot be seen into, which again means you'll have to shoot them twice to open them. The best weapons to proceed to the 44th floor with are once again not applicable given that it is the final floor of the castle.
Floor 44[edit]

- This floor contain five blocks (one of which is enemy-spawning) and Majyo, who is invulnerable to normal weapons, the Tornado Attack, and the Star Shot. Eight hearts will also appear in random locations around the floor, which will fly towards Majyo when collected as if she was a moving doubledoor and wear down her fight resistance. Once you have collected the last of these eight randomly-appearing hearts, and it has hit Majyo, she will explode in a manner similar to that of Mahou (remember that the four Katakana characters in the explosion read as "Yarareta"), and the game will be over. You will now be treated with the game's Ending Cutscene: "PINO AND ACHA BEATS MAJYO, AND SETS FREE THEIR FRIENDS." and "MORNING CAME, EVERYTHING WAS AGAIN IN ORDER. THE END."