| (11 intermediate revisions by 8 users not shown) | |||
| Line 1: | Line 1: | ||
{{Header Nav|game=Pokémon Red and Blue}} | {{Header Nav|game=Pokémon Red and Blue}} | ||
This ship caters to some of the world's most renowned Pokémon trainers. In fact, the S.S. Anne is on its annual Pokémon cruise, where amateurs and professionals meet for a series of duels. Though not a trainer himself, the captain will give you Cut (HM 01), which will allow you to hack through the bush that blocks your path to the Vermilion City Gym. | |||
== All aboard! == | |||
When you talk to the guard near the Vermilion City harbor, flash your S.S. Ticket to him stationed at the docks, and you'll be allowed onto the massive cruise liner. | |||
If you want to get straight down to business, take stairway C, then stairway E all the way to the Captain's cabin. But be forewarned: your rival is after the same thing, and he'll be ready for a battle when you two cross paths when you're near the Captain's cabin. | |||
[[File:Pokemon RBY S.S. Anne Kitchen.png|thumb|180px|S.S. Anne Kitchen]] | |||
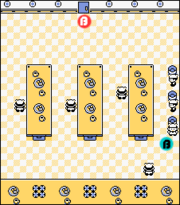
The rest of the ship is completely optional, but you may find it worth your while to explore a little and spend time battling to grind out some experience points. An important thing to remember is that if you do not do the rival battle and see the captain, you can go on and off at your leisure. Also, stop in the kitchen (B) and root through the trash for a '''Great Ball'''. '''TM08''' can be located at the fourth room left from the entrance. The TM contains '''Body Slam''', a Normal-type move which does above-average damage and has a 30% chance of paralysis to a target. Many Pokémon can learn this excellent move. | |||
[[File: | |||
The Sailors in the basement may not give as much cash as the Gentlemen, but they're easy to defeat if you have strong Electric or Grass Pokémon, and defeating them gives you access to some useful items, including '''TM 44''', which contains Rest, a skill that can be learned by any Pokémon that can use TMs. It completely fills that Pokémon's life bar, but puts it to sleep in return for two turns (also an extra turn in Generation I only where it also won't perform an action when it wakes up either), so only give it to a Pokémon (maybe Jigglypuff or something) that's tough enough to survive the beat-down it's going to receive while asleep. Or, better yet, don't use it at all, since opponents can easily damage the sleeping Pokémon back up and Potions are usually the better option because item uses go first in the sequence of turns. | |||
In the very last room in the basement, if you examine the pillow on the bed, you will be awarded with a '''Hyper Potion'''! | |||
==1F== | |||
[[File:Pokemon RBY S.S. Anne 1F.png|left|thumb|300px|S.S. Anne 1F]] | |||
{| {{prettytable|float=left|style=ont-size:smaller}} | |||
| | |||
|- | |- | ||
|style="background:#c080ff"|A | |style="background:#c080ff"|A | ||
| Line 42: | Line 27: | ||
|} | |} | ||
{{-}} | {{-}} | ||
===Trainers=== | |||
{{ContentBoxContainer}} | |||
{{Pokemon/Trainer|RB}} | |||
{{Pokemon/Trainer row|RB|Gentleman||1260}} | |||
{{Pokemon/Trainer mon|RB|058|18}} | |||
{{Pokemon/Trainer mon|RB|058|18}} | |||
{{Pokemon/Trainer row|RB|Gentleman||1330}} | |||
{{Pokemon/Trainer mon|RB|032|19}} | |||
{{Pokemon/Trainer mon|RB|029|19}} | |||
{{Pokemon/Trainer row|RB|Lass||270}} | |||
{{Pokemon/Trainer mon|RB|016|18}} | |||
{{Pokemon/Trainer mon|RB|029|18}} | |||
{{Pokemon/Trainer row|RB|Youngster||315}} | |||
{{Pokemon/Trainer mon|RB|032|21}} | |||
|} | |||
{{Pokemon/Trainer|YEL}} | |||
{{Pokemon/Trainer row|YEL|Gentleman||1260}} | |||
{{Pokemon/Trainer mon|YEL|058|18}} | |||
{{Pokemon/Trainer mon|YEL|058|18}} | |||
{{Pokemon/Trainer row|YEL|Gentleman||1330}} | |||
{{Pokemon/Trainer mon|YEL|032|19}} | |||
{{Pokemon/Trainer mon|YEL|029|19}} | |||
{{Pokemon/Trainer row|YEL|Lass||270}} | |||
{{Pokemon/Trainer mon|YEL|016|18}} | |||
{{Pokemon/Trainer mon|YEL|029|18}} | |||
{{Pokemon/Trainer row|YEL|Youngster||315}} | |||
{{Pokemon/Trainer mon|YEL|032|21}} | |||
|} | |||
</div> | |||
==B1F== | |||
[[File:Pokemon RBY S.S. Anne B1F.png|left|thumb|300px|S.S. Anne B1F]] | |||
{| {{prettytable|float=left|style=font-size:smaller}} | {| {{prettytable|float=left|style=font-size:smaller}} | ||
|- | |- | ||
|style="background:#c080ff"|A | |style="background:#c080ff"|A | ||
|colspan="2"|Max Potion | |colspan="2"|Max Potion | ||
|- | |- | ||
|style="background:#c080ff"|B | |style="background:#c080ff"|B | ||
| Line 107: | Line 73: | ||
|} | |} | ||
{{-}} | {{-}} | ||
{| {{ | ===Trainers=== | ||
| | {{ContentBoxContainer}} | ||
| | {{Pokemon/Trainer|RB}} | ||
| | {{Pokemon/Trainer row|RB|Sailor||595}} | ||
| | {{Pokemon/Trainer mon|RB|090|21}} | ||
| | {{Pokemon/Trainer row|RB|Sailor||510}} | ||
| | {{Pokemon/Trainer mon|RB|116|17}} | ||
| | {{Pokemon/Trainer mon|RB|090|17}} | ||
| | {{Pokemon/Trainer mon|RB|072|17}} | ||
| | {{Pokemon/Trainer row|RB|Sailor||510}} | ||
| | {{Pokemon/Trainer mon|RB|116|17}} | ||
| | {{Pokemon/Trainer mon|RB|116|17}} | ||
| | {{Pokemon/Trainer mon|RB|116|17}} | ||
| | {{Pokemon/Trainer row|RB|Sailor||540}} | ||
| | {{Pokemon/Trainer mon|RB|072|18}} | ||
| | {{Pokemon/Trainer mon|RB|120|18}} | ||
| | {{Pokemon/Trainer row|RB|Fisherman||595}} | ||
{{Pokemon/Trainer mon|RB|072|17}} | |||
{{Pokemon/Trainer mon|RB|120|17}} | |||
{{Pokemon/Trainer mon|RB|090|17}} | |||
{{Pokemon/Trainer row|RB|Sailor||600}}{{Pokemon/Trainer mon|RB|066|20}} | |||
|} | |||
{{Pokemon/Trainer|YEL}} | |||
{{Pokemon/Trainer row|YEL|Sailor||595}} | |||
{{Pokemon/Trainer mon|YEL|090|21}} | |||
{{Pokemon/Trainer row|YEL|Sailor||510}} | |||
{{Pokemon/Trainer mon|YEL|116|17}} | |||
{{Pokemon/Trainer mon|YEL|090|17}} | |||
{{Pokemon/Trainer mon|YEL|072|17}} | |||
{{Pokemon/Trainer row|YEL|Sailor||510}} | |||
{{Pokemon/Trainer mon|YEL|116|17}} | |||
{{Pokemon/Trainer mon|YEL|116|17}} | |||
{{Pokemon/Trainer mon|YEL|116|17}} | |||
{{Pokemon/Trainer row|YEL|Sailor||540}} | |||
{{Pokemon/Trainer mon|YEL|072|18}} | |||
{{Pokemon/Trainer mon|YEL|120|18}} | |||
{{Pokemon/Trainer row|YEL|Fisherman||595}} | |||
{{Pokemon/Trainer mon|YEL|072|17}} | |||
{{Pokemon/Trainer mon|YEL|120|17}} | |||
{{Pokemon/Trainer mon|YEL|090|17}} | |||
{{Pokemon/Trainer row|YEL|Sailor||600}}{{Pokemon/Trainer mon|YEL|066|20}} | |||
|} | |} | ||
</div> | |||
==2F== | |||
[[File:Pokemon RBY S.S. Anne 2F.png|left|thumb|300px|S.S. Anne 2F]] | |||
{| {{prettytable|float=left|style=font-size:smaller}} | {| {{prettytable|float=left|style=font-size:smaller}} | ||
|- | |- | ||
|style="background:#c080ff"|A | |style="background:#c080ff"|A | ||
| Line 150: | Line 131: | ||
{{-}} | {{-}} | ||
== | ===Trainers=== | ||
{| {{ | {{ContentBoxContainer}} | ||
| | {{Pokemon/Trainer|RB}} | ||
| | {{Pokemon/Trainer row|RB|Fisherman||350}} | ||
| | {{Pokemon/Trainer mon|RB|118|17}} | ||
| | {{Pokemon/Trainer mon|RB|072|17}} | ||
| | {{Pokemon/Trainer mon|RB|118|17}} | ||
| | {{Pokemon/Trainer row|RB|Gentleman||1610}} | ||
| | {{Pokemon/Trainer mon|RB|025|23}} | ||
| | {{Pokemon/Trainer row|RB|Gentleman||1190}} | ||
| | {{Pokemon/Trainer mon|RB|058|17}} | ||
| | {{Pokemon/Trainer mon|RB|077|17}} | ||
| | {{Pokemon/Trainer row|RB|Lass||270}} | ||
| | {{Pokemon/Trainer mon|RB|019|18}} | ||
| | {{Pokemon/Trainer mon|RB|025|18}} | ||
| | |} | ||
| | {{Pokemon/Trainer|YEL}} | ||
| | {{Pokemon/Trainer row|YEL|Fisherman||350}} | ||
| | {{Pokemon/Trainer mon|YEL|118|17}} | ||
| | {{Pokemon/Trainer mon|YEL|072|17}} | ||
| | {{Pokemon/Trainer mon|YEL|118|17}} | ||
| | {{Pokemon/Trainer row|YEL|Gentleman||1540}} | ||
| | {{Pokemon/Trainer mon|YEL|100|22}} | ||
| | {{Pokemon/Trainer mon|YEL|081|22}} | ||
| | {{Pokemon/Trainer row|YEL|Gentleman||1190}} | ||
| | {{Pokemon/Trainer mon|YEL|058|17}} | ||
| | {{Pokemon/Trainer mon|YEL|077|17}} | ||
{{Pokemon/Trainer row|YEL|Lass||300}} | |||
{{Pokemon/Trainer mon|YEL|039|20}} | |||
|} | |} | ||
</div> | |||
===Rival Battle #4=== | |||
Your rival makes another appearance and demands another battle. This battle should be very easy if you know what to do. While you had Routes 24, 25, and 6, plus Cerulean Gym and the rest of the S.S. Anne, to raise your Pokémon some 5-6 levels from where they were after the last fight, your rival raised his about two apiece. And he didn't even add anything. | Your rival makes another appearance and demands another battle. This battle should be very easy if you know what to do. While you had Routes 24, 25, and 6, plus Cerulean Gym and the rest of the S.S. Anne, to raise your Pokémon some 5-6 levels from where they were after the last fight, your rival raised his about two apiece. And he didn't even add anything. | ||
What this means is that your strategy for all versions remains basically the same. Use Pikachu on the bird, Mankey in Yellow against the Normals, etc. However, you should have added three more Pokémon since that fight: a Grass-type (Bellsprout/Oddish), Diglett and Kadabra (by evolving Abra). As such, you can use a new strategy, assuming all your Pokémon are L22+. | What this means is that your strategy for all versions remains basically the same. Use Pikachu on the bird, Mankey in Yellow against the Normals, etc. However, you should have added three more Pokémon since that fight: a Grass-type (Bellsprout/Oddish), Diglett and Kadabra (by evolving Abra). As such, you can use a new strategy, assuming all your Pokémon are L22+. | ||
{{ContentBoxContainer}} | |||
{{Pokemon/Trainer|RB}} | |||
|+'''If you chose Bulbasaur''' | |||
{{Pokemon/Trainer row|RB|Rival Blue||1300}} | |||
{{Pokemon/Trainer mon|RB|017|19}} | |||
{{Pokemon/Trainer mon|RB|064|18}} | |||
{{Pokemon/Trainer mon|RB|020|16}} | |||
{{Pokemon/Trainer mon|RB|005|20}} | |||
|} | |||
{{Pokemon/Trainer|RB}} | |||
|+'''If you chose Charmander''' | |||
{{Pokemon/Trainer row|RB|Rival Blue||1300}} | |||
{{Pokemon/Trainer mon|RB|017|19}} | |||
{{Pokemon/Trainer mon|RB|064|18}} | |||
{{Pokemon/Trainer mon|RB|020|16}} | |||
{{Pokemon/Trainer mon|RB|008|20}} | |||
|} | |||
{{Pokemon/Trainer|RB}} | |||
|+'''If you chose Squirtle''' | |||
{{Pokemon/Trainer row|RB|Rival Blue||1300}} | |||
{{Pokemon/Trainer mon|RB|017|19}} | |||
{{Pokemon/Trainer mon|RB|064|18}} | |||
{{Pokemon/Trainer mon|RB|020|16}} | |||
{{Pokemon/Trainer mon|RB|002|20}} | |||
|} | |||
</div> | |||
;Red and Blue | ;Red and Blue | ||
Pidgeotto leads. Pikachu defeats it with a Thundershock or two, same as always. The next one is the biggest threat: his Abra evolved, which means it can actually hurt you this time. As Kadabra, it has a lot of power to sweep your team with its STAB, {{bp|Confusion}}, thanks to its high special stat. However, Kadabra's main drawback is that it is generally weak, defensively. Fearow is up to the task, fortunately; it should be faster, for starters, and it has Peck and Fury Attack running off of a high Attack hitting a very low Defense. Just attack with Fearow and K.O. it quickly. Raticate is next, and while it still has the obnoxious Hyper Fang move, it has ceased to be a noteworthy threat. Use a fast, hard-hitting Pokémon (such as Kadabra | Pidgeotto leads. Pikachu defeats it with a Thundershock or two, same as always. The next one is the biggest threat: his Abra evolved, which means it can actually hurt you this time. As Kadabra, it has a lot of power to sweep your team with its STAB, {{bp|Confusion}}, thanks to its high special stat. However, Kadabra's main drawback is that it is generally weak, defensively. Fearow is up to the task, fortunately; it should be faster, for starters, and it has Peck and Fury Attack running off of a high Attack hitting a very low Defense. Just attack with Fearow and K.O. it quickly. Raticate is next, and while it still has the obnoxious Hyper Fang move, it has ceased to be a noteworthy threat. Use a fast, hard-hitting Pokémon (such as Kadabra or Fearow) to beat it in one hit, before it can start being annoying. Finally, the starter also evolved, but the strategy didn't need to evolve with it. Use Fearow (Peck) or Kadabra (Confusion) on Ivysaur, Geodude (or Sandshrew in Blue) on Charmeleon, and Bellsprout/Oddish/Pikachu (Vine Whip/Absorb/Thundershock) on Wartortle. If you've already gone to Diglett's Cave to the east of town, you can also use Diglett (Dig) on Raticate and Charmeleon. | ||
{{ContentBoxContainer}} | |||
{{Pokemon/Trainer|YEL}} | |||
{{Pokemon/Trainer row|YEL|Rival Blue||1300}} | |||
{{Pokemon/Trainer mon|YEL|021|19}} | |||
{{Pokemon/Trainer mon|YEL|027|18}} | |||
{{Pokemon/Trainer mon|YEL|019|16}} | |||
{{Pokemon/Trainer mon|YEL|133|20}} | |||
|} | |||
</div> | |||
;Yellow | ;Yellow | ||
| Line 194: | Line 216: | ||
Once you've received HM01 your quest is complete, and the ship will sail off as soon as you set foot on dry land. So if you'd like to visit the kitchen or the other decks (to fight the other guests and crew for EXP, cash, and prizes), you might want to save the Captain for last. Once that ship is gone, you can never come back to it, so finish whatever you need to do before you exit the ship, such as getting the two TMs available here. | Once you've received HM01 your quest is complete, and the ship will sail off as soon as you set foot on dry land. So if you'd like to visit the kitchen or the other decks (to fight the other guests and crew for EXP, cash, and prizes), you might want to save the Captain for last. Once that ship is gone, you can never come back to it, so finish whatever you need to do before you exit the ship, such as getting the two TMs available here. | ||
==Deck== | |||
[[File:Pokemon RBY S.S. Anne Deck.png|left|thumb|300px|S.S. Anne Upper Deck]] | |||
{{-}} | |||
{{ | ===Trainers=== | ||
{{ContentBoxContainer}} | |||
{| | {{Pokemon/Trainer|RB}} | ||
| | {{Pokemon/Trainer row|RB|Sailor||510}} | ||
{{Pokemon/Trainer mon|RB|066|17}} | |||
| | {{Pokemon/Trainer mon|RB|072|17}} | ||
| | {{Pokemon/Trainer row|RB|Sailor||540}} | ||
| | {{Pokemon/Trainer mon|RB|066|18}} | ||
| | {{Pokemon/Trainer mon|RB|090|18}} | ||
|} | |||
| | {{Pokemon/Trainer|YEL}} | ||
| | {{Pokemon/Trainer row|YEL|Sailor||510}} | ||
{{Pokemon/Trainer mon|YEL|066|17}} | |||
| | {{Pokemon/Trainer mon|YEL|072|17}} | ||
| | {{Pokemon/Trainer row|YEL|Sailor||540}} | ||
{{Pokemon/Trainer mon|YEL|066|18}} | |||
{{Pokemon/Trainer mon|YEL|090|18}} | |||
|} | |} | ||
</div> | |||
{{Footer Nav|game=Pokémon Red and Blue|prevpage=Vermilion City|nextpage=Route | {{Footer Nav|game=Pokémon Red and Blue|prevpage=Vermilion City|nextpage=Route 11}} | ||
Latest revision as of 15:39, 15 April 2024
This ship caters to some of the world's most renowned Pokémon trainers. In fact, the S.S. Anne is on its annual Pokémon cruise, where amateurs and professionals meet for a series of duels. Though not a trainer himself, the captain will give you Cut (HM 01), which will allow you to hack through the bush that blocks your path to the Vermilion City Gym.
All aboard![edit]
When you talk to the guard near the Vermilion City harbor, flash your S.S. Ticket to him stationed at the docks, and you'll be allowed onto the massive cruise liner.
If you want to get straight down to business, take stairway C, then stairway E all the way to the Captain's cabin. But be forewarned: your rival is after the same thing, and he'll be ready for a battle when you two cross paths when you're near the Captain's cabin.

The rest of the ship is completely optional, but you may find it worth your while to explore a little and spend time battling to grind out some experience points. An important thing to remember is that if you do not do the rival battle and see the captain, you can go on and off at your leisure. Also, stop in the kitchen (B) and root through the trash for a Great Ball. TM08 can be located at the fourth room left from the entrance. The TM contains Body Slam, a Normal-type move which does above-average damage and has a 30% chance of paralysis to a target. Many Pokémon can learn this excellent move.
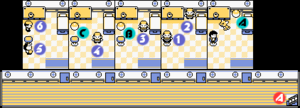
The Sailors in the basement may not give as much cash as the Gentlemen, but they're easy to defeat if you have strong Electric or Grass Pokémon, and defeating them gives you access to some useful items, including TM 44, which contains Rest, a skill that can be learned by any Pokémon that can use TMs. It completely fills that Pokémon's life bar, but puts it to sleep in return for two turns (also an extra turn in Generation I only where it also won't perform an action when it wakes up either), so only give it to a Pokémon (maybe Jigglypuff or something) that's tough enough to survive the beat-down it's going to receive while asleep. Or, better yet, don't use it at all, since opponents can easily damage the sleeping Pokémon back up and Potions are usually the better option because item uses go first in the sequence of turns.
In the very last room in the basement, if you examine the pillow on the bed, you will be awarded with a Hyper Potion!
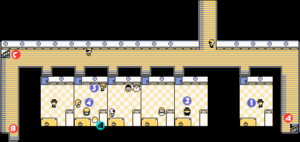
1F[edit]

| A | TM 08 | |
| B | Great Ball | |
Trainers[edit]
| Red and Blue | |
|---|---|
| Trainer | Pokemon |
 Gentleman Reward: |
|
 Gentleman Reward: |
|
 Lass Reward: |
|
 Youngster Reward: |
|
| Yellow | |
|---|---|
| Trainer | Pokemon |
 Gentleman Reward: |
|
 Gentleman Reward: |
|
 Lass Reward: |
|
 Youngster Reward: |
|
B1F[edit]

| A | Max Potion | |
| B | Ether | |
| C | TM 44 | |
Trainers[edit]
| Red and Blue | |
|---|---|
| Trainer | Pokemon |
 Sailor Reward: |
|
 Sailor Reward: |
|
 Sailor Reward: |
|
 Sailor Reward: |
|
 Fisherman Reward: |
|
 Sailor Reward: |
|
| Yellow | |
|---|---|
| Trainer | Pokemon |
 Sailor Reward: |
|
 Sailor Reward: |
|
 Sailor Reward: |
|
 Sailor Reward: |
|
 Fisherman Reward: |
|
 Sailor Reward: |
|
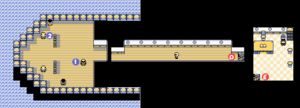
2F[edit]

| A | Max Ether | |
| B | Rare Candy | |
Trainers[edit]
| Red and Blue | |
|---|---|
| Trainer | Pokemon |
 Fisherman Reward: |
|
 Gentleman Reward: |
|
 Gentleman Reward: |
|
 Lass Reward: |
|
| Yellow | |
|---|---|
| Trainer | Pokemon |
 Fisherman Reward: |
|
 Gentleman Reward: |
|
 Gentleman Reward: |
|
 Lass Reward: |
|
Rival Battle #4[edit]
Your rival makes another appearance and demands another battle. This battle should be very easy if you know what to do. While you had Routes 24, 25, and 6, plus Cerulean Gym and the rest of the S.S. Anne, to raise your Pokémon some 5-6 levels from where they were after the last fight, your rival raised his about two apiece. And he didn't even add anything.
What this means is that your strategy for all versions remains basically the same. Use Pikachu on the bird, Mankey in Yellow against the Normals, etc. However, you should have added three more Pokémon since that fight: a Grass-type (Bellsprout/Oddish), Diglett and Kadabra (by evolving Abra). As such, you can use a new strategy, assuming all your Pokémon are L22+.
| Red and Blue | |
|---|---|
| Trainer | Pokemon |
 Rival Blue Reward: |
|
| Red and Blue | |
|---|---|
| Trainer | Pokemon |
 Rival Blue Reward: |
|
| Red and Blue | |
|---|---|
| Trainer | Pokemon |
 Rival Blue Reward: |
|
- Red and Blue
Pidgeotto leads. Pikachu defeats it with a Thundershock or two, same as always. The next one is the biggest threat: his Abra evolved, which means it can actually hurt you this time. As Kadabra, it has a lot of power to sweep your team with its STAB, Confusion, thanks to its high special stat. However, Kadabra's main drawback is that it is generally weak, defensively. Fearow is up to the task, fortunately; it should be faster, for starters, and it has Peck and Fury Attack running off of a high Attack hitting a very low Defense. Just attack with Fearow and K.O. it quickly. Raticate is next, and while it still has the obnoxious Hyper Fang move, it has ceased to be a noteworthy threat. Use a fast, hard-hitting Pokémon (such as Kadabra or Fearow) to beat it in one hit, before it can start being annoying. Finally, the starter also evolved, but the strategy didn't need to evolve with it. Use Fearow (Peck) or Kadabra (Confusion) on Ivysaur, Geodude (or Sandshrew in Blue) on Charmeleon, and Bellsprout/Oddish/Pikachu (Vine Whip/Absorb/Thundershock) on Wartortle. If you've already gone to Diglett's Cave to the east of town, you can also use Diglett (Dig) on Raticate and Charmeleon.
- Yellow
This strategy is literally the exact same thing as in Cerulean. Use Mankey on the Normals, Ivysaur on Sandshrew, and Pikachu on Spearow.
Victory![edit]
Once you've defeated your rival, you're free to visit the seasick Captain and exchange a back rub for HM01, which teaches Cut to Pokémon that can learn it. As an attack it's worthless because of its low power, but when used outside of battle it lets you cut down those trees that are always blocking your way. This includes the tree that was blocking the Vermilion City Gym.
Once you've received HM01 your quest is complete, and the ship will sail off as soon as you set foot on dry land. So if you'd like to visit the kitchen or the other decks (to fight the other guests and crew for EXP, cash, and prizes), you might want to save the Captain for last. Once that ship is gone, you can never come back to it, so finish whatever you need to do before you exit the ship, such as getting the two TMs available here.
Deck[edit]

