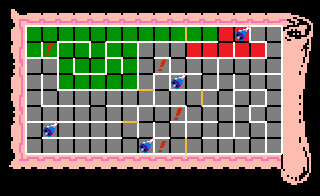
Grey: rooms cleared in previous pages.
Room K-2[edit]
| Strategy | ★★★ | Agility | ★★★ |
|---|
- Solution
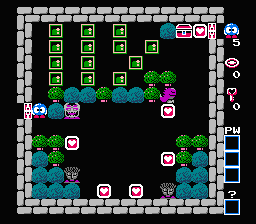
In order to complete this stage so that you never have to put Lolo at risk, you'd need seven free Emerald Frames. However, because of the starting configuration of frames at the top, the most that you can access and move down to the lower half is six. As a result, there are two different solutions for this stage. Both involve a fair degree of risk since you are required to run into spaces where the Don Medusa might see you. In one solution, you must risk getting seen by the Don Medusa when collecting the left Heart Frame in order to spare one Emerald Frame to block the Gol. In the other solution, you don't block the Gol, and you don't completely block the Don Medusa from seeing the left Heart Frame, saving that frame for last and walking across the top to bypass the Gol on the way to the chest.
The complicated nature of this stage makes it difficult to spell out each and every move that you should make. Instead, knowing how to properly set up the top will allow you to maneuver six Emerald Frames along the top down into the bottom so that you can position them around the Don Medusa and two Medusas that view the Heart Frames. Start by pushing the lowest Emerald Frame along the left column to the right, as well as the frame two spaces above it. Then push the frame between those two up. Additionally, push the second frame that you pushed up to the top wall. Stand to the left of the frame that has two spaces open to the right, and push it all the way over. However, watch the Don Medusa below as it can see you through the tree below you. Then walk up to the top and push the frame on your right all the way over. You now have six Emerald Frames available to be positioned. When the time comes to move the two frames that touch near the bottom, push the lowest frame over to the right in order to push the left frame up one space.
Once you have the frames accessible, begin moving each frame out, one at a time from right to left. Do this by moving them to the right until they are below the treasure chest, and then moving them down to the trees below. Then push them left and position them where necessary. For both solutions, you'll need to position a frame above both Medusas and along side them so that they can't see the center of the room.
In the solution where you block the Gol, you must push one Emerald Frame up to the right of the Don Medusa, but don't push it over until you have blocked the left Medusa's sight upward. Then collected the left Heart Frame by approaching it from the left, and running away before the Don Medusa returns and sees you. Then you can position your sixth and final frame in front of the Gol and run straight for the chest when you are ready.
In the solution where you don't block the Gol, you must place the sixth Emerald Frame one space above and one space to the right of the left Heart Frame. The Emerald Frame to the right of the Don Medusa should be placed no further to the left than halfway in front of the tree (which also has the benefit of blocking the Don Medusa's sight through the tree.) After you collect the last Heart Frame, run through the opening on the left when the Don Medusa is headed to the right, and then cross along the top to avoid the Gol entirely and reach the key.
Room L-2[edit]
| Strategy | ★★ | Agility | ★★★ |
|---|
- Solution
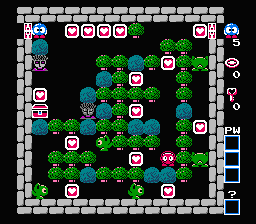
- Collect the four Heart Frames along the top near the entrance. Stay along the top and approach the Heart Frame in the upper right corner. Once you collect it, you will gain two egg shots, and a Leeper will be freed and follow you out. Let the Leeper follow you, and once it is two spaces to the left of the lone tree along the top wall, shoot it once. Push the egg to the right of the left Medusa and stand next to the egg until it hatches so that it goes to sleep next to the Medusa.
- Walk along the right wall and collect another Heart Frame for two more egg shots, and let the next Leeper out. Once again, shoot the Leeper once at the same location, and push the egg below the left Medusa. Stand by the egg and wait for the Leeper to hatch to put it to sleep. Do the same with the next Leeper, and push the egg down to the left of the right Medusa. Then you can collect the Heart Frame above the chest.
- Lure the next Leeper out, but don't shoot it if you don't have to. Instead, stand one square up and to the right of the boulder above the left Medusa. The Leeper should go to sleep above the first Leeper that you froze next to the Medusa. Let the final Leeper out, let it follow you and stop next to the Leeper that you most recently put to sleep. The last Leeper should fall asleep on the other side of Lolo, allowing you to move in and out freely.
- You should still have three egg shots at your disposal. Walk into the center of the room when the Alma is moving upward. When it approaches you, shoot it twice to remove it from the screen, collect the remaining Heart Frames, and then exit out to collect the key. Don't hesitate and give the Alma a chance to return to the screen and threaten you.
Room M-2[edit]
| Strategy | ★ | Agility | ★★★ |
|---|
- Solution
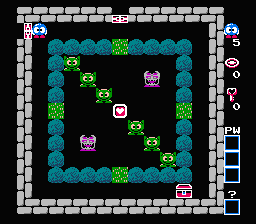
Because of the unpredictability of the Leepers in this room, there's very little planned strategy that you can employ to safely obtain the single Heart Frame without getting caught by the Don Medusas. Your safest approach is to enter the inner chamber through the grass at the bottom of the screen, and allow the Leepers to fall asleep to your left. It's ok if one or two fall asleep to your right, but you should not allow any to fall asleep above you. If you make a mistake, leave the room and return to reset the Leepers. Once you have a wall of Leepers on your left defending you from the Don Medusa that moves vertically, wait for the Don Medusa above to move to the left. Then collect the Heart Frame and run to the right in order to escape before the Don Medusa comes back and sees you. Once you are safely out, run to the key and collect it.
Fork room M-1[edit]
| Strategy | ★★★★ | Agility | ★★ |
|---|
- Solution
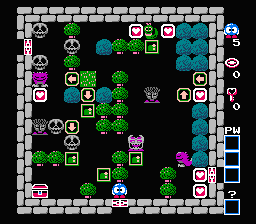
- Push the Emerald Frame that starts directly beneath the Don Medusa up one space. Then push the frame to the left of the trees up one space. Walk around to the left of the first frame and push it out half of one space so that it blocks both the Medusa's and the Don Medusa's vision below. Then walk back around to stand below it, and push it up to the Medusa.
- Return to the second frame that you pushed, push it up one space, then to the right four spaces. Walk around, stand beneath it, and push it up three spaces until it's to the right of the Medusa. Walk on the up arrow tile, and collect the Heart Frame to the right for two egg shots. Then come back to the up arrow tile, and move down.
- Walk to the Skull directly between an Emerald Frame and a down arrow tile. Shoot it once, and push the egg to the left two spaces to block the left Medusa's view below. Then push the nearby Emerald Frame down one space, then left one space. Then walk around to the left side of the frame and push it to the right three spaces. Walk around the trees above the entrance, and push the frame up from below two spaces. Then come to the left side and push it to the right four space. Push it up one space, then right one space, and then push it up through the up arrow tile. Stand on top of the left arrow tile, and push the frame to the left two and a half spaces, pinning the Don Medusa next to the Medusa.
- Collect the Heart Frame to the right of the Snakey, and the collect the one on the left. Shoot the Snakey and push it to the right. Then push the Emerald Frame that you stand above down one space. The stand to its right and push it all the way to the left until it hits the tree. Walk back around the top, and shoot the Skull between two trees and push it two spaces to the left. Then push the Emerald Frame down one space to the grass, and the left through the arrow tile two spaces. Come around and stand above the frame and push it down two spaces.
- Walk back around and push the Emerald Frame below the down arrow tile three spaces below. Then return to the Emerald Frame that you were previously pushing and push it to the left so that is sits between the left Medusa and the Heart Frame. Then collect the Heart Frame.
- Before you continue, stand below the Emerald Frame that you last pushed down, and push it back up one space, and to the left half of a space. This will ensure that the Skulls won't have a quick escape route where they can catch you on your way to the key. Stand above the Gol on the right, shoot it once, and push it down. Collect the last two Heart Frames, and start making your way back to the left to collect the key. Before you grab the key, make sure that a Skull is moving to block the left Medusa's view of the key, or you will get killed trying to collect it.
Once you have the key, you can go to the left or the right. It is recommended that you visit the room to the right first.
Room N-1[edit]
| Strategy | ★★ | Agility | ★★★★ |
|---|
- Solution
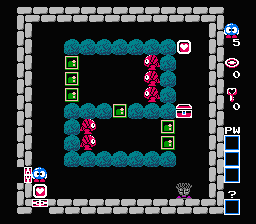
- Walk up to the trio of Emerald Frames along the top chamber that has three Almas inside. Push the center frame in one and a half spaces. Then push the bottom frame in three spaces so that it's over the frame between the two chambers.
- In what is perhaps the most difficult maneuver in the game, you must now push the center frame to the right half of a space, and then up half of a space, without letting any Almas squeeze out along the top. This can be incredibly frustrating and difficult, as it requires extremely precise timing. If you succeed, push this frame and the bottom frame all the way to the right, trapping the Almas in place against the back wall.
- Stand to the right of the top frame that you left alone, push it one space to the left, and then push it all the way down, in order to block the Medusa's view of the bottom Heart Frame. Collect the Heart Frame, and push the Emerald Frame all the way to the right until it sits against the Medusa.
- Return to the upper chamber and prepare to push the center block down. Once again, this requires extremely careful timing, as you attempt to free the lower two Almas without getting hit by them. Push the center frame down when both Almas are going to the right along the bottom of the chamber, and then quickly back out. Stand so that you lure them into rolling to the left, and then cut back up the middle and lure them back to the right. While they roll to the right get down to the lower portion of the room.
- If done correctly, the Almas should be hugging the wall of the inner chamber, and walking clockwise around it. When the coast is clear, step inside the lower chamber. Push the bottom Emerald Frame to the right one space, and push the top one out two spaces. Then dash up and collect the last Heart Frame, and return to collect the key before the Almas return.
Room N-2[edit]
| Strategy | ★★ | Agility | ★★ |
|---|
- Solution
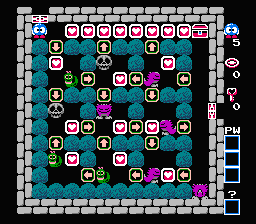
- Collect the row of hearts along the top. The last one will give you two egg shots.
- Return to the left, and walk down through the down arrow tile below the entrance. Collect the Heart Frame in the small chamber, then shoot the Snakey twice to remove him.
- Walk through the right arrow tile, and collect the Heart Frame inside for two more egg shots. Then walk down through the down arrow tile, and shoot the Gol below once. Push it down until the egg comes to rest on the up arrow tile below.
- Collect the Heart Frame in the center chamber, and walk through the right arrow tile to collect the next Heart Frame.
- Walk down through the down arrow tile, and collect the Heart Frame near the lower right corner for two egg shots. Double shoot the Gol to your left, and move through the left arrow tile.
- Collect the next Heart Frame, get two more egg shots, and shoot the Snakey once. Push the egg to the left, and walk up to collect another Heart Frame for two more egg shots.
- Double shoot the Snakey below the up arrow tile, and walk up through the arrow tile. Collect the Heart Frame to the right, then walk all the way to the right, and shoot the Gol at the end twice to remove him.
- Walk through the right arrow tile, and then walk up and back through the left arrow tile above. When you are ready, walk up and collect the last Heart Frame. The Skulls nearby will awake and start chasing you, so move immediately towards the key to collect it before the Skulls catch you. In a pinch, the last Heart Frame gives you two more egg shots, so you can shoot one of the Skulls to block the path if necessary.
Key room O-2[edit]
| Strategy | ★★★ | Agility | ★★ |
|---|
- Solution
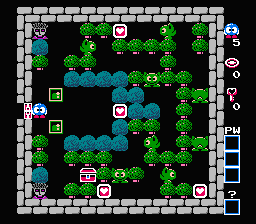
- Start out by moving the lower Emerald Frame down one space. Then move the top Emerald Frame down one space, and to the right two spaces. Hop in and collect the Heart Frame in between the boulders, and then have Lolo stand halfway out of the spot.
- Let the Leepers approach, but do not move from your current position until two Leepers are positioned, one above you and one below you. Then move the Emerald Frame out to the left half of a space, and stand next to it. Do not move until two more Leepers are asleep above and below you. Now a total of four Leepers should be asleep.
- Push the Emerald Frame out one space, but don't stand next to it until a Leeper is approaching from above. You only want to put a Leeper to sleep above you, not below you. If a Leeper falls asleep below you here, you will have to start over.
- Once five Leepers are asleep, three above and two below, let the remaining three Leepers bounce back to the end of the trail. If they don't return to the end, you may have to start over.
- Push either Emerald Frame all the way up and down respectively so that they block both Medusas' view to the right. The next steps require crucial timing, or you'll have to start over. Start by standing just below the entrance. Lure a Leeper down along the left side of the wall. Then walk over to the two sleeping Leepers on the bottom, luring the next Leeper to follow behind you. Walk up one space and to the right half of a space so that the sixth Leeper falls asleep alongside the two others.
- Next, stand next to the entrance. Another Leeper will ascend down the left wall. Walk up to it and put it to sleep just as it enters the corner along the left wall. Then stand below the entrance and let the final Leeper do the same thing, putting it to sleep as it touches the left wall. It does not matter if the Leepers end up blocking the entrance, as long as you have a clear path above and below.
- Now walk freely down the path collecting all of the remaining Heart Frames without fear of getting trapped by the Leepers or seen by the Medusa, and return to the lower left to collect the large key.
Now you should retrace your steps back to room M-1, and head west.
West room 1[edit]
| Strategy | ★ | Agility | ★ |
|---|
- Solution
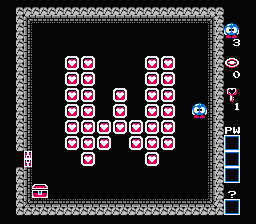
The first room of the West dungeon, like each of the other dungeons, begins with a bunch of Heart Frames laid out in the shape of a W. Collect them all and grab the key, and enter the room to the left.
West room 2[edit]
| Strategy | ★★★ | Agility | ★★ |
|---|
- Solution
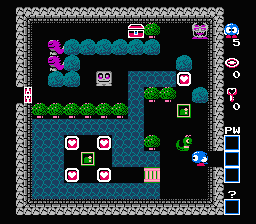
- Push the Emerald Frame above the Snakey over to the left, and carefully collect the Heart Frame above for two egg shots, without being seen by the Don Medusa.
- Collect the remaining for Heart Frames around the Emerald Frame, push the Emerald Frame down, and over to the left until it is under the Snakey. Push it up beneath the Snakey.
- Shoot the Snakey once. Then push it one space to the left. Push the Emerald Frame beneath it up to the Snakey's former position. Then push the egg up one space, walk around the frame, and push it left into the water, hopping on board.
- Get off on the other side of the river, but stay to the left of the boulders to protect yourself from the Don Medusa. Watch out for the Rocky walking around here.
- Wait for the Snakey to reappear to the left of the Don Medusa. Carefully walk to its left, shoot it with your remaining egg shot, and push the egg to the right while the Don Medusa is below the egg. Note that this creates a small window of opportunity for the Don Medusa to still shoot it if you sees you through the water.
- Make your way to the left side of the room, and use the Rocky to shield you from the Don Medusa when trying to reach the row above the trees if necessary. Then stand halfway between the boulder and the lowest of the two left-facing Gols. Lure theRocky over to you and let him shove you up the alley. He will absorb the fireballs from the Gols as they fire, protecting you from certain doom in the process. Then walk over and collect the key.
West room 3[edit]
| Strategy | ★ | Agility | ★★ |
|---|
- Solution
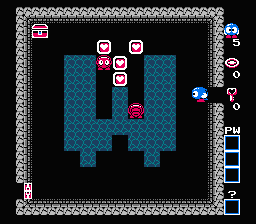
You must collect the four Heart Frames placed along the top of the W shaped pool, without getting hit by the Almas. Collect the two highest Heart Frames when the Almas are on their way down. The lure them out of the W, attract them to the bottom of the room, and return to the top to collect the last two Heart Frames, and the key. Get the Almas to line up with you and roll into balls to lure them off course.
West room 4[edit]
| Strategy | ★★ | Agility | ★★★ |
|---|
- Solution
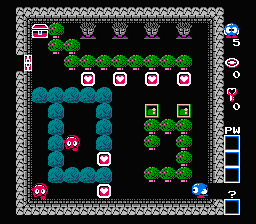
- Push the left Emerald Frame over until it is one space to the right and one space above the second lowest Heart Frame (blocking the Alma in the rectangular chamber). Just after the Alma passes the Heart Frame, collect it, and then quickly push the Emerald Frame down, keeping the Alma trapped in the chamber. If it gets out, you will need to reset the room, as it is extremely difficult, if not impossible, to lure the Alma back into its prison.
- Collect the lowest Heart Frame when the other Alma is on its way up. Then walk up and stand between the two rightmost Heart Frames below the Medusa. This should lure the Alma up along the right wall. Once the Alma passes you and walks below the Medusas, begin pushing the other Emerald Frame over to the left four spaces, down to the wall, and all the way into the lower left corner (where the lower Alma began the level.)
- Lure the Alma back down, get out of the way, and return to the space between the two rightmost Heart Frames. Let the Alma walk back up along the right wall, and start walking below the Medusas again. This time, as it walks below each Medusa, collect the Heart Frame that lies beneath them, including the one to Lolo's right which you must collect first, and then double back to the left.
- The key will appear, but you can't collect it without being seen by the left Medusa. The leftmost Heart Frame gave you two egg shots. Stay one row above the boulders, and the free Alma will see you and start rolling toward you. Shoot it twice to remove it from the screen. Because of the Emerald Frame you placed in the lower left corner, the Alma will reappear to the left of the left Medusa, allowing you to collect the key.
West god's room[edit]
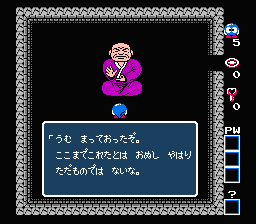
Translation: I was expecting you. You aren't any ordinary person to have gotten this far. However, that far-off land called hell is not where your mistress was taken. How about I teach you how to fell a tree with a mighty shout? There is nothing you can't crush.