| Well | |
|---|---|

| |
| Developer | Valve Software |
| Type | Standard Control Points (CP) |
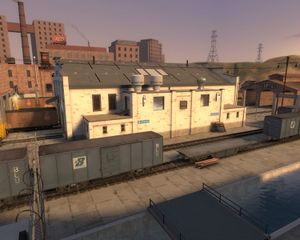
Well is a 2-way CP map. As it's name suggests, Well prominently features water in its map design.
The map has a few paths available to players, with teams capable of creating choke points.
Well is home to a few map-specific achievements:
- Lightning Offense: Win Well in 5 minutes or less.
- (Scout) Quick Hook: Kill a player in Well before the round starts.
Strategies[edit]
Scout[edit]
The scout can serve as a quick player to start capturing the first point. As with the spy, he can infiltrate the enemy base from his fast movement (although is easier to detect), and possibly attack a teleporter entrance.
They are effective in performing chain captures, especially with the final point.
Soldier[edit]
Soldiers are one of two classes capable of jumping over the center area before the round starts, but this doesn't give much tactical benefit.
Pyro[edit]
Pyros are slightly weaker on this map because of the water. However, they can patrol the battlements for spies as well as providing cover on some entrances or exits.
Demoman[edit]
Demomen are one of two classes capable of jumping over the center area before the round starts, but this doesn't give much tactical benefit. They may alternatively throw grenades over that section as well.
They are normally expected to perform grenade jumps over carts and ambush bases behind a train cart. As such, they can ambush bases located behind said card without too much warning.
A single demoman can block the water entrance into the central area, without the need of too much cover. Fire a few pipebombs on that exit, and move left and right against the opposite wall to detect any cloaked spies that try to approach. If you get blocked by an invisible spy or one is uncloaking, switch to the bottle and attack.
Heavy[edit]
Heavies serve as an assault force along side a medic; however, since the enemy team likely will do the same, the heavies should normally use the regular minigun.
Engineer[edit]
The engineer is somewhat valuable - as well is a tight map, his sentry guns usually provide coverage on the choke points within this map.
Base locations typically appear:
- On or near your final control point
- In the area with your water exit, covering one or both base entrances
- Outside your base, behind a train cart, covering one angle of attack (vulnerable to soldiers and demomen).
- Outside your base, in front of the train building (vulnerable)
- In the train-track area, lower floor (a rally point that covers all entrances, but is flankable)
- In the enemy base, on the upper floor(s).
Medic[edit]
As with all maps, the medic is essential. There will initially be an ubercharged pair coming into the central area; as such, you may want to heal your friends before the map starts, and deploy your charge a few seconds after the enemy deploys theirs.
Medics will want to heal heavies, soldiers, and other front line attackers (or otherwise be in a close location.) Their focus should be on building an übercharge, and deploying it on a pyro or soldier to break through the enemy lines.
Sniper[edit]
Snipers usually place themselves within the battlements, attacking enemies coming from the central building, or in the central building covering one entrance or targetting the battlements.
They are not as effective in defending the final control point, except in the three-story chamber before your second capture point. At that stage, enemies are coming from both above and the ground, and are likely to receive fire if they remain still.
There is not much reason to have more than two snipers on a team.
Spy[edit]
Spies are be dangerous in this map, especially on unsuspecting enemies. If they wish to be stealthy, they normally take the water path into the central train yard, and cloaking as they come out of the water. From there, they can sneak across the central building, dive into the water again, and sneak into the enemy base.
The priority targets should be the teleporter entrances, to slow down the attacking waves. However, extra damage can be done by sneaking up on enemies.
However, there isn't a need for more than one to infiltrate the enemy base, but there is no harm in having 2 or 3 spies as necessary.
