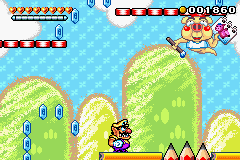
Hoggus (upper-right corner of screen) has just completed a Flying Poker. Watch out!
Hoggus: This pig artist flying in the background cannot be attacked. He will make his drawing from time to time while trying to keep in front of Wario, and when his artwork is completed, it will be realized into actual monster. There are two types of monsters which drop nothing.
Spiked Roly Poly: The first type of artwork enemy looks like a snail with spikes. Stomp the ground to make it filp, then stomp the side without spike to dispatch it.
Flying Poker: The second type of artwork enemy looks like a flying pig with sharp head. A bump from above or below is enough.
Blue Curtains: While they look like part of the wall, they actually hide the indoor area behind. When Wario is inside, the indoor layout will be revealed.
Crayon: Found in the side shafts, they act as standing platforms and can be pushed from the side. In normal version, there are only purple and blue ones, where purple ones start at left and blue ones at right. Red crayons only appear in hard and super hard version, where they must be pushed twice.
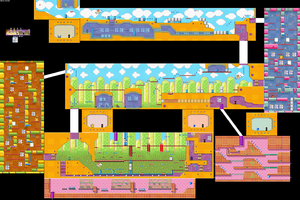
Entrance: Start your trip by getting on the red platform. Jump to reveal the mechanic of blue curtains. You will find 90 Gems, a Heart and the first Stone Chest. Proceed to the right.
Sky Area: Hoggus is here, move with caution while collecting Gems and Hearts. Some of the Gems and Hearts can only be collected by stepping on blocks before breaking them. Walk to the right end and drop to the lower floor. Here, you will find four blocks lined up below, break them all to discover a narrow ramp below, although it is stuck now, it will be useful later. Follow the arrow of Gems and drop to the room below.
Forest Area: The path to the right is blocked by folding gate, so proceed to the left. While dodging Hoggus' paintings, beware of the pencil on the ground - the sharp ends hurt. You may have noticed platforms high up, but ignore them first. Follow the Gems to lower floor, but before proceeding to the left, look at the block on the right. Break the block and go inside to find a hidden passage with more blocks, and charge inside to discover a pipe to Bonus Room B. When it is done, move to the left and jump into the curtains. Behind the first curtain is a Mini-Wario, 20 Gems and a Heart, then a second Mini-Wario between two curtains, and another two behind the second curtain. There is Door A hidden in the blocks of second curtain, and break into Door A to find the second Stone Chest. Follow the arrow of Gems on the left end and drop to the room below.
Bonus Room B: This is a loop room on both horizontal sides. Start rolling with the slope on the right. You will need to jump while rolling to hit the switch and change the path to lower area. Repeat until you roll over the Big Diamond at the basement, then repeat again to move upwards, until finally back to the top and hit the pipe to stop.
Ground Area: This time, move to the right first. Hoggus is again in the background releasing artwork monsters. Dodge the sharp pencils, break a wall of blocks, collect the Gems and run to the right end. The Key Ghost is shut behind folding gates, so you have to go upstairs and run to the left. There will be platforms in the middle, but instead of climbing up, crawl past the sharp pencils on the left, jump over platforms above sharp pencils, run to the left end and move up, and finally find the pipe to Bonus Room E, and the exit to the right. Now at the upmost floor, run to the right end, but before breaking the wall of blocks, wait until Hoggus makes a Flying Poker, then use that to Goomba-Jump to the ledge above, and move inside to find Door F with a Big Diamond inside. Back to the wall of blocks and break in, fall down to find the Frog Switch. Hurry Up!
Bonus Room E: In this room, you shall first stand on the visible platform to see through the curtain and remember the position of platforms in front, then, when you land on one of the platforms above the spikes, the curtain will reappear and you have to proceed according to your memory. Repeat the process three times until you reach the Big Diamond in the far end, then use the slope for a quick return.
Ground Area (return): Now that you have activated the Frog Switch, all folding doors will be open. Run off the ledge on the right, then run to the left to collect the Key Ghost. Now you have no choice but to roll down the slope and into the ramp on the left and finally hit the left end. Go upwards and you will return to the entrance. This time, move to the left pass the folding gate.
Left Shaft: You may have seen the drawings of Dancing Pigs on the wall before, but watch out, as some of them may come to live and start spinning around. Use the crayons to move upwards while taking out the Mini-Warios in the way, and you will find the third Stone Chest on the right side in the middle. At top of the shaft, push the purple crayon to the right to make a platform, then climb to the top, and use the crayon to leave from the right. You can choose to fall to below for three Hearts, in expense of a few seconds.
Forest Area (return): You appear at the upper floor. Use the slope on the left to start rolling, collect the Gems, and jump onto every platform you meet. Shall you have succeeded, you will reach the upmost area with a Big Diamond behind the curtain, and land on the right end directly, otherwise, you shall run to the right via the coming path. Enter the folding door on the right.
Right Shaft: If you still have time, push the blue crayon to the left if needed, then stomp the ground for a few times to shake the Apple Ape upward, then get Fat Wario and move to the right side, break the hard block and fall below, run to the left and back to a hidden portion of Forest Area, revealing Door G with a Big Diamond inside. When it is done, push the blue crayon to the right and proceed upwards. Right above the blue crayon, there is a Dancing Pig, but instead of killing it, stun it and carry to the left, then wait for it to get up and use it for Goomba Jump to reach additional 600 Gems above. Collect the fourth Stone Chest in the middle level, but beware of the Spear Masks and Dancing Pigs. At top of the room, you must push two crayons to the left to reach the exit at upperleft corner.
Sky Area (return): If you have not freed the ramp below, run all the way to the left and escape. Otherwise, roll down the slope and enter the ramp, and reach the curtained area with more Dancing Pigs. Before returning to the upper portion, run to the left end to find Door H with CD Chest inside. When everything is done, return to the entrance and escape.
Sky Area: Two Mini-Warios are roaming. You must clear the path since there is an important chest inside.
Forest Area: It is uncommon to have extra Heart and Gems above first set of pencils. There are three more Mini-Warios at curtain area.
Ground Area: There are 20 Gems below first set of downward pencils. The second Stone Chest sits behind Door F.
Left Shaft: More Dancing Pigs around. The third blue crayon becomes red and is on the left, push it to reach the CD Chest on the right. The second purple crayon becomes blue.
Forest Area (return): A Mini-Wario is patrolling around the slope, and another in the room with Big Diamond.
Right Shaft: You must enter Door G to find the third Stone Chest. All Spear Masks have been replaced with Dancing Pigs. No Stone Chest in the shaft. The second highest crayon is red.
Sky Area (return): You must enter Door H to find the fourth Stone Chest.
Only the differences from hard version will be listed.
Sky Area: More Mini-Warios.
Forest Area: There are some Mini-Warios at right half.
Ground Area: Mini-Warios are roaming everywhere.
Bonus Room E: There will be Mini-Warios on the platforms. It is recommended to shake them off first.
Ground Area (return): Oddly, the Key Ghost is not at his usual place.
Left Shaft: Even more Dancing Pigs.
Forest Area: It is recommended to roll all the way, since instead of Big Diamond, you will find more Mini-Warios in the curtain room.
Right Shaft: There is a Spear Mask at the entrance. Some of the Dancing Pigs are not "placed" on the canvas in the background. At top of room, the Key Ghost is in the right shaft, and in order to escape with him, you must push the lower blue crayon for three times totally.
Sky Area (return): More Dancing Pigs in the tunnel.