No edit summary |
Trig Jegman (talk | contribs) mNo edit summary |
||
| (12 intermediate revisions by 5 users not shown) | |||
| Line 1: | Line 1: | ||
-- | {{needimage}} | ||
{{Header Nav|game=Wolfenstein: Enemy Territory}} | |||
The game, being entirely multiplayer, is extremely open-ended. Included with the game are two campaigns, each with three maps. Not covered in this walkthrough are all the other player-made maps. The campaigns are as follows: | |||
{{col|2|begin}} | |||
'''Northern Europe''' | |||
* [[Wolfenstein: Enemy Territory/Würzburg Radar|Würzburg Radar]] | |||
* [[Wolfenstein: Enemy Territory/Rail Gun|Rail Gun]] | |||
* [[Wolfenstein: Enemy Territory/Fuel Dump|Fuel Dump]] | |||
{{col|2}} | |||
'''North Africa''' | |||
* [[Wolfenstein: Enemy Territory/Siwa Oasis|Siwa Oasis]] | |||
* [[Wolfenstein: Enemy Territory/Seawall Battery|Seawall Battery]] | |||
* [[Wolfenstein: Enemy Territory/Gold Rush|Gold Rush]] | |||
{{col|2|end}} | |||
Various maps, not only these, make use of several key features which should be documented, but are not large enough to warrant their own page. | |||
== | ==Command Posts== | ||
[[File:WET Allied command post.jpg|left|Allied Command Post]][[File:WET Axis command post.jpg|right|Axis Command Post]] | |||
Command posts look like large cabinets with a team flag on them, or they have a power icon on them. Command posts can be constructed by engineers. Setting up a command post will allow all players on that team to have their power bars charge quicker - medics can drop more health packs, field ops can throw more airstrikes and call more artillery, etc. Command posts are represented on the command map as one of two icons, seen left (Allies) or right (Axis). Command posts can be destroyed via either satchel charges or dynamite, but satchel charges are the preferred way because it is quicker, and there is no mapwide alert ("Dynamite Planted!"). | |||
==Team Doors== | |||
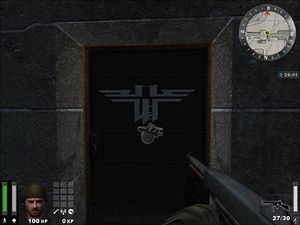
[[File:WET Team Door.jpg|right|thumb|Team Doors are locked to players of the opposite team.]] | |||
Team doors are special doors with a team's emblem on it. These doors can be opened only by a player on that side (most team doors are Axis-owned, since the Allies are on the offense most of the time). Team doors can be used as shortcuts to reach certain areas ahead of time. When opened, team doors create a loud "creak" which can alert nearby players that the door is being opened. Said doors, however, can also be opened silently. Team doors stay open for a few seconds before closing. | |||
It should be noted that team doors can be opened by the opposite team if they are opened by a covert ops disguised in an enemy uniform. This allows them to skip areas they may ordinarily have to fight through. The best example is on Fuel Dump, in which the Allies can bypass the initial Axis defences, use the team door to reach the objective and destroy it without having to get the tank past the Axis defences. This can either provide a distraction (the Axis players must rush to respawn at the fuel dump to defend it against the infiltrators) or win the game (if the Axis players do not attempt to defend the objective, it will explode and cause them to lose the game). | |||
{{Footer Nav|game=Wolfenstein: Enemy Territory|nextpage=Siwa Oasis|prevpage=}} | |||
Latest revision as of 23:15, 28 August 2023
The game, being entirely multiplayer, is extremely open-ended. Included with the game are two campaigns, each with three maps. Not covered in this walkthrough are all the other player-made maps. The campaigns are as follows:
Northern Europe
North Africa
Various maps, not only these, make use of several key features which should be documented, but are not large enough to warrant their own page.
Command Posts[edit]


Command posts look like large cabinets with a team flag on them, or they have a power icon on them. Command posts can be constructed by engineers. Setting up a command post will allow all players on that team to have their power bars charge quicker - medics can drop more health packs, field ops can throw more airstrikes and call more artillery, etc. Command posts are represented on the command map as one of two icons, seen left (Allies) or right (Axis). Command posts can be destroyed via either satchel charges or dynamite, but satchel charges are the preferred way because it is quicker, and there is no mapwide alert ("Dynamite Planted!").
Team Doors[edit]

Team doors are special doors with a team's emblem on it. These doors can be opened only by a player on that side (most team doors are Axis-owned, since the Allies are on the offense most of the time). Team doors can be used as shortcuts to reach certain areas ahead of time. When opened, team doors create a loud "creak" which can alert nearby players that the door is being opened. Said doors, however, can also be opened silently. Team doors stay open for a few seconds before closing.
It should be noted that team doors can be opened by the opposite team if they are opened by a covert ops disguised in an enemy uniform. This allows them to skip areas they may ordinarily have to fight through. The best example is on Fuel Dump, in which the Allies can bypass the initial Axis defences, use the team door to reach the objective and destroy it without having to get the tank past the Axis defences. This can either provide a distraction (the Axis players must rush to respawn at the fuel dump to defend it against the infiltrators) or win the game (if the Axis players do not attempt to defend the objective, it will explode and cause them to lose the game).