- Password: 863 9JQZ WQ?
Stage 4-1[edit]
Here is where the game starts getting tough. This one in particular is one of the more unique stages in the game. You start and end the stage inside a large box that moves you around. It's supposed to be an elevator from what it says in the manual but you probably wouldn't figure that if you didn't read the manual. It starts off simple enough, just let it take you for a ride.
A Flame powerup up will soon appear, followed by several Pods to ruin the moment. Grab the Flame if you want but stick to the bottom because a Rotator Pod will show up there and if you're on the top you'll have a tricky time trying to get through it. The Flame is useful on this stage because you can pass through enemies with it. You might want to keep that in mind.
Another Rotator Pod will appear at the top. Go to the ceiling and destroy it. More Pods will follow, as well as an Armor powerup nestled amount several Pods and a Weapon powerup. Soon after this, the elevator will start to move upwards. A set of three wall traps are ahead. Since you're moving with the elevator you'll have to time it. It's not hard though.
Wait until you're almost level with the first set of wall traps and then do a Gravity Jump. You should avoid getting hit this way. Now, stand on the right side of the elevator and wait until the three White Turrets appear above you and blast them all. The elevator will turn right at this point. Two sets of two Pods will form a wall ahead.
Walk under the first set and then Gravity Jump over the second set. Further ahead will be the same set of Pods, except that a Rotator Pod will be at the top and another one at the bottom. Gravity Jump to the ceiling and destroy the first one, and then fall back to the ground and destroy the second one. This next part is the hardest in my opinion.
A Blue Turret will appear in the bottom right corner. You can destroy them but you can't get rid of them permanently. You can also destroy the shots they fire. Blast the first one. The elevator will move upwards again and another Blue Turret will appear in the top left corner. Blast that one and destroy the bottom right one again. A third and fourth Blue Turret will appear soon after.
Get the third one and while it's gone, get the fourth one. The third one will reappear again. Gravity Jump to the ceiling and take care of it. The fourth one will reappear again by this time. Be at the bottom to take it out before it can fire at you. One last Blue Turret will appear at the top. Gravity Jump to the ceiling and destroy it. Now, let the elevator take you to the boss.
Stage 4 Mini Boss[edit]

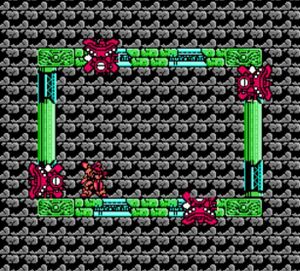
This isn't really the boss of the stage; it's more of a mini-boss to tide you over. The boss consists of four red machines circling around the edge of the elevator. They don't attack but they will gradually speed up and then slow down again and speed up... you get the point. Just stay where you are and jump over them as they pass by while firing forward. While they are slowing down again take this time to blast as many of them as you can. They might fire at you but you should be able to avoid it. Once the remaining ones pick up speed again, destroy the stragglers to finish off the boss.
Notice that they move *much* faster in Expert mode.
Stage 4-2[edit]
The stony Romanesque style elevator will be replaced with a more mechanical type. The remainder of the stage is also harder. You'll get a Shield and an Armor powerup right off the bat. Several small Crab machines will start appearing around the edge of the elevator and flying at you. The Shield, if you want to keep it, will protect you from them when they hit it.
Three more powerups will appear soon after - a Weapon and a Flame powerup, also a rare as heck Crush. It will destroy all enemies on the screen. Kind of useless but interesting. The elevator will do a shimmy downwards around the time those powerups appear so you don't have much time to grab them. Soon the elevator will take you to a Sentry... yeah, that big, round machine.
Stand under it, fire at it, and watch it blow up. They are simple to defeat just don't stand to the side of it since that's where it's bullets tend to go. Not long after you destroy the Sentry, the elevator will go upwards and you'll run into another one on the left side. And after that, yet another one will appear on the right. The elevator will stop there and start going right again.
Destroy the Sentry from the top if you want to get rid of it. Soon after that, a Wall Sentry will appear on the right. It's weak point is the green part in the center but you have to destroy it quickly or you'll run into it. It also fires missiles toward the bottom so you should continually jump when you run into another one, which is right away actually.
Stand in the middle of the elevator once the first Wall Sentry is gone. Not long after that, two more will appear on either side of you. Destroy the left one first since the elevator will start to move left. After the left one is gone, destroy the right one. The elevator will start left again right in a little while. But alas, soon it will start going downward again, through the toughest part of this stage.
Several Pods will appear right down the middle of the elevator, effectively splitting it into two. Right after that, a Sentry Ship will appear on the top right. Try to destroy it since it's bullets might hit you while you're on the way down. You can also just Gravity Jump to the ceiling and wait for it on the right and then fall back down later.
Either way, once the Pods clear out, move toward the right side of the elevator to make way for a second Sentry Ship that will appear from the left corner. This one is simpler to destroy. After it's gone, the elevator will start zigzagging left and right, while more Sentry Ships will start showing up and single Pods in the center of the elevator.
Destroy the Sentry Ships when they appear and don't let them fire at you. One will appear on the top and another on the bottom so you can just wait for them and jump over the Pods as they show up. After a couple of zigzags, the elevator will straighten out and a long line of Pods will appear down the center. The elevator will turn one last time and then you'll be at the boss.
Stage 4 Boss[edit]

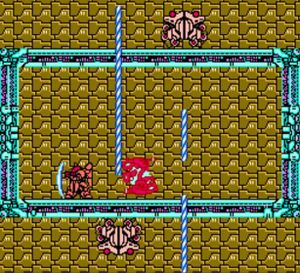
This boss is sort of similar to the stage 4-1 boss but quite a bit harder. It's made up of three parts, but you only have to destroy the red core bouncing around inside the elevator to defeat the boss. The other two parts are guns that move along the top and bottom of the elevator, often following you around, and occasionally firing a long laser beam at you.
The first thing you should do is make sure that you take out at least one of the guns, preferably both of them, before you concentrate on the red core. The top gun should be the first to go since it's easier to fire upwards, and then the bottom one if you want. You still have to watch out for the red core bouncing around and make sure you don't touch it though.
Once the guns are gone start, all you have to do is destroy the red core to finish the stage. Another strategy you can use to defeat the boss right off the bat is to Gravity Jump right into the red core, but only if you have the armor powerup from the beginning of the second part of the stage. It don't know why it works but it does. And thank God for that.
Expert mode: While the boss does not seem to change a lot, you may be carrying Gravity Fireball and cannot take out the guns. As such, just focus on using Gravity Jumps all the time, either by ramming through the core, or dodge the lasers.