
Collecting the keys[edit | edit source]
Keys are quite literally the key to increasing Kuros' ability. The best items are locked away in treasure chests, so it's a good idea to collect these keys as early as you can.
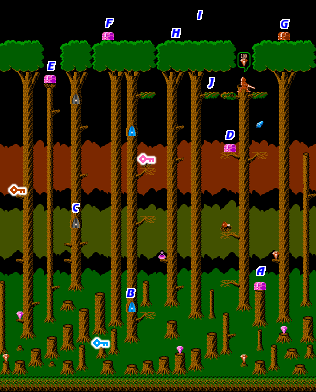
- Blue Key: The blue key is the easiest key to collect. You can find it on top of one of the stumps along the bottom of the forest.
- Pink Key: Once you collect the blue key, you can enter the blue door which takes you to the interior of one of the center trees (map shown to the right). Jump up from branch to branch until you reach the top, and when you exit through the upper blue door, it will deposit you right above the pink key, which is resting in a nest to the right of the door.
- Red Key: The red key is the hardest key to collect, but it's not too difficult. Travel up the interior of the tree with the gray doors (map shown to the left). Gray doors don't require a key, but they open and close intermittently. When you reach the top, take a huge leap to the left, and fall down the left side of the left-most tree. You should land on the branch which holds the red key.
Useful treasure[edit | edit source]
There are three treasures which will improves Kuros' chances for survival considerably. They all happen to be near the top of the forest.
- Dagger of Throwing: After collecting the pink key just outside the upper blue door, jump over to the branches on the tree to the right, and then hop over to the pink treasure chest marked D on the map. With your newly acquired pink key, you will be able to open the treasure chest waiting for you, and you will obtain the Dagger of Throwing. With this dagger, you can obtain more items from the blue acorns scattered around the tree interiors. (If you miss it here, there is an opportunity to collect it from a pink treasure chest in the first half of the final tree.)
- Boots of Force: Climb to the top of the tree with the gray doors. Once outside the top door, wait for the door to close, and then hop over to the branch on the left. Jump up to the pink treasure chest marked E on the map. Inside, you will find the Boots of Force. In addition to being a powerful alternate weapon (press
to kick for three units of damage) you can use it to kick open chests even if you don't have the correct color key. Realize, however, that this item can be replaced if you collect another changeable piece of equipment.
- Shield of Protection: Another useful item, this shield will repel projectiles. But you'll need to collect it from the red treasure chest in the upper right corner of the forest, marked G on the map. There are two ways to get up there. One way is to keep killing enemies until one of them provides you with a pink potion. The effect of the pink potion will be to increase your jump height and allow you to leap from the top of the smaller trees to the canopy above. The other way is to jump off an enemy that has damaged you. If the enemy doesn't hurt you, you will fall right through it, but if you hurts you, you will boost off of it and reach the top at the cost of some health. If you collected the Boots of Force first, you won't be required to obtain the red key before you can access the contents of the chest.
Treasures for score[edit | edit source]
There are two treasures that are hidden in the stage. If you can find them, they will each award you 10,000 points. The first one can be found on the tree tops. If you jump up above where the two center trees meet in the middle of the stage, you will make one treasure appear at the position marked H on the map. The second one is found to the left of the guardian knight who demands 100 diamonds before he will let you enter the final tree. To make that treasure appear, you must jump over to the branch that sits above the upper blue door, and then jump back to the position marked J on the map to collect the treasure.


The final tree[edit | edit source]
In order to access the interior of the tree that the knight is guarding, you must first gather the required 100 diamonds. In addition to the damonds that are scattered around the exterior of the forest as well as the interior of the trees, there are several treasure chests that can help you accumulate more diamonds rapidly. These include the pink chest on the highest stump (A), the pink chest at the bottom of the blue door tree interior (B), the blue chest at the bottom of the gray door tree interior (C), and the pink chest on top of the tree canopy (F). In addition to that, you can find more diamonds inside of a hidden secret chamber. To find the chamber entrance jump up into the air above the tree canopy at the location marked I on the map. If you find the right spot, a door will appear, and you will enter the secret chamber. In this particular chamber, diamonds are worth two whether you touch them physically, or collect them with your dagger.
Once you have over 100 diamonds, the knight will quietly step aside from the tree top that he defends, and you can enter the final leg of the first stage by squatting down over the hole. This will plunge you into the interior of the final tree, which is broken up into two parts, the trunk and the roots. The map of the first part is shown to the left, while the map of the second part is shown to the right. You will be making your way down from the top to the bottom. Throughout this section, your major enemy will be the bees that appear from the various bee hives scattered around on various platforms. Do your best to clear them away before they get too close and sting you. Though extremely time consuming, it is possible to remove a hive by destroying enough bees that come from it.
The first part looks rather similar to the tree interiors you have explored before. There are many knots that form platforms which you can jump on. You may be lured into collecting all of the diamonds you see, but don't put yourself in great danger, since diamonds are merely bonus points now. There is only on chest in the first part of the final tree. It is a pink chest (K) that contains the Dagger of Throwing if you did not collect it prior to entering the tree, or more diamonds if you already obtained the dagger.
Upon entering the second part, the background will change. You will likely land on top of the platforms near to beginning of this part, and this is the last solid ground you will encounter for a while. The majority of this part of the tree is composed of roots that are too slippery for Kuros to stand on. Instead, he will slip and slide down either side of the roots, which all break away to the left and to the right. You have a limited amount of control over Kuros as he slides. You will want to steer him either towards the diamonds or pieces of meat that you see, or throw a dagger in their direction in hopes of collecting them that way. If you are trying to reach sure footing, make your way to the side of the tree to find platforms.
There are three treasure chests that you encounter along the way down. The first chest (L), a red one, is your second chance to obtain the Shield of Protection if you missed collecting it from the tree canopy. The second chest (M), also red, is another chance to collect the Boots of Force. If you already have them, this chest will appear locked even if you possess the red key. The final chest (N) is pink, and sure actually be avoided. If you touch this chest, you will obtain the Wand of Wonder at the expense of your Boots of Force. Against the upcoming boss, the Boots of Force are far more useful. When you reach the bottom of the roots, hop up to the platform with the gray door to access the boss of the Forest.
Boss: Skull[edit | edit source]

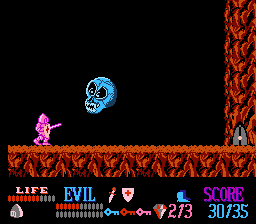
The boss of the first stage is a giant skull. This skull bounces along the floor while spitting projectiles at you. It starts the fight off with only six bars of health. As a result, it only takes two kicks from the Boots of Force to defeat this boss. Using the boots requires that you get considerably close to the boss in order to strike him. If you do not have the boots, or prefer to use another method, toss daggers at him while jumping over him when he is low to the ground. If you do not have daggers, you'll have to rely on striking him with your sword. Try to predict where he will touch down on the ground, and stand to one side while you prepare to strike him. Then jump over him or dash beneath him and run to the other side, putting some distance between you so that you can turn around and prepare for your next attack. Once you defeat him, a treasure pile will appear on the floor. Collect it and you will run off to the door, and free the maiden Lucinda for 5000 bonus points.
