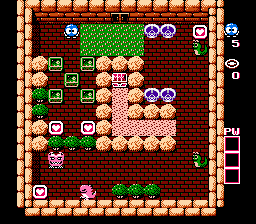
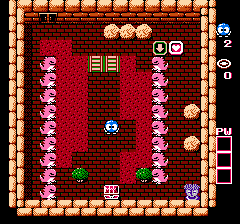
[[File:AdventuresOfLolo10-1.png|thumb|right|Map of floor 10-1.]]
[[File:AdventuresOfLolo10-1.png|right]]
#Collect the upper-right heart, and use one of its shots to align the upper Snakey with the skull.
{| {{prettytable|notwide=1}}
#Move the middle framer down, and get one framer on the same row as the Don Medusa.
! Strategy
#Shoot the lower Snakey, and push it all the way down, then push the framer to pin the Don Medusa.
| ★★
#Move a second framer under the Don Medusa.
! Agility
#Move a third framer to the left of the Gol.
| ★
# Collect the two hearts at the framer, and move the fourth one in line with the skulls.
|}
#Get the last framer, and exit.
;Solution:
# Start by pushing the center of the five Emerald Frames down between the two Heart Frames below, and collect the Heart Frames.
# Walk up and over to collect the Heart Frame in the upper right corner above the Snakey for two egg shots. Shoot the Snakey and push it down three spaces so that its even with the lower pair of Skulls.
# Come back to the Emerald Frames, and move the upper right frame up one space, over to the right until it's one space away from the right wall, and down to the lower Snakey. Shoot the lower Snakey once and push it down into the lower right corner, then slide the Emerald Frame all the way to the left, pinning the Don Medusa against the left wall.
# Return to the Emerald Frames. Choose another, and slide this one between the Don Medusa and the Heart Frame in the lower left corner. Get another Emerald Frame and slide it to the left of the Gol. Finally, move the last available Emerald Frame down past the Skulls, but then turn around and slide it between the Skulls and the higher Snakey.
# Now you are ready to collect the last Heart Frame, and then the key. The Skulls should be trapped in the upper right corner, unable to hurt you.
{{-}}
{{-}}
== Floor 10-2 ==
== Floor 10-2 ==
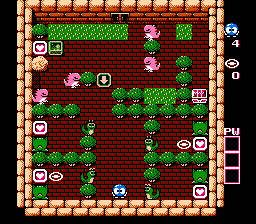
[[File:AdventuresOfLolo10-2.png|thumb|right|Map of floor 10-2.]]
[[File:AdventuresOfLolo10-2.png|right]]
{| {{prettytable|notwide=1}}
This level requires some guess work, but once you know which hearts give two shots, you can complete it.
! Strategy
| ★★
First, get the hearts in the top left corner. You then need to open the two cells with shots (marked on the map), move the upper-left and lower-right Gols to the top, then get the other two hearts.
! Agility
To open one of the cells, shoot the snake, and do a properly timed push. When you open the first cell, make sure you get the bottom-left Don blocked completely.
| ★★★
|}
;Solution:
# Head up to the top Heart Frame in the upper left corner, push the Emerald Frame that blocks it up, and collect the Heart Frame for two egg shots.
# In order to collect each of the four remaining Heart Frames, stand next to a Snakey, and shoot it once when the Leeper behind the Snakey is moving away from the Snakey. Push the egg in, and then run in the opposite direction to the trees on the other side. Let the Leeper follow you out and fall asleep along the middle of the room. You can collect the Hearts in any order, but the Heart Frame in the upper left section must be among the first two that you get in order to gain enough egg shots for the stage.
# Once you have all of the Heart Frames, the Gols will awaken. Now you must carefully navigate the maze in the upper half. Approach the lowest Gol's row, and step into it to trigger the Gol to spit a fireball. Then back down and wait for the fireball to pass overhead. When it passes, run up and to the left, and move up to the row with no Gol in it before proceeding.
# Stand above the second lowest Gol, and move down to trigger the second highest Gol to spit a fireball. Step back up and move to the right as the fireball moves to the left. The quickly run down past the Gol before his fireball reaches the left wall and he can spit again. Then walk around the trees to collect the key.
{{-}}
{{-}}
== Floor 10-3 ==
== Floor 10-3 ==
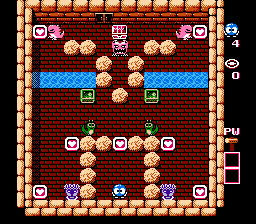
[[File:AdventuresOfLolo10-3.png|thumb|right|Map of floor 10-3.]]
[[File:AdventuresOfLolo10-3.png|right]]
{| {{prettytable|notwide=1}}
#Get the first heart.
! Strategy
#Shoot a Snakey, push it all the way to the left, and into the water. Run across the water to get the heart, and return once the egg aligns with the emerald framer. Push said framer above the medusa, and get the heart.
| ★★★
#Repeat for the other side.
! Agility
#After the first Snakey respawns, shoot it and push it between the heart and the medusa. Collect the heart.
| ★★
#Repeat for the other side, but when done, shoot it off the map before the egg breaks.
|}
#Break the middle rock below the Don Medusa, and quickly take cover behind the snake.
;Solution:
#Shoot the snakey, and trap the Don Medusa in the lower room.
# Collect the middle Heart Frame for two egg shots.
# Shoot the left Snakey once, push the egg to the left wall, and then up to the water. Push it into the water, and hop over the egg to collect the Heart Frame above. Then stand above the Emerald Frame across the water, and wait for the egg to float by so that you can push the Emerald Frame down.
# Move the Emerald Frame down and to the left, and then position it above the left Medusa. Collect the Heart Frame above it.
# Shoot the right Snakey once, push the egg to the right wall, and then up to the water. Push it into the water, and hop over the egg to collect the Heart Frame above. Then stand above the Emerald Frame across the water, and wait for the egg to float by so that you can push the Emerald Frame down.
# Move the Emerald Frame down and to the right, and then position it above the right Medusa. Collect the Heart Frame above it.
# Shoot the left Snakey once, and slide the egg down to the bottom wall between the left Medusa and the Heart Frame in the lower left corner. Collect the Heart Frame, and then stand above the egg and shoot it once more before it hatches to remove the egg from the screen.
# Shoot the right Snakey once, and slide the egg down to the bottom wall between the right Medusa and the Heart Frame in the lower right corner. Collect the Heart Frame to activate the Hammer power, but do not shoot the egg a second time.
# Stand either to the left of the center boulder keeping the Don Medusa in the upper portion of the screen. When the Don Medusa is moving up, hit the boulder with the hammer, and then run behind the left Snakey.
# Shoot the Snakey you are standing behind, and push the egg so that it blocks the Don Medusa into the lower portion of the screen, and leaves you free to safely collect they key above.
{{-}}
{{-}}
== Floor 10-4 ==
== Floor 10-4 ==
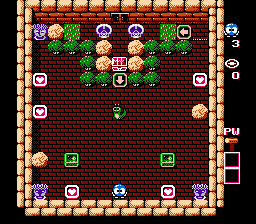
[[File:AdventuresOfLolo10-4.png|thumb|right|Map of floor 10-4.]]
[[File:AdventuresOfLolo10-4.png|right]]
#Shoot and move the Snakey to the top-left corner. Get the two hearts, and shoot the egg off the map.
{| {{prettytable|notwide=1}}
#When it reappears, shoot and move the Snakey to the top-right corner and get the heart. Shoot the egg off the map, and run downward past the rock.
! Strategy
# Move a framer up and left of the rock.
| ★★★
#Shoot and move the Snakey, and move it to the right of the lower-left medusa. Get the heart.
! Agility
#Smash the rock, and take cover behind the framer. When the Don Medusa passes by, push the framer right, and down.
| ★★
# Move the other framer to a half-tile covering both medusas. Get the heart.
|}
# When approaching the chest, shoot the Skull, and push it. Get the pearl and exit the level.
;Solution:
# Start by collecting the lower of the two Heart Frames along the left wall.
# Push each Emerald Frame between the two lower corner Medusas and the Heart Frames nearest to them, then collect the Heart Frames.
# Stand to the right of the Snakey, shoot it once, and push the egg to the left and up, and slide it between the upper left Medusa and the Heart Frame below. Quickly collect the Heart Frame (which will activate the Hammer power) and then stand to the right of the egg and shoot it before it hatches.
# Wait for the Snakey to return to the middle, stand to it's left, shoot it once, and slide it below the Don Medusa so that you can collect the Heart Frame along the right wall. Then stand to the left of the egg and shoot it before it hatches. Immediately run to the boulder below to avoid getting killed by the Don Medusa.
# Wait for the Snakey to return to the middle. Stand to the left of the boulder along the right wall, and when the Don Medusa heads up, use the Hammer on the boulder. Then run to stand to the left of the Snakey before the Don Medusa comes back down.
# Shoot the Snakey again, and this time, slide the egg to the right wall so that the Don Medusa gets stuck below it.
# Walk up to the upper right corner, cross over the left arrow tile, and shoot the Skull coming toward you. Continue walking left, pushing the egg (and the other Skull) over to the left until you can collect the key.
{{-}}
{{-}}
== Floor 10-5 ==
== Floor 10-5 ==
[[File:AdventuresOfLolo10-5.png|thumb|right|Map of floor 10-5.]]
[[File:AdventuresOfLolo10-5.png|right]]
{| {{prettytable|notwide=1}}
This is the final puzzle level. If you want the password for the level, you need to suicide to end the game, as the game will start the ending which requires a system Reset to continue playing.
! Strategy
| ★★
#Get the heart.
! Agility
#Shoot the top-left Don from above.
| ★★
#Shoot the top-right Don from above, push it right one time, and all the way down.
|}
#Run down the center of the bridge, on the half-tile. At the bottom, make a turn to the right.
;Solution:
# Collect the only Heart Frame for two egg shots.
# Stand above the upper left Gol and shoot it once to turn it into an egg.
# Stand above the upper right Gol, shoot it once, and push the egg one space to the right and then all the way down.
# Return to the bridges. Stand halfway between both of them before running down to the bottom of the room. When you reach the bottom wall, move to the right to collect the key.
{{-}}
{{-}}
{{Footer Nav|game=Adventures of Lolo|prevpage=Floor 9|nextpage=}}
{{Footer Nav|game=Adventures of Lolo|prevpage=Floor 9|nextpage=}}
Start by pushing the center of the five Emerald Frames down between the two Heart Frames below, and collect the Heart Frames.
Walk up and over to collect the Heart Frame in the upper right corner above the Snakey for two egg shots. Shoot the Snakey and push it down three spaces so that its even with the lower pair of Skulls.
Come back to the Emerald Frames, and move the upper right frame up one space, over to the right until it's one space away from the right wall, and down to the lower Snakey. Shoot the lower Snakey once and push it down into the lower right corner, then slide the Emerald Frame all the way to the left, pinning the Don Medusa against the left wall.
Return to the Emerald Frames. Choose another, and slide this one between the Don Medusa and the Heart Frame in the lower left corner. Get another Emerald Frame and slide it to the left of the Gol. Finally, move the last available Emerald Frame down past the Skulls, but then turn around and slide it between the Skulls and the higher Snakey.
Now you are ready to collect the last Heart Frame, and then the key. The Skulls should be trapped in the upper right corner, unable to hurt you.
Floor 10-2
Strategy
★★
Agility
★★★
Solution
Head up to the top Heart Frame in the upper left corner, push the Emerald Frame that blocks it up, and collect the Heart Frame for two egg shots.
In order to collect each of the four remaining Heart Frames, stand next to a Snakey, and shoot it once when the Leeper behind the Snakey is moving away from the Snakey. Push the egg in, and then run in the opposite direction to the trees on the other side. Let the Leeper follow you out and fall asleep along the middle of the room. You can collect the Hearts in any order, but the Heart Frame in the upper left section must be among the first two that you get in order to gain enough egg shots for the stage.
Once you have all of the Heart Frames, the Gols will awaken. Now you must carefully navigate the maze in the upper half. Approach the lowest Gol's row, and step into it to trigger the Gol to spit a fireball. Then back down and wait for the fireball to pass overhead. When it passes, run up and to the left, and move up to the row with no Gol in it before proceeding.
Stand above the second lowest Gol, and move down to trigger the second highest Gol to spit a fireball. Step back up and move to the right as the fireball moves to the left. The quickly run down past the Gol before his fireball reaches the left wall and he can spit again. Then walk around the trees to collect the key.
Floor 10-3
Strategy
★★★
Agility
★★
Solution
Collect the middle Heart Frame for two egg shots.
Shoot the left Snakey once, push the egg to the left wall, and then up to the water. Push it into the water, and hop over the egg to collect the Heart Frame above. Then stand above the Emerald Frame across the water, and wait for the egg to float by so that you can push the Emerald Frame down.
Move the Emerald Frame down and to the left, and then position it above the left Medusa. Collect the Heart Frame above it.
Shoot the right Snakey once, push the egg to the right wall, and then up to the water. Push it into the water, and hop over the egg to collect the Heart Frame above. Then stand above the Emerald Frame across the water, and wait for the egg to float by so that you can push the Emerald Frame down.
Move the Emerald Frame down and to the right, and then position it above the right Medusa. Collect the Heart Frame above it.
Shoot the left Snakey once, and slide the egg down to the bottom wall between the left Medusa and the Heart Frame in the lower left corner. Collect the Heart Frame, and then stand above the egg and shoot it once more before it hatches to remove the egg from the screen.
Shoot the right Snakey once, and slide the egg down to the bottom wall between the right Medusa and the Heart Frame in the lower right corner. Collect the Heart Frame to activate the Hammer power, but do not shoot the egg a second time.
Stand either to the left of the center boulder keeping the Don Medusa in the upper portion of the screen. When the Don Medusa is moving up, hit the boulder with the hammer, and then run behind the left Snakey.
Shoot the Snakey you are standing behind, and push the egg so that it blocks the Don Medusa into the lower portion of the screen, and leaves you free to safely collect they key above.
Floor 10-4
Strategy
★★★
Agility
★★
Solution
Start by collecting the lower of the two Heart Frames along the left wall.
Push each Emerald Frame between the two lower corner Medusas and the Heart Frames nearest to them, then collect the Heart Frames.
Stand to the right of the Snakey, shoot it once, and push the egg to the left and up, and slide it between the upper left Medusa and the Heart Frame below. Quickly collect the Heart Frame (which will activate the Hammer power) and then stand to the right of the egg and shoot it before it hatches.
Wait for the Snakey to return to the middle, stand to it's left, shoot it once, and slide it below the Don Medusa so that you can collect the Heart Frame along the right wall. Then stand to the left of the egg and shoot it before it hatches. Immediately run to the boulder below to avoid getting killed by the Don Medusa.
Wait for the Snakey to return to the middle. Stand to the left of the boulder along the right wall, and when the Don Medusa heads up, use the Hammer on the boulder. Then run to stand to the left of the Snakey before the Don Medusa comes back down.
Shoot the Snakey again, and this time, slide the egg to the right wall so that the Don Medusa gets stuck below it.
Walk up to the upper right corner, cross over the left arrow tile, and shoot the Skull coming toward you. Continue walking left, pushing the egg (and the other Skull) over to the left until you can collect the key.
Floor 10-5
Strategy
★★
Agility
★★
Solution
Collect the only Heart Frame for two egg shots.
Stand above the upper left Gol and shoot it once to turn it into an egg.
Stand above the upper right Gol, shoot it once, and push the egg one space to the right and then all the way down.
Return to the bridges. Stand halfway between both of them before running down to the bottom of the room. When you reach the bottom wall, move to the right to collect the key.