This chapter discusses the solutions to level 12. One thing to take a note of: Every room in level 12 has at least one Don Medusa in it.
12-1[edit]
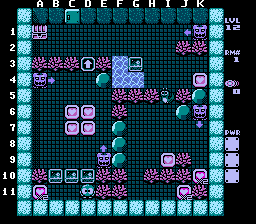
The toughest part of this level is the beginning, where you have 3 Dons to keep track of. After they are trapped, it's smooth sailing.
- Get the A11 heart, keeping an eye on the Row 4 Don, and get back behind the EFs.
- Push the D10 EF up one space, the C10 EF up two, then the B10 EF up 5 spaces. Get the C7 heart and go back to D10.
- When the Column E Don hits the coral and starts going back up, Push the D9 and C8 EFs up one space, and wait at C8. When he gets back to E9, trap him with the EF to your right.
- Use the B5 EF to trap the Row 4 Don against the left wall, then wait.
- When the top Don starts moving right again, Get the other hearts in the enclosure and use the C7 EF to trap him in the top-right corner.
- Use the Snakey to trap the right Don at K6. Collect the hearts in the area.
- The Snakey has hatched. Stand at I7 and shoot Snakey twice, immediately moving up after the second shot to avoid the Don. Wait there at I6.
- When the Snakey respawns, move it to K3, Get the final heart, then shoot the egg from the left before it hatches. Wait at I6 again.
- When the Snakey respawns the second time, move it into the water at G4 (push it up two, down one, then left two) and get the EF up one space.
- Push the EF all the way to the left wall A2, get the treasure, and finish the level.
12-2[edit]
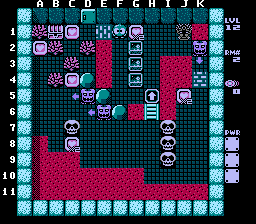
This level requires some careful timing.
- Push the G2 EF right 3 spaces. Push the G4 EF right then wait under it.
- When the right Don passes K5 going down, push the H4 EF all the way up and get the G1 heart.
- Get below the bridge, watching out for the Don at right. When you get there, use one of the skulls to trap him at the top or bottom of his path and get the J5 heart. Wait at F8.
- When the two Dons get in the same position they were in at the start of the level (see screenshot), Get the C8 heart and wait under the Skull.
- Push the Skull up 1.5 spaces so that both Dons are to its left. This is fastest when they are aligned. Quickly push the egg left, trapping the dons against the left wall, and get the C4 heart.
- Go to B8, blow the skull above you away and immediately run to safety.
- Move a Skull to D/E7 (Row 7, halfway between Columns D and E). Wait under it.
- When the C7 Skull respawns, push it up 1.5 spaces so that both Dons are to its right. Get the A2 heart.
- Get the C1 heart and the treasure without stopping between them.
12-3[edit]
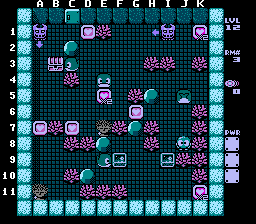
The first appearance of Mobies in Level 12. There are not many spots where you can come into a Don's line of sight, but you still need to pay attention.
- Push the I9 EF to the bottom and get the bottom-right heart. If you do this with no hesitation at the very beginning of the level, you'll avoid the top Don's sight.
- When the top Don hits the EF, go left as far as you can, then move up to H9. When he passes your position going left, quickly go right, up, then right to hide under the J5 Moby.
- Push the Moby to the top and grab the top-right heart, then quickly go to J8, shoot the egg when the Don Bounces off of it, then immediately get to G8 and wait.
- When the top Don hits the coral, push the F9 EF down and move the E9 Moby to A10. Wait at E10.
- When the top Don hits the coral again, Move the F10 EF to I5. Use the respawned J5 Moby to trap the top Don in the right corner. Wait at H6.
- When the left Don hits the heart, move left 2, up 2, then right 3. Move the I5 EF to E6. Wait at F5.
- When the Don passes A5 moving up, go left 2 then up 3. Get the D1 heart when the Don is out of the way and wait at E3.
- When the Don reaches A4 going either direction, quickly push the E4 Moby down then left, and use it to trap the Don in the top corner. The C3 Moby will pull you onto the chest.
- Move the C3 Moby to D7. Loop around to get the A7 heart, then the treasure.
12-4[edit]
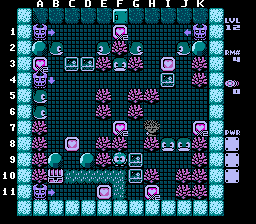
The mobies in this level can be quite a nuisance, even more than the Dons.
- Push the G9 EF right one space then the G10 EF all the way up. Get the H11 heart.
- Push the I8 Moby up one then move the J8 Moby to H6, getting the K7 heart in the process. Wait at J4 (go to K5 on the way there to account for the left Moby).
- When the top-right Don passes H1 going right, go push the EF at I4 left as far as you can then push C3 up one and wait at B3.
- Use the B2 Moby to trap the top-left Don in the corner, then wait at G4.
- Use the J2 Moby to trap the top-right Don in the corner, and get the hearts at I3 and F1 before it hatches. Push the C2 and D3 EFs down one space.
- Egg the E2 Moby and push the C3 EF down 3 spaces. Get the F7 heart and Push the D4 EF left.
- Egg the A5 Moby. Move right then left so that you are facing left at C5. Shoot the Egg and immediately move up one space. Push the B4 EF left and get the A3 heart.
- Egg the E2 Moby again and move the C3 EF to B5. Push the C6 EF down one space.
- Get the C8 heart when the bottom Don is out of the way, then egg the A6 Moby and use the C7 EF to trap him in the corner. Get the final heart and the treasure.
12-5[edit]
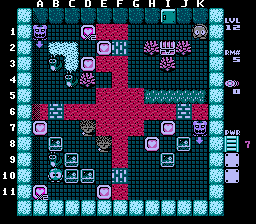
Another level where timing is key. Speed is required at the beginning.
- Get the heart in the bottom-left corner.
- Get under the D10 EF, wait for the Don at the right to move up above the bottom row, then push the EF up one space then quickly return to the bottom row.
- Move the C10 EF right two spaces. Then move the 9C EF up 1.5 spaces. Move the D9 EF right half a space. Push the B9 Snakey left against the wall. Push the B8 EF up 3 spaces and wait on the bridge.
- When the don starts moving back up, quickly go up and push the C4 Snakey up one space, then use the EF to trap the Don in the top-left corner. Push the egg all the way up before it hatches and get the D1 heart.
- Move the B3 Snakey to D5 and get the D3 heart. Then get the A7 heart.
- Move the E10 EF right one. When the Don at the right is out of the way, get the E11 heart then get behind the EF again. Use the EF to trap the Don in the bottom-right corner.
- Move the I9 EF to G8 and get the H8 heart. Then move the J8 EF to H7 and get the I7 heart. Wait on the grass above.
- When the alma is going up, make a bridge at F4 then turn right. When the alma reaches J4, shoot it. Quickly move the egg to E4 then get off the bridge before it burns away, which should happen before the egg hatches.
- Get the E2 heart, then the treasure.
Level 12 boss[edit]
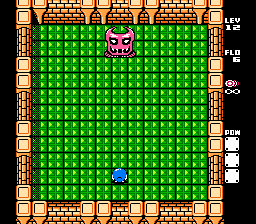
The level ends with a fight against a giant Don Medusa. It will move around the room's walls counter-clockwise. Once it reaches the place where it started it will then move in a diamond pattern. It repeats these two patterns then. Upon reaching a point adjacent to the center, it will shoot out a giant knife right at the center. The knives are invincible. The best strategy is simply to trail the Don in its movement. Since it always shoots towards the center, you will not be caught by its knives. The Don Medusa will explode when defeated.