(→Using gold: equipment link fix) |
m (table format is more appropriate) |
||
| Line 6: | Line 6: | ||
Each round of combat you have a choice of actions. Following your action the monster will get to take an action of its own before you get to act again. | Each round of combat you have a choice of actions. Following your action the monster will get to take an action of its own before you get to act again. | ||
{| {{prettytable}} | |||
Choose the '''FIGHT''' action and you will physically attack the enemy. The damage done depends on your attack power as well as the enemy's defense. | ! Command || Description | ||
|- | |||
| Fight | |||
Choose the '''RUN''' action when you feel you cannot defeat the enemy, or it is not worth it to do so. If successful, you will leave the combat. Beware though as there is a chance of failure, in which case you will have wasted your turn and be in worse condition than before. Some monsters cannot be run from, and trying to do so will only cause your death. | | Choose the '''FIGHT''' action and you will physically attack the enemy. The damage done depends on your attack power as well as the enemy's defense. | ||
|- | |||
| Run | |||
Choose the '''SPELL''' action to cast a [[Dragon Warrior/Spells|spell]]. As you learn spells you'll find many of them are useful in combat; others will not even work during a fight. Strategic use of spellcasting is crucial to survival and to progressing within the game. | | Choose the '''RUN''' action when you feel you cannot defeat the enemy, or it is not worth it to do so. If successful, you will leave the combat. Beware though as there is a chance of failure, in which case you will have wasted your turn and be in worse condition than before. Some monsters cannot be run from, and trying to do so will only cause your death. | ||
|- | |||
| Spell | |||
Choose the '''ITEM''' action to use an [[Dragon Warrior/Items and Equipment#Items|item]]. Only a few items are usable in combat and they generally have similar effects as spellcasting. | | Choose the '''SPELL''' action to cast a [[Dragon Warrior/Spells|spell]]. As you learn spells you'll find many of them are useful in combat; others will not even work during a fight. Strategic use of spellcasting is crucial to survival and to progressing within the game. | ||
|- | |||
| Item | |||
| Choose the '''ITEM''' action to use an [[Dragon Warrior/Items and Equipment#Items|item]]. Only a few items are usable in combat and they generally have similar effects as spellcasting. | |||
|} | |||
<gallery> | <gallery> | ||
Image:DW1_Snap_BattleStart.png|If you want to attack, choose the FIGHT command. Then the computer determines the outcome. | Image:DW1_Snap_BattleStart.png|If you want to attack, choose the FIGHT command. Then the computer determines the outcome. | ||
Revision as of 00:51, 25 December 2009
Combat
From the moment you set foot outdoors until you have utterly destroyed the Dragonlord in his dark fortress, enemies will hound your every step. To keep alive you must learn to defend yourself. Battling with weapons in the Fighting Mode requires a sharp mind more than a sharp blade, although a good sword is always welcome. What is important is that you know your own strength and that of your opponent. Note which spells a creature uses, how many HP of life it has, etc.
Each round of combat you have a choice of actions. Following your action the monster will get to take an action of its own before you get to act again.
| Command | Description |
|---|---|
| Fight | Choose the FIGHT action and you will physically attack the enemy. The damage done depends on your attack power as well as the enemy's defense. |
| Run | Choose the RUN action when you feel you cannot defeat the enemy, or it is not worth it to do so. If successful, you will leave the combat. Beware though as there is a chance of failure, in which case you will have wasted your turn and be in worse condition than before. Some monsters cannot be run from, and trying to do so will only cause your death. |
| Spell | Choose the SPELL action to cast a spell. As you learn spells you'll find many of them are useful in combat; others will not even work during a fight. Strategic use of spellcasting is crucial to survival and to progressing within the game. |
| Item | Choose the ITEM action to use an item. Only a few items are usable in combat and they generally have similar effects as spellcasting. |
-
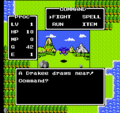
If you want to attack, choose the FIGHT command. Then the computer determines the outcome.
-
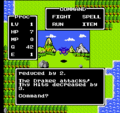
The creature withstood your initial attack. Now it will counter-attack!
-
You attack again, determined to win through.
-

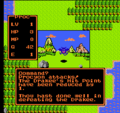
When the enemy's hit points are reduced to zero, you win the battle.


Combat spoils

Each time an enemy is defeated, you will gain both experience and gold. Experience points are added as you defeat more and stronger enemies, boosting you up in character level at predetermined totals. As for gold, use it in the shops of Alefgard to purchase weapons, tools, armor and other items and to stay at the Inn.
Gaining levels

Each level gained grants your character greater strength (power) and agility (response time) as well higher maximum HP and MP. On certain levels you will also learn a new spell.
When you talk to King Lorik, notice that the King tells you how many Experience Points are needed to reach the next level. If you keep that number in mind you should be able to calculate when you will get the next increase in your level.
Learning spells

Magic spells are learned only after many trials and failures. At particular levels you will learn particular spells, but don't expect to learn a new spell each time your level increases. There are ten spells in all.
At level 3 you will learn your first magical spell, Heal. The effect of Heal is that when chanted it raises the chanter's HP by as much as 15. During a fierce battle you may notice your HP sinking rapidly. That might be a good time to use Heal.
Next, at level 4, the spell of Hurt is learned. It is an attack spell, capable of inflicting up to 15 HP worth of damage on an enemy. Once you've learned a spell and saved the game, you can't lose it. You might run out of MP, and you need MP to cast spells, so keep an eye on your Condition Window.
Using gold
Gold may be used to rest at an inn, to buy items, or to upgrade your equipment. Equipment - weapons, armor, and shields - is available in shops present in nearly all towns. When selling you a new piece of equipment, the shopkeeper will buy back the piece it is replacing. Although you only receive a fraction of the equipment's value when selling it, it is always good to upgrade your equipment at first opportunity rather than saving up for the next piece; increased attack or defense power will make previously challenging monsters quickly seem easy and you will soon find that it is experience levels that limit your advancement rather than gold.
Hit points
When in battle, each counter-attack of the enemy is likely to inflict some damage on you. Your hit points (HP) will be diminished by a number determined by the strength of the enemy and your ability to withstand its attack. Body armor, a shield, or simply raising your character level can help you stand up to the onslaught of a ferocious monster.
When your HP fall into dangerous levels, portions of the screen will turn orange. This is a warning that death may be imminent.
Restoring HP


If you are badly wounded, make your way back to town as quickly as possible. When you reach a town, go at once to the Inn. By spending a night at the Inn you will restore all your HP and MP.
The Medicinal Herb available in tool shops is one of the best buys in Alefgard. Always carry some Herbs with you when you travel. To use them, just select ITEM in your Command Window and choose Herb from the list of items that appears.
Spells may also be used for healing. Simply choose the spell, either in combat or from the command window, and you will be healed.
Death


There may come a time when you bite off more than you can chew. If a servant of the Dragonlord defeats you in battle, you will die and lose half of your gold. The King, however, has the power to restore your life so you can continue your quest. Only your supply of gold ultimately suffers.
Exploration
With higher levels come greater strength, stamina, and wisdom, not to mention wealth and spells. You are able to explore ever more distant lands and towns. Test your limits, but be careful not to push yourself too far. If you encounter some new invincible enemy, don't go further; build up your level first. A good guideline is that each time you cross a bridge, enemies are likely to become tougher. At low level you should be able to explore many regions of Northern Alefgard, but beware of the Southlands!
Saving

Whenever your level increases or you obtain a special item, you should return to King Lorik and save the game. Then, if you are defeated you won't lose the items and experience you've fought so hard to win.